



Contents: Removal ↓ Installation ↓
Instructions: Below is a description of the work on removing and installing the right bearing panel. The left bearing panel is removed and installed in a similar manner.
The window lift, door lock and speaker are mounted on the carrier panel. The door lock can only be removed together with the carrier panel. The carrier panel can only be removed after loosening the window glass clamping screws. To do this, lower the glass to the level of the mounting holes and loosen the clamping screws. If the window does not go down despite the presence of an electric window lift, first find out the exact cause of the fault. To do this, use the tester -VAS 5051 A- or -VAS 5052- to query the fault memory of the comfort systems. If the cause is an electrical fault, first rectify this fault. If the electric motor of the window lift is faulty, you can remove it from the carrier panel and move the glass to the required position by hand.
Removal
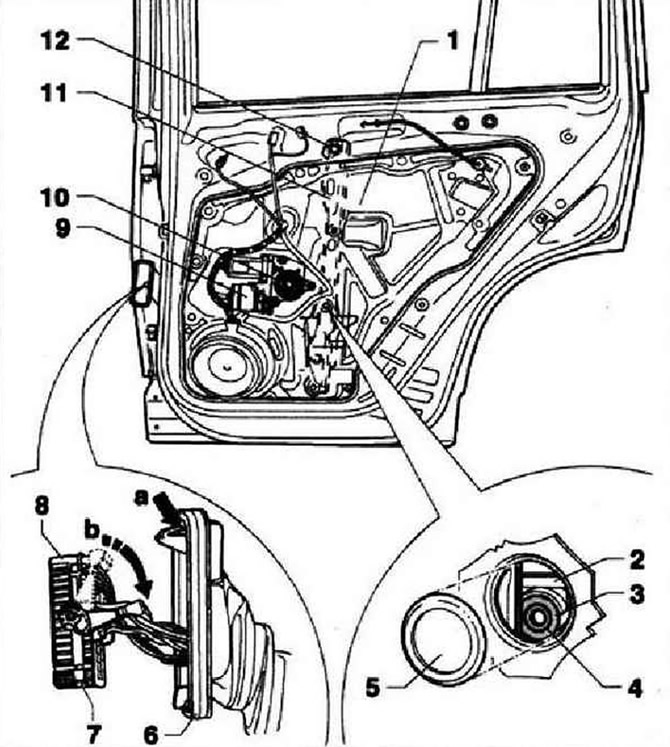
Remove the door trim. Remove the door handle. Pry up and remove the decorative cap "5". Lower the door glass so that the spacer pin "4" and insert "3" are opposite the window regulator cutout. Screw in a 5 mm diameter screw (about 70 mm long) into the expansion pin "4" and remove the screw from the expansion insert "3". Screw in a screw with a diameter of 8 mm (about 80 mm long) into the spacer insert "3" and remove the spacer insert "3" from the window regulator socket "2".
Instructions: When screwing the screw into the spacer insert, do not press it with great force, otherwise the insert may fall inside the door.
Disconnect the boot retainer "6" on the B-pillar "arrow a" and disconnect the boot. Release the connector retainer on the B-pillar "8" by pressing it down, "arrow b", and disconnect the connector. Unscrew bolt-12-.
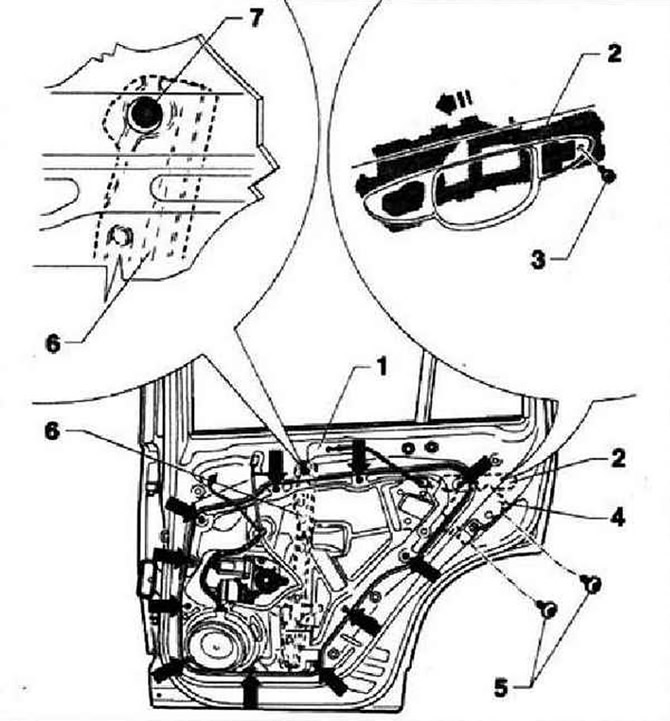
Unscrew bolts "5" securing door lock "4". Unscrew bolt "3" securing handle housing "2". Move handle housing "arrow" to detach the handle housing hook from the door. Unscrew screw "7" and screws marked with "arrows".
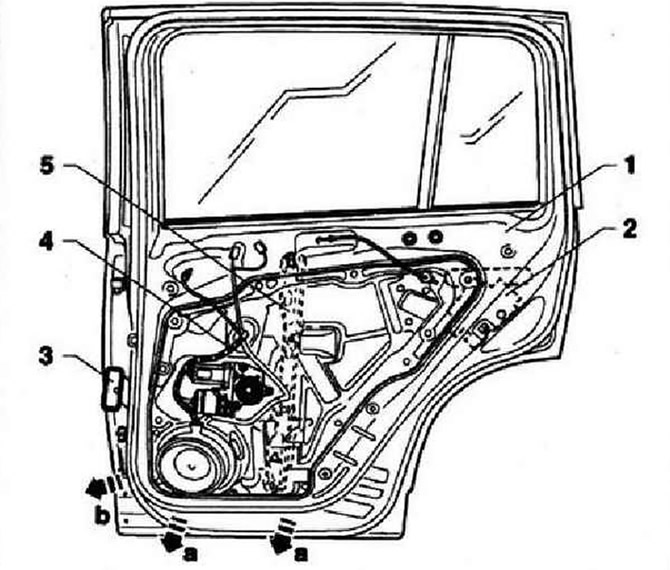
Insert connector "3" into the door. Separate the lower part of the support panel from the door "arrows a". Remove the support panel from the door by moving it downwards and sideways towards the pillar "arrow b". First, remove the upper part of the window lifter "5" from the door, and then the door lock "2".
Installation
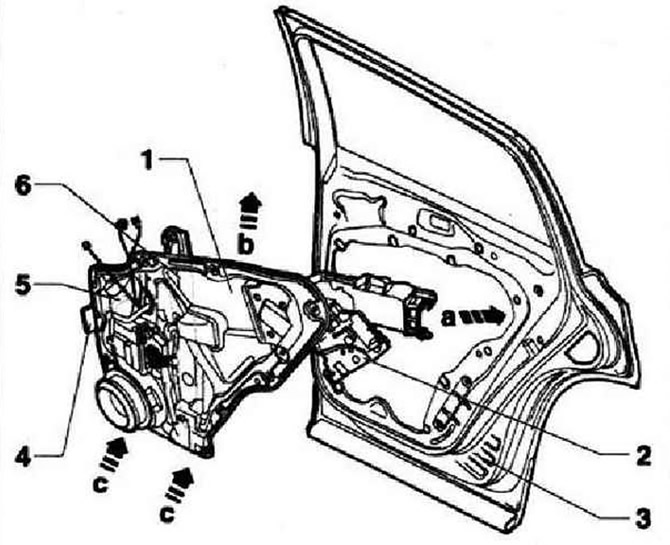
Insert the supporting panel "1" into the door from the bottom up, "arrow a" diagonally to the door. Install the lock "2" and the wiring harness "3" in the corresponding places in the door. Insert the supporting panel into its places with an upward movement "arrow b" and together with it the window lifter "6". Install the supporting panel in the lower part of the door "arrows c".
The original text is available on the website: VWManual.ru
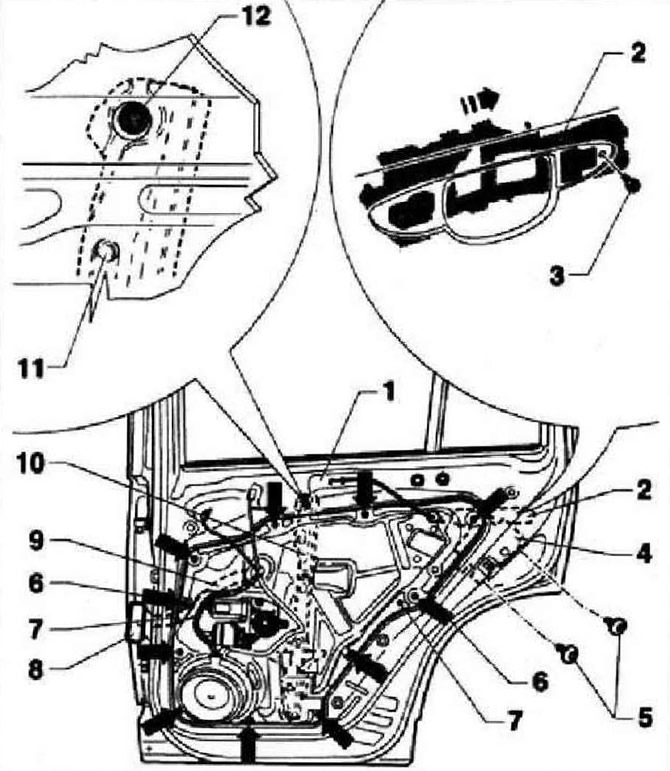
Center the position of the supporting panel "1" by placing it on the protrusions "7". Install all the screws. First, tighten the bolts "6". Then tighten the remaining bolts "arrow" in any order. The tightening torque of bolts -6 and arrow - 8 Nm. Tighten bolt "12" of the window regulator "11". Tightening torque: 8 Nm. Secure the glass. Tighten bolts "5" of the door lock. Tightening torque of bolt "5" 20 Nm. Then perform the actions performed when removing the supporting panel in the reverse order. Before installing the door trim, check the operation of the door mechanisms.
Visitor comments