
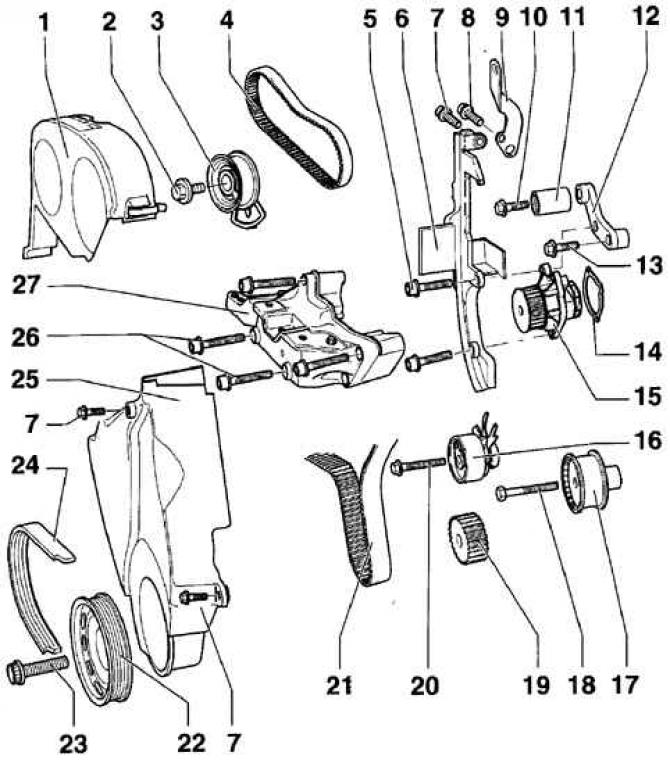
- 1 - the upper casing of the toothed belt;
- 2 - bolt, 20 Nm;
- 3 - tension roller of the connecting belt;
- 4 - toothed connecting belt.
Check the condition of the toothed belt. Before removing the toothed belt, it is necessary to put an arrow on it indicating the direction of rotation of the toothed belt;
- 5 - bolt, 20 Nm;
- 6 - rear casing of the toothed belt;
- 7 - bolt 10, Nm;
- 8 - bolt 20, Nm;
- 9 - eye;
- 10 - guide roller mounting bolt, 25 Nm;
- 11 - guide roller;
- 12 - bracket;
- 13 - bolt, 50 Nm;
- 14 - seal. If damaged, use a new seal;
- 15 - water pump;
- 16 - tension roller of the main toothed belt;
- 17 - guide roller;
- 18 - bolt, 50 Nm;
- 19 - crankshaft toothed belt pulley;
- 20 - bolt, 20 Nm;
- 21 - main toothed belt. Check the condition of the toothed belt. Before removing the toothed belt, it is necessary to put an arrow on it indicating the direction of rotation of the toothed belt. Do not bend the toothed belt;
- 22 - belt pulley. For correct installation of the belt pulley there is a lock;
- 23 - bolt, 90 Nm + tighten by 90°. When installing, a new bolt must be used. Before screwing in the bolt, lubricate the bearing surface of the bolt head with a thin layer of engine oil. Turning the bolt 90°can be done in several steps;
- 24 - V-belt. Before removing the V-belt, it is necessary to put an arrow on it indicating the direction of rotation of the V-belt;
- 25 - lower casing of the toothed belt;
- 26 - bolt, 50 Nm;
- 27 - engine holder
The location of the toothed belts on the engine 1.4-I
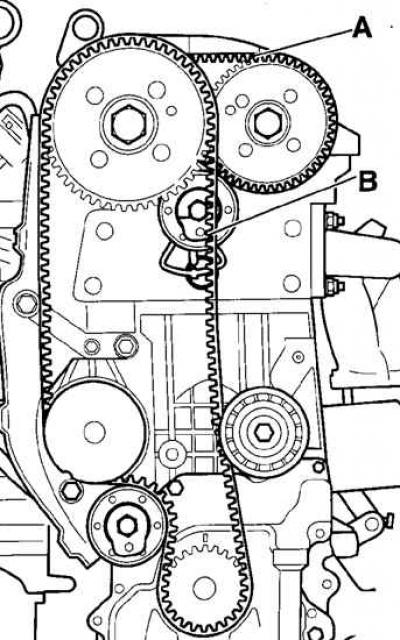
- A - a toothed belt connecting the camshaft pulleys;
- B - main toothed belt
The camshaft that controls the intake valves is driven by a toothed belt from the crankshaft pulley. The camshaft that controls the exhaust valves is driven by a toothed belt from the camshaft pulley that controls the intake valves.
Warning: General timing belt replacement procedures for all engines are described in subsection 2.1.3.2. This section only describes the differences regarding the 1.4-I engine.
PROCEDURE
1. Unscrew the four screws and remove the upper engine cover.
2. Remove the air filter.
3. Remove the top casing of a gear belt.
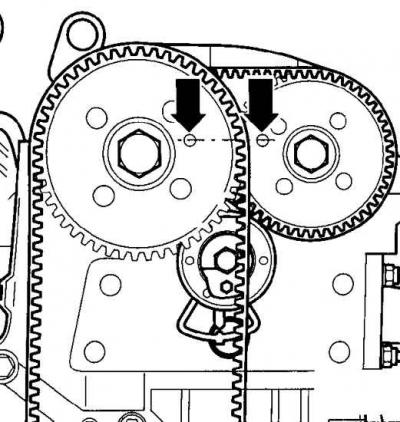
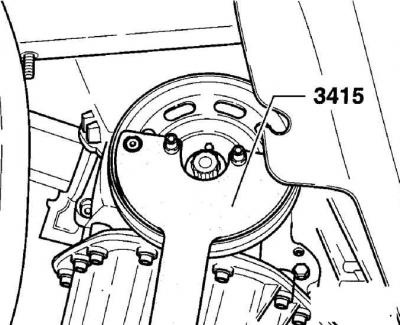
4. Set the number one piston to top dead center on the compression stroke. In this position, the mounting holes (indicated by arrows) on the camshaft pulleys must be directed towards each other and be in line (shows the location of the mounting holes on the engine 1.4-I). In this position, a mandrel or an 8 mm drill shank can be inserted into the mounting holes.
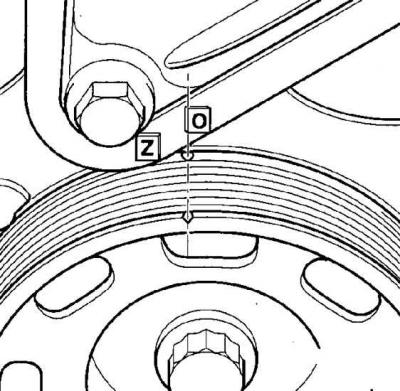
5. When installing the piston of the first cylinder at TDC, the mark on the crankshaft pulley must be aligned with the pointer.
6. Remove the right support of the power unit (see subsection 2.1.3).
7. Lower the right side of the engine just enough to expose the crankshaft pulley bolt.
8. Remove the auxiliary V-belt.
9. Holding the crankshaft from turning with a special tool, unscrew the central bolt securing the toothed and V-belt pulleys.
10. Remove the V-belt pulley from the crankshaft and then, with two thick washers, hand-tighten the crankshaft pulley bolt.
Cars with air conditioning
11. Unscrew the guide and tension roller of the V-belt.
12. Unscrew the bottom part of a casing of a gear belt.
13. If the timing belts are to be reused, use chalk or paint to mark the direction of rotation of the timing belts.
14. Loosen the main toothed belt tensioning roller nut, causing the roller to turn and loosen the belt tension. Remove the main toothed belt.
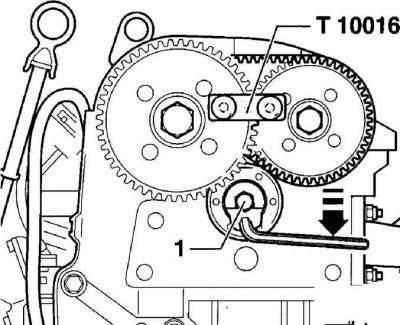
15. Loosen the bolt (1) fastening the tension roller of the auxiliary toothed belt and by turning the tension roller clockwise, loosen the belt tension. Fix the camshaft pulleys with a special tool and remove the toothed belt.
Warning: After removing the toothed belts, do not turn the camshaft pulleys, as otherwise the valves may hit the pistons.
16. Install the toothed belt in accordance with the previously made marking, which marks the direction of rotation of the toothed belt. When viewed from the front of the engine, the engine pulleys rotate clockwise.

17. Check that the cut tooth (indicated by an arrow) on the crankshaft timing belt pulley is aligned with the pointer on the front cover of the engine.
18. Install the connecting timing belt first on the exhaust camshaft timing belt pulley, then on the intake camshaft timing belt pulley. The relaxed branch of the belt should be at the bottom of the tension roller.
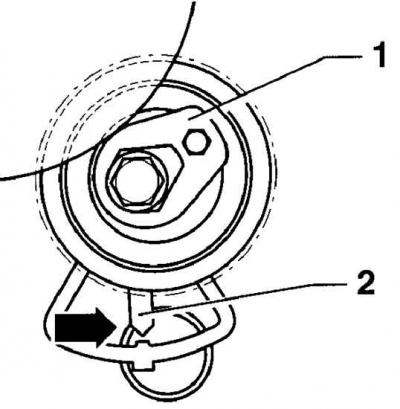
19. Rotate idler (1) auxiliary toothed belt so that the pointer (2) aligns with the protrusion on the cylinder head.
20. Turn the tension roller of the auxiliary toothed belt with an internal hexagon. Tighten the idler pulley bolt to 20 Nm.
21. Install the main toothed belt in sequence on the water pump pulley, idler pulley, crankshaft pulley, idler pulley and intake camshaft pulley.

22. Check the installation position of the main toothed belt tensioner. Bolt (2) fasteners must pass through the recess of the movable plate (1) roller (3 - pointer).
23. Using an internal hex wrench, turn the main timing belt tensioner until the pointer is aligned (3) with a notch on the movable plate. In this position, tighten the tensioner roller nut to 20 Nm.
24. Check that the crankshaft pulleys and camshafts are in the position of the installation of the piston of the first cylinder at top dead center.
25. Install the toothed belt guard.
26. Install the crankshaft pulley and secure it with a new bolt.
27. Lubricate the underside of the bolt head with clean engine oil before screwing in the bolt. Tighten the bolt to 90 Nm and then tighten it by 90°.
28. Fasten the support to the cylinder block by tightening the mounting bolts to 50 Nm.
29. Using new bolts, secure the right power unit support.
30. Install the power steering reservoir.
31. Install the V-belt.
Visitor comments