



Location of the fastening elements of the air pipe and the heat shield of the turbocharger
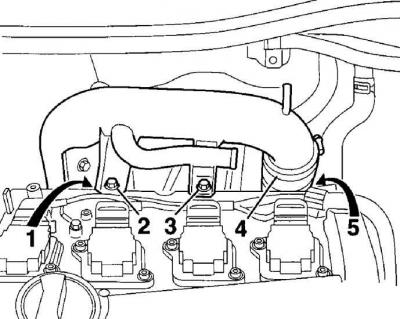
- 1 - heat shield mounting bolt;
- 2 - air pipe mounting bolt;
- 3 - air pipe mounting bolt;
- 4 - clamp;
- 5 - heat shield mounting bolt
Execution order
1. Check that the engine is cold, otherwise allow time for the engine to cool down.
2. Turn off the ignition and remove the ground cable from the battery.
Warning: When the battery is disconnected, the contents of the memory cells, such as the radio code, are erased. Without the code, the radio can only be reconnected by the manufacturer.
3. Drain the coolant from the engine cooling system.
4. Clean the spark plugs using a brush, vacuum cleaner or compressed air to prevent dirt from getting into the engine cylinders after the spark plugs are removed. Remove the spark plugs using a spark plug wrench.
5. Remove the air filter.
6. Relieve pressure in the fuel system.
7. To relieve pressure in the fuel system, wrap the fuel hose connection and carefully loosen the connections slowly, gradually releasing the pressure in the fuel system.
8. Label and disconnect the fuel supply and return hoses from the fuel distributor. Before disconnecting the hoses, loosen the clamps and move them to the hoses.
9. Close the ends of the fuel hoses with suitable plugs.
10. Disconnect the electrical connectors from the fuel injectors and move them to the side.
11. Label and disconnect all electrical connectors from the cylinder head.
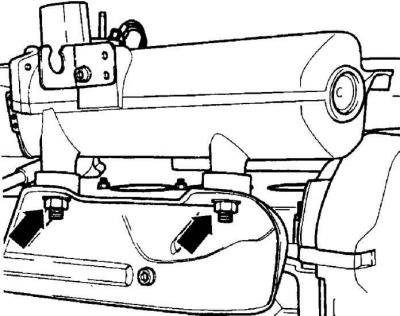
12. Unscrew the nuts (indicated by arrows), securing the top of the intake pipe to the bracket (shows the location of the nuts on a 125hp engine.).
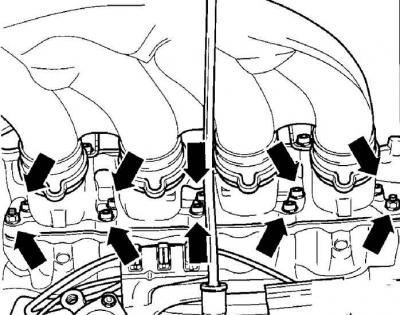
13. Unscrew the nuts (indicated by arrows), securing the intake manifold to the cylinder head.
Engine 1.6-I
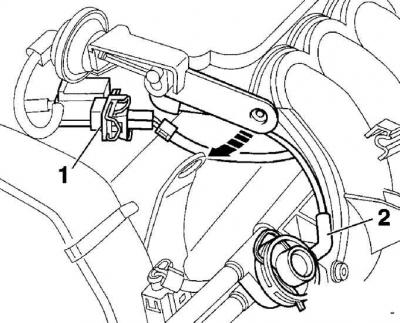
14. Disconnect the electrical connector (1) from the intake manifold register switching valve. Disconnect the hose (2) from the pressure regulator.
15. The arrow shows the direction of decoupling of the intake manifold.
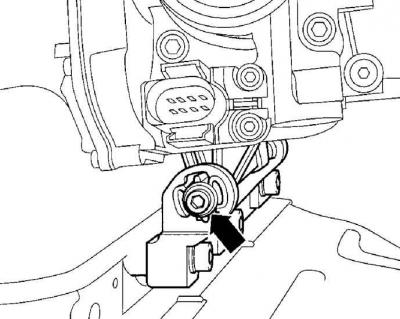
16. Unscrew the fastening (indicated by the arrow) the bottom of the intake manifold to the cylinder head.
17. Mark and disconnect the coolant hoses from the cylinder head.
18. Unscrew the exhaust inlet pipe with the catalytic converter from the elbow pipe.
Engine 1.8-I-Turbo.
19. Loosen the clamp (4), unscrew the bolts (2, 3) supporting the turbocharger pipe. Unscrew the screws (1 and 5) securing the heat shield to the cylinder head (see figure Location of fastening elements of the air pipe and heat shield of the turbocharger).
20. Remove the auxiliary V-belt.
Engine 1.8-I
21. Unscrew and remove the V-belt tensioner mechanism.
22. Remove the upper toothed belt cover, turn the engine crankshaft clockwise using the crankshaft pulley mounting bolt until the timing marks on the pulleys align with the pointers. In this case, the piston of the first cylinder will be at TDC in the compression stroke.
23. Release the tensioner pulley, which will reduce the tension on the timing belt. Remove the timing belt from the camshaft pulley.
24. Using paint or a marker, mark the position of the crankshaft pulley in relation to the cylinder block and turn the engine crankshaft clockwise so that no piston is at top dead center. Before installing the timing belt, set the crankshaft to a position where the piston of the first cylinder is at TDC in the compression stroke.
25. Unscrew the bolts and remove the cylinder head cover together with the gasket.
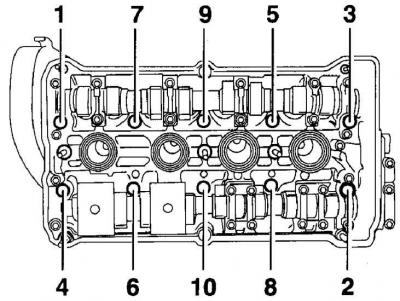
26. In the sequence shown in the figure, gradually and evenly unscrew the cylinder head mounting bolts.
27. Check that all lines, hoses and electrical connectors are disconnected from the cylinder head.
28. Remove the cylinder head from the engine and place it on two wooden blocks.
29. Remove the cylinder head gasket.
Visitor comments