



Aligning the right powertrain support
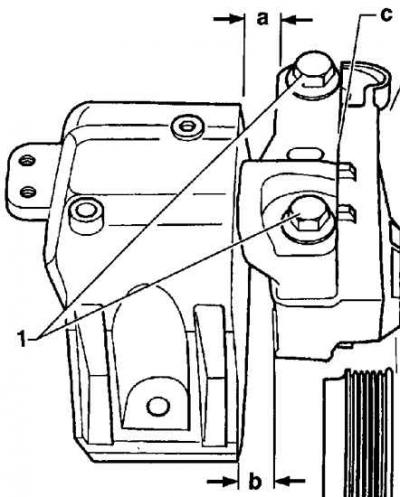
- 1 - bolt;
- A = 14 mm;
- B = at least 10 mm;
- C - bolt head flange alignment
Execution order
1. Check the condition of the powertrain mounts and hoses for cracks or wear and replace them if necessary.
2. If the transmission has been disconnected from the engine, check the condition of the clutch.
3. Install the power unit into the engine compartment and align it as follows.
4. Secure the right powertrain mount with new bolts, hand tightening them at this stage.
5. Secure the powertrain pendulum support with new bolts, tightening them by hand at this stage.
6. Align the right powertrain support as shown in the figure Aligning the right powertrain support.
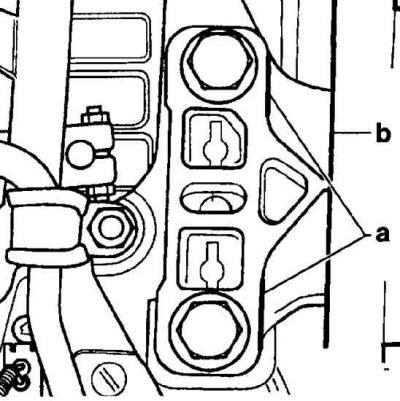
7. Align the left powertrain support so that ends (a) and (b) are parallel to each other.
8. Tighten the powertrain mounts to the specified torque (engines 1.4-/ 1.6-/ 1.8-/ 2.3):
- engine to bracket: 60 Nm + turn by 90°;
- gearbox to bracket: 60 Nm + turn by 90°;
- pendulum support to gearbox: 40 Nm + turn by 90°;
- pendulum support to the body: 20 Nm + turn further by 90°.
Warning: Unless specified, standard bolt tightening torques are as follows: M8 – 20 Nm, M10 – 45 Nm and M12 – 60 Nm.
9. Install the servo pump.
10. Install the starter.
11. Install the V-belt and adjust its tension.
12. Install the air intake pipe.
13. Install the air filter housing.
Engine 1.8-I-Turbo
14. Install the connecting pipes connecting the turbocharger to the supercharger radiator, air filter and secure them with clamps.
15. Install the exhaust pipe and catalytic converter with new gaskets.
16. Install the right and left drive shafts.
17. Install the accelerator cable and adjust it.
18. Connect the fuel supply and return hoses to the fuel line and secure them with clamps.
19. Connect the coolant supply hoses to the heater radiator on the engine compartment bulkhead and secure them with clamps.
20. Install the radiator fan.
Cars with manual transmission
21. Connect the shift rods to the gearbox. Install the clutch slave cylinder.
Cars with automatic transmission
22. Install and secure the power steering pressure line bracket to the gearbox. Connect the control cable to the gearbox and adjust it. Connect the disconnected electrical connectors and lines to the power unit, securing them with clamps.
23. Replace and secure the battery holder.
24. Reinstall the battery, but do not connect the ground cable to it at this stage.
25. Check that electrical connectors and lines are connected correctly to the power unit.
26. Check the oil level in the engine and gearbox and top it up if necessary.
27. Fill the cooling system with coolant.
28. Install the upper engine cover.
29. Install the lower engine compartment splash shield.
30. Connect the ground wire to the battery.
Warning: Activate the electric windows, set the clock and enter the code into the radio.
31. Start and warm up the engine to normal operating temperature.
32. Check the oil and coolant levels and the tightness of all connections.
33. Visually check that the adjustments are correct.
Visitor comments