



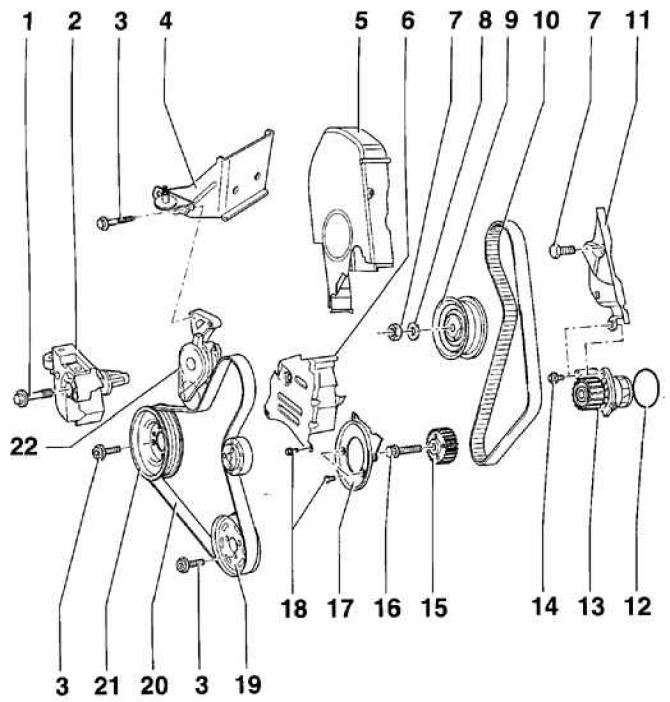
- 1 - bolt, 45 Nm;
- 2 - power unit support;
- 3 - bolt, 25 Nm;
- 4 - bracket;
- 5 - Upper timing belt casing;
- 6 - middle toothed belt cover;
- 7 - nut, 20 Nm;
- 8 - washer;
- 9 - tension roller;
- 10 - toothed belt. Before installation, it is necessary to check the toothed belt for wear. Before removing the toothed belt, it is necessary to mark its direction of rotation. It is forbidden to bend the toothed belt;
- 11 - rear timing belt cover;
- 12 - O-ring. Use a new ring when installing;
- 13 - water pump;
- 14 - bolt, 15 Nm;
- 15 - crankshaft timing belt pulley;
- 16 - bolt, 90 Nm and tighten by 90°. A new bolt must be used during installation. Tightening the bolt by 90° can be done in several stages;
- 17 - lower toothed belt casing;
- 18 - bolt, 10 Nm;
- 19 - servo pump belt pulley;
- 20 - V-belt. Before removing, mark the direction of rotation of the belt;
- 21 - Crankshaft belt pulley. The pulley can only be installed in one position due to the offset of the mounting holes;
- 22 - V-belt tensioning mechanism. To loosen the V-belt tension, use a wrench to move the tensioning mechanism to the side
The timing belt tension in four-cylinder petrol engines is provided by an automatic tensioner roller, which maintains optimum belt tension, resulting in increased service life and smoother running of the timing belt.
Execution order
1. Remove the auxiliary V-belt.
2. Unscrew the auxiliary drive V-belt tensioner mechanism.
[The information is available on the website VWmanual]
Visitor comments