



Releasing the timing belt tensioner on the 1.8-I engine
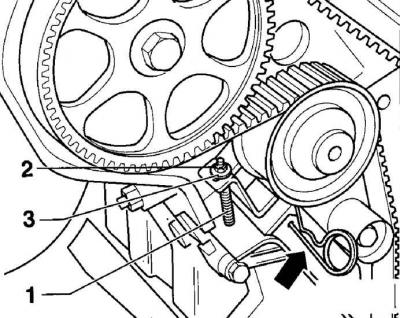
- The arrow points to the 1.5mm diameter locking pin;
- 1 - set screw, M5x55;
- 2 - hex nut;
- 3 - washer
Execution order
1. Remove the upper timing belt cover.
2. If the timing belt is to be reinstalled, use a marker or paint to mark the direction of rotation of the timing belt.
3. When viewed from the front of the engine, the engine pulleys rotate clockwise.
4. Turn the engine crankshaft so that the piston of the first cylinder is at top dead center.
5. You can turn the engine crankshaft in the following ways:
- raise the front of the car and secure it on stands. Put it in 5th gear and apply the handbrake. While holding one front wheel from turning, manually turn the other front wheel. This will cause the engine crankshaft to turn;
- place the car on a flat horizontal surface, then engage 5th gear and manually move the car forward or backward;
- set the gearbox to neutral and apply the handbrake. Using a wrench, turn the engine crankshaft by the crankshaft pulley mounting bolt.
Warning: Do not turn the engine crankshaft by the camshaft pulley mounting bolt, as this will place maximum load on the timing belt.
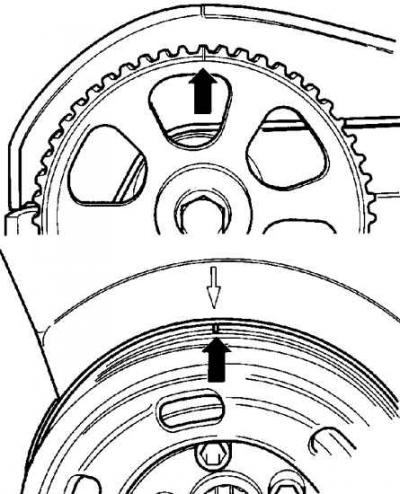
6. Turn the engine crankshaft until the mark on the camshaft pulley (drawing above) does not align with the TDC indicator on the cylinder head cover Check that the mark on the crankshaft pulley (picture below) aligned with the pointer on the lower toothed belt casing. The marks are indicated by arrows. When the marks are aligned with the pointers, the piston of the first cylinder is at TDC in the compression stroke.
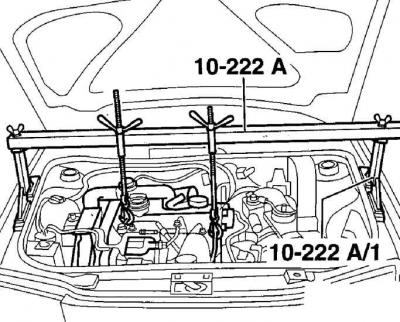
7. Since the right support of the power unit prevents the removal of the toothed belt, it is necessary to support the engine with a special device VW 10-222A and remove the right support of the power unit.
8. The engine can be supported from below using a jack through a wooden block.
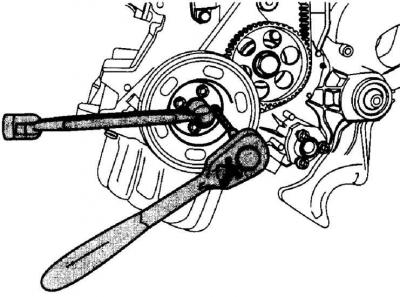
9. While holding the crankshaft pulley from turning, remove the four bolts securing the pulley to the crankshaft.
10. Remove the crankshaft pulley.
11. Unscrew and remove the lower and middle timing belt covers.
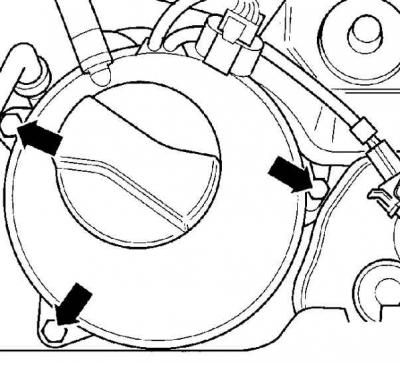
12. Unscrew the bolts (indicated by arrows), securing the expansion tank and power steering refill tank, and without disconnecting the hoses from them, move them to the side.
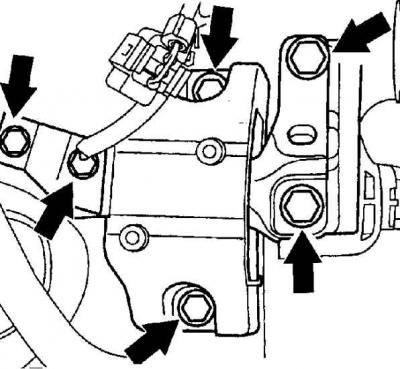
13. Unscrew the bolts (indicated by arrows), fastening the right support of the power unit to the body and the engine mount.
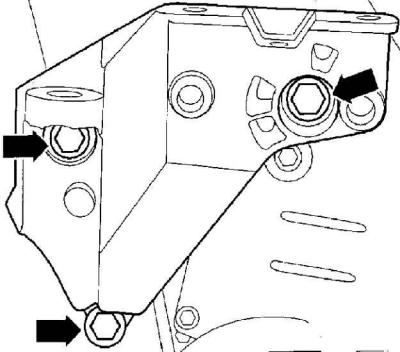
14. Unscrew the bolts (indicated by arrows), securing the right powertrain support bracket to the engine.
Engine 1.6-I
15. Loosen the bolt securing the timing belt tensioning roller (see figure Using a spanner to rotate the timing belt tensioner roller on the eccentric on the 1.6-I engine).
Engine 1.8-I
16. Screw the M5x55 set screw into the timing belt tensioner. Screw the hex nut 2 with the large washer 3 onto the set screw 1 (see figure Releasing the timing belt tensioner on the 1.8-I engine).
17. After aligning the holes in the piston and housing, insert a steel rod or a 1.5 mm drill shank into the aligned holes. This will lock the tension roller in the retracted position, resulting in a release of the toothed belt tension.
18. Remove the timing belt from the engine pulleys.
Warning: Do not sharply bend the toothed belt, as during operation the toothed belt may break at the sharp bend, which will lead to engine damage.
Warning: After removing the timing belt, do not change the position of the timing belt pulleys.
Warning: If the engine crankshaft is turned after the timing belt is removed, the pistons will collide with the valves, causing damage to the valves and requiring major engine repairs. Mark the position of the crankshaft pulley by making marks on the pulley and engine block with paint. If necessary, the engine crankshaft can be turned 90° clockwise or counterclockwise.
Warning: Check the timing belt for wear, delamination or oil contamination. If there is oil on the timing belt, find the source of the oil leak and repair it before installing a new belt.
Visitor comments