
English Русский
Български
Беларускі
Український
Српски
Hrvatski
Română
Polski
Slovenský
Magyar
  |  Articles  |  Sitemap  |  Contacts  |    |
Car maintenance Ford Car maintenance Hyundai Car maintenance Chevrolet Car maintenance BMW Car maintenance Audi Car maintenance Opel Car maintenance AvtoVAZ
VWmanual.ru


Main   Passat   Golf   Polo   Touareg   Tiguan   Sharan   Transporter   Others  
Golf 1 (1974-1984, diesel) Golf 1 (1974-1984, petrol) Golf 2 (1984-1993, petrol) Golf 2 (1984-1993) Golf 3 (1991-1997) Golf 4 (1997-2004) Golf 5 (2003-2008)

Cleaning and checking the cylinder head of 1.6-/1.8-I engines (VW Golf 4)

  • Main
  • Golf
  • Golf 4
  • Power unit
  • Petrol engines
  • Cleaning and checking the cylinder head of 1.6-/1.8-I engines
            0


1. Clean off any traces of old gasket and sealant from the cylinder head.

2. Clean carbon deposits from the combustion chamber and cylinders, then wash the cylinder head with a suitable solvent.

3. Clean the passages in the cylinder head using a wire brush.

4. Carefully inspect the head for cracks and other damage. If there are cracks on the head, it must be replaced.

5. Using a metal ruler and feeler gauge, check the flatness of the mating surface of the head.

6. Valve seats with signs of wear or burning must be processed with the mandatory preservation of the angles and chamfer size.

7. If the valve seat must be machined, determine the maximum amount of metal that can be removed. If too much metal is removed, the hydraulic lifters will not function properly.
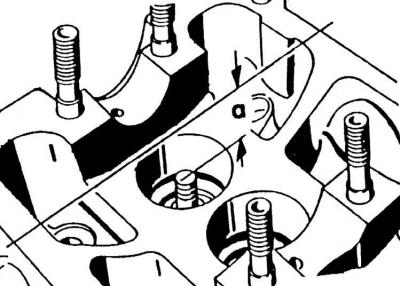
7. If the valve seat must be machined, determine the maximum amount of metal that can be removed.…


8. Insert the valve into the guide and press it against the valve seat. Measure the distance (a) from the end of the valve stem to the top surface of the cylinder head. The minimum allowable distance is 33.8 mm for intake valves and 34.1 mm for exhaust valves. If the valve seat is excessively worn, machining is not allowed and the cylinder head must be replaced.


(The original article is available at www.VWManual.ru)

9. After any treatment of the valve seats, it is necessary to grind them in.

10. Check the internal diameters of the valve guides. If the values exceed the maximum permissible value, the valve guides should be replaced in a special repair shop.

Warning: Replacing the guide also requires regrinding the seat of the corresponding valve.


11. Inspect each valve head for pitting, burning, cracks and general wear.
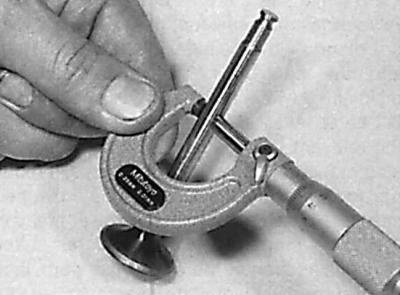
11. Inspect each valve head for pitting, burning, cracks and general wear.


12. If the valve is in good condition, measure the valve stem diameter at several points using a micrometer. Any significant difference in the obtained valve stem measurement data indicates stem wear. In this case, the valve must be replaced.

13. If the valves are in satisfactory condition, they need to be ground in. The valves need to be ground in using only fine-grained polishing paste. Lubricate the surface of the valve seat with a small amount of paste and install the valve in the corresponding seat. Press the rubber suction cup tightly to the valve plate and rotate the valve in one direction or the other.

14. After finishing the grinding process, thoroughly clean all parts from dirt and paste. Check the valve seat and plate. A solid matte ring should be visible on both parts, which indicates the width of the valve chamfer.


15. Check the valve springs for wear and delamination, and measure their free length. If possible, compare each of the existing springs to the new spring.

16. Place the springs on a flat horizontal surface and check their deviations from the horizontal position. If at least one of the springs is damaged, replace all the springs in the set.

17. Check the condition of the valve crackers, as well as the cracker installation locations on the valve. If there are any defects, the damaged parts must be replaced. The oil-deflecting caps must be replaced each time they are removed.

18. Check valve train components and hydraulic lifters.

This article is available at russian, bulgarian, belarusian, ukrainian, serbian, croatian, romanian, polish, slovak, hungarian
The text has been checked: Kolesnikov Artem

Share information:

Previous articles
Disassembling the cylinder head of engines 1.6-/1.8-I
Checking hydraulic valve lifters of 1.6-/1.8-I engines
Installation of engine head 1.6-/1.8-I for installation
Preparing the 1.6-/1.8-I engine head for installation
Removal the cylinder head of 1.6-/1.8-I engines
Cylinder head of the 1.6-I engine
Next articles
Assembly of cylinder head for 1.6-/1.8-I engines
Toothed belt for 1.4-I engine
Removal the cylinder head of the 1.4-I engine
Installing the cylinder head of the 1.4-I engine
Engine timing drive 2.3-I-VR5
Removal and installation the cylinder head of the 2.3-I-VR5 engine


Similar articles from other manuals for VW cars:
Removal and installation of cylinder head of 1.6-I and 1.8-I… Passat B5 (1996-2005)
Cylinder head Polo 3 (1995-2003)
Removal and installation the cylinder head cover Touareg 1 (2002-2006)
Cylinder head Tiguan 1 (2007-2015)
Cylinder head repair Sharan 1 (1995-2000)
Removal and installation the cylinder head (petrol 4-cylinder) Transporter T4 (1990-2003)
Checking the deformation of the cylinder head mating plane Caddy 3 (2003-2010)
Link to this page in different formats


Visitor comments


No comments yet


How much will 33 + 44 =


Golf 5 
  • General information
  • User manual
  • Maintenance
  • Troubleshooting
  • Power unit
  • Engine repair
  • Cooling and ventilation system
  • Fuel system
  • Ignition system
  • Transmission
  • Clutch
  • Mechanical gearbox
  • Automatic gearbox
  • Chassis
  • Brake system
  • Car suspension
  • Steering
  • Body
  • Interior (internal elements)
  • Exterior (external elements)
  • Doors and covers
  • Electrical equipment
  • Power devices
  • Washers and wipers
  • Lighting and appliances
  • Electrical circuits
Golf 4 
  • General information
  • User manual
  • Weekly checks
  • Maintenance
  • Power unit
  • Petrol engines
  • Diesel engines
  • Cooling system
  • Fuel system (petrol)
  • Control system (petrol)
  • Fuel system (diesel)
  • Exhaust system
  • Transmission
  • Clutch
  • Car gearbox
  • Drive shafts
  • Chassis
  • Car suspension
  • Steering
  • Wheels and tires
  • Brake system
  • Body
  • Exterior (external elements)
  • Interior (internal elements)
  • Ventilation and heating
  • Car doors and sunroof
  • Washers and glass cleaners
  • Electrical equipment
  • Power devices
  • Lighting and appliances
  • Electrical circuits
Golf 3 
  • Petrol engine
  • Engine repair
  • Lubrication system
  • Cooling system
  • Ignition system
  • Diesel engine
  • Engine repair
  • Diesel injection system
  • Pre-glow system
  • Transmission
  • Clutch
  • Gearbox and drive shafts
  • Chassis
  • Steering
  • Wheels and suspension
  • Brake system
  • Electrical equipment
  • Lighting and appliances
  • Electrical circuits
Golf 2 
  • General information
  • Introduction to guide
  • User manual
  • Petrol engines 1.3 l
  • Engine repair
  • Lubrication system
  • Cooling system
  • Carburetors
  • Supply system
  • Ignition system
  • Petrol engines 1.6/1.8 l
  • Engine repair
  • Supply system
  • Ignition system
  • Diesel engines
  • Engine repair
  • Lubrication system
  • Cooling system
  • Power and exhaust system
  • Transmission
  • Clutch
  • 4-speed gearbox 084
  • 5-speed gearbox 085
  • 4-speed gearbox 020/4R
  • 5-speed gearbox 020/4T
  • Automatic gearbox
  • Drive shafts
  • Chassis
  • Steering
  • Car suspension
  • Brake system
  • Body
  • Body elements
  • Doors, locks and windows
  • Electrical equipment
  • Equipment and devices
  • Power devices
Golf 2 (petrol) 
  • General information
  • Characteristics
  • Car care
  • Maintenance
  • Power unit
  • Engine repair
  • Engine 1.05/1.30
  • Engine 1.60/1.80
  • Cooling and lubrication system
  • Power and exhaust system
  • Transmission
  • Clutch
  • Car gearbox
  • Drive shafts
  • Chassis
  • Brake system
  • Steering
  • Suspension
  • Body
  • Body and equipment
  • Electrical equipment
  • Lighting and appliances
  • Electrical circuits
Golf 1 (petrol) 
  • General information
  • Characteristics
  • User manual
  • Maintenance
  • Power unit
  • Engine adjustment
  • Engine 1.1/1.3
  • Engine 1.5/1.6/1.8
  • Engine electrical equipment
  • Cooling system
  • Fuel system
  • Transmission
  • Clutch and manual gearbox
  • Automatic gearbox
  • Chassis
  • Steering
  • Front suspension
  • Rear suspension
  • Brake system
  • Electrical equipment
  • Lighting and appliances
  • Electrical circuits
  • Body
  • Body and equipment
  • Optional equipment
Golf 1 (diesel) 
  • General information
  • Specifications
  • Maintenance
  • Power unit
  • Engine repair
  • Exhaust and turbocharger
  • Cooling system
  • Fuel system
  • Fuel injection system
  • Transmission
  • Clutch and drive shafts
  • Car gearbox
  • Chassis
  • Suspension and wheels
  • Steering
  • Brake system
  • Wheels and tires
  • Body
  • Heating and ventilation
  • Exterior (external elements)
  • Interior (internal elements)
  • Doors and windows
  • Electrical equipment
  • Equipment and devices
  • Lighting system
  • Power devices
  • Electrical circuits
VWmanual.ru © 2016-2026 | Mobile version | News and articles | Sitemap: EN BG BY UA RS HR RO PL SK HU | Write message | Site search
Passat B2 • Passat B3 • Passat B4 • Passat B5 • Passat B6 • Golf 1, diesel • Golf 1, petrol • Golf 2, petrol • Golf 2 • Golf 3 • Golf 4 • Golf 5 • Polo 3 • Polo 4 • Touareg 1 • Tiguan 1 • Sharan 1 • Transporter T3 • Transporter T4 • LT 28 • LT 2D • Beetle • Caddy 3 •
Our website uses cookies to ensure functionality and convenience.