
English Русский
Български
Беларускі
Український
Српски
Hrvatski
Română
Polski
Slovenský
Magyar
  |  Articles  |  Sitemap  |  Contacts  |    |
Car maintenance Ford Car maintenance Hyundai Car maintenance Chevrolet Car maintenance BMW Car maintenance Audi Car maintenance Opel Car maintenance AvtoVAZ
VWmanual.ru


Main   Passat   Golf   Polo   Touareg   Tiguan   Sharan   Transporter   Others  
Golf 1 (1974-1984, diesel) Golf 1 (1974-1984, petrol) Golf 2 (1984-1993, petrol) Golf 2 (1984-1993) Golf 3 (1991-1997) Golf 4 (1997-2004) Golf 5 (2003-2008)

Removal and installation the cylinder head of the 2.3-I-VR5 engine (VW Golf 4)

  • Main
  • Golf
  • Golf 4
  • Power unit
  • Petrol engines
  • Removal and installation the cylinder head of the 2.3-I-VR5 engine
            0


Cylinder head assembly for 2.3-I-VR5 engine
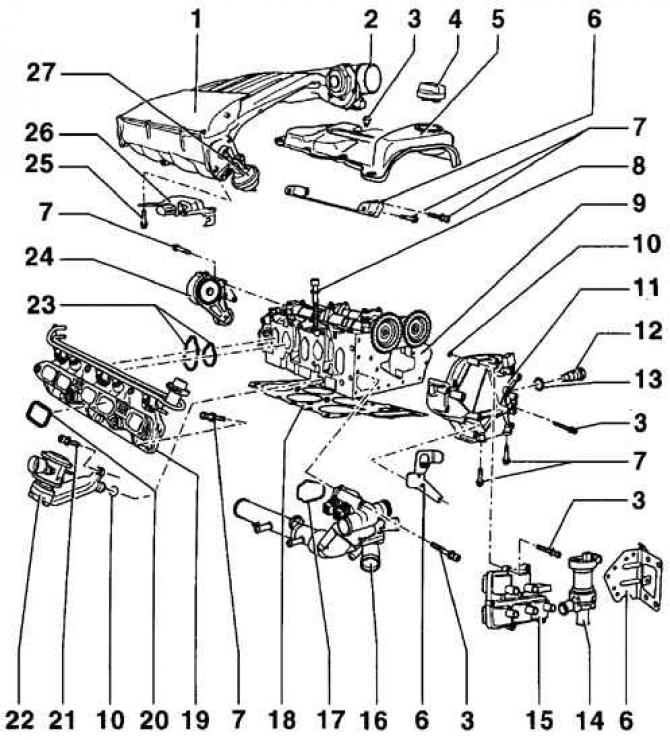


Cylinder head assembly for 2.3-I-VR5 engine

  • 1 - Upper intake manifold. The upper intake manifold is first attached to the lower intake manifold, and then the manifold assembly is attached to the cylinder head;
  • 2 - throttle body;
  • 3 - bolt, 10 Nm;
  • 4 - lid;
  • 5 - cylinder head cover. When installing the cover, a layer of sealant WV-D454300A3 must be applied to the segmented recess around the perimeter of the cover;
  • 6 - bracket;
  • 7 - bolt, 25 Nm;
  • 8 - cylinder head mounting bolt. When installing, it is necessary to use new bolts and tighten the bolts in a certain sequence in several stages;
  • 9 - cylinder head. If the flatness is more than 0.1 mm, it is necessary to regrind the cylinder head. The minimum permissible height of the cylinder head is 139.5 mm;
  • 10 - Round sealing ring. When installing, it is necessary to use a new sealing ring lubricated with clean engine oil;
  • 11 - timing chain cover. Removal and installation of the timing chain cover can only be performed on the installed cylinder head. When installing the timing chain cover, it is necessary to fill the holes in the end of the cover with liquid sealant VW-AMV18800102;
  • 12 - chain tensioner, 40 Nm. The engine can only be turned with the chain tensioner installed;
  • 13 - sealing ring;
  • 14 - water pump;
  • 15 - ignition system unit;
  • 16 - thermostat housing;
  • 17 - sealing ring. If the seal is broken, a new sealing ring must be used;
  • 18 - Cylinder head gasket. A new cylinder head gasket must be used during installation;
  • 19 - lower part of the intake manifold;
  • 20 - Seal for the upper part of the intake manifold. If damaged, a new seal must be used;
  • 21 - bolt, 5 Nm;
  • 22 - combination valve;
  • 23 - Seal for the lower part of the intake manifold. If damaged, a new seal must be used;
  • 24 - V-belt tensioning mechanism;
  • 25 - bolt, 5 Nm;
  • 26 - bracket;
  • 27 - vacuum actuator

Cylinder Head Bolt Tightening Sequence for VR5 Engine


The information is posted on this resource: VWmanual.ru
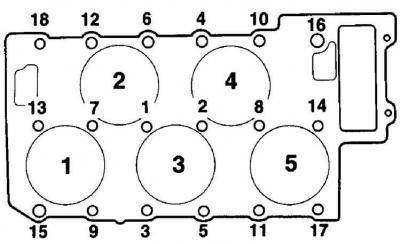


Cylinder Head Bolt Tightening Sequence for VR5 Engine


Warning: The operations for removing and installing the cylinder head on the VR5 engine are similar to the operations for removing and installing the cylinder head on a four-cylinder gasoline engine. This section only describes the differences for removing and installing the cylinder head on VR5 engines.


Execution order


1. Remove the cylinder head mountings and the cylinder head cover.

2. Unscrew the cylinder head mounting bolts in the reverse order of tightening them (see figure Cylinder head bolt tightening sequence on VR5 engine).
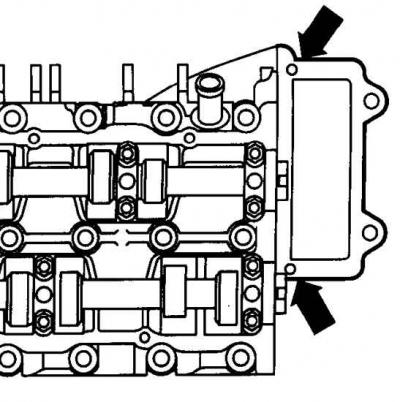
2. Unscrew the cylinder head mounting bolts in the reverse order of tightening them (see figure…


3. Clean the holes (indicated by arrows) 3 mm in diameter from the sealant at the end of the drive chain cover.

4. Fill the holes in the end of the timing chain cover with liquid sealant VW-AMV18800102.


Warning: After installing the cylinder head, the sealant holes in the end of the timing chain cover are half-closed.


5. Before installing the cylinder head gasket, check that holes 15 and 16 (see figure Cylinder head bolt tightening sequence on VR5 engine) guide bushings are installed on the cylinder block.

6. Carefully install the head onto the cylinder block. Insert and hand tighten the cylinder head bolts and washers.

7. In a certain sequence (see figure Cylinder head bolt tightening sequence on VR5 engine) tighten all bolts to a torque of 30 Nm, then tighten all bolts to a torque of 50 Nm and finally tighten all bolts in two stages, each time by 90°.

This article is available at russian, bulgarian, belarusian, ukrainian, serbian, croatian, romanian, polish, slovak, hungarian
The text has been checked: Kolesnikov Artem

Share information:

Previous articles
Engine timing drive 2.3-I-VR5
Installing the cylinder head of the 1.4-I engine
Removal the cylinder head of the 1.4-I engine
Toothed belt for 1.4-I engine
Assembly of cylinder head for 1.6-/1.8-I engines
Cleaning and checking the cylinder head of 1.6-/1.8-I engines
Next articles
Checking the compression in the engine cylinders
Removal the poly V-belt of 1.6-/1.8-I engines
Installation of poly V-belt for 1.6-/1.8-I engines
Removal the poly V-belt of 1.4-I engines
Installation of poly V-belt for 1.4-I engines
Removal the poly V-belt of 2.3-I engines


Similar articles from other manuals for VW cars:
Features of repair of the cylinder head of the engine «AAA» Passat B4 (1988-1996)
Cylinder head of the AZQ petrol engine with a displacement of… Polo 4 (2001-2009)
Removal and installation cylinder head covers and gaskets Touareg 1 (2002-2006)
Cylinder head Tiguan 1 (2007-2015)
Cylinder Head — Removal with Engine Installed Sharan 1 (1995-2000)
Removal and installation the cylinder head (petrol 4-cylinder) Transporter T4 (1990-2003)
Disassembly and assembly of the cylinder head Caddy 3 (2003-2010)
Link to this page in different formats


Visitor comments


No comments yet


How much will 41 + 19 =


Golf 5 
  • General information
  • User manual
  • Maintenance
  • Troubleshooting
  • Power unit
  • Engine repair
  • Cooling and ventilation system
  • Fuel system
  • Ignition system
  • Transmission
  • Clutch
  • Mechanical gearbox
  • Automatic gearbox
  • Chassis
  • Brake system
  • Car suspension
  • Steering
  • Body
  • Interior (internal elements)
  • Exterior (external elements)
  • Doors and covers
  • Electrical equipment
  • Power devices
  • Washers and wipers
  • Lighting and appliances
  • Electrical circuits
Golf 4 
  • General information
  • User manual
  • Weekly checks
  • Maintenance
  • Power unit
  • Petrol engines
  • Diesel engines
  • Cooling system
  • Fuel system (petrol)
  • Control system (petrol)
  • Fuel system (diesel)
  • Exhaust system
  • Transmission
  • Clutch
  • Car gearbox
  • Drive shafts
  • Chassis
  • Car suspension
  • Steering
  • Wheels and tires
  • Brake system
  • Body
  • Exterior (external elements)
  • Interior (internal elements)
  • Ventilation and heating
  • Car doors and sunroof
  • Washers and glass cleaners
  • Electrical equipment
  • Power devices
  • Lighting and appliances
  • Electrical circuits
Golf 3 
  • Petrol engine
  • Engine repair
  • Lubrication system
  • Cooling system
  • Ignition system
  • Diesel engine
  • Engine repair
  • Diesel injection system
  • Pre-glow system
  • Transmission
  • Clutch
  • Gearbox and drive shafts
  • Chassis
  • Steering
  • Wheels and suspension
  • Brake system
  • Electrical equipment
  • Lighting and appliances
  • Electrical circuits
Golf 2 
  • General information
  • Introduction to guide
  • User manual
  • Petrol engines 1.3 l
  • Engine repair
  • Lubrication system
  • Cooling system
  • Carburetors
  • Supply system
  • Ignition system
  • Petrol engines 1.6/1.8 l
  • Engine repair
  • Supply system
  • Ignition system
  • Diesel engines
  • Engine repair
  • Lubrication system
  • Cooling system
  • Power and exhaust system
  • Transmission
  • Clutch
  • 4-speed gearbox 084
  • 5-speed gearbox 085
  • 4-speed gearbox 020/4R
  • 5-speed gearbox 020/4T
  • Automatic gearbox
  • Drive shafts
  • Chassis
  • Steering
  • Car suspension
  • Brake system
  • Body
  • Body elements
  • Doors, locks and windows
  • Electrical equipment
  • Equipment and devices
  • Power devices
Golf 2 (petrol) 
  • General information
  • Characteristics
  • Car care
  • Maintenance
  • Power unit
  • Engine repair
  • Engine 1.05/1.30
  • Engine 1.60/1.80
  • Cooling and lubrication system
  • Power and exhaust system
  • Transmission
  • Clutch
  • Car gearbox
  • Drive shafts
  • Chassis
  • Brake system
  • Steering
  • Suspension
  • Body
  • Body and equipment
  • Electrical equipment
  • Lighting and appliances
  • Electrical circuits
Golf 1 (petrol) 
  • General information
  • Characteristics
  • User manual
  • Maintenance
  • Power unit
  • Engine adjustment
  • Engine 1.1/1.3
  • Engine 1.5/1.6/1.8
  • Engine electrical equipment
  • Cooling system
  • Fuel system
  • Transmission
  • Clutch and manual gearbox
  • Automatic gearbox
  • Chassis
  • Steering
  • Front suspension
  • Rear suspension
  • Brake system
  • Electrical equipment
  • Lighting and appliances
  • Electrical circuits
  • Body
  • Body and equipment
  • Optional equipment
Golf 1 (diesel) 
  • General information
  • Specifications
  • Maintenance
  • Power unit
  • Engine repair
  • Exhaust and turbocharger
  • Cooling system
  • Fuel system
  • Fuel injection system
  • Transmission
  • Clutch and drive shafts
  • Car gearbox
  • Chassis
  • Suspension and wheels
  • Steering
  • Brake system
  • Wheels and tires
  • Body
  • Heating and ventilation
  • Exterior (external elements)
  • Interior (internal elements)
  • Doors and windows
  • Electrical equipment
  • Equipment and devices
  • Lighting system
  • Power devices
  • Electrical circuits
VWmanual.ru © 2016-2026 | Mobile version | News and articles | Sitemap: EN BG BY UA RS HR RO PL SK HU | Write message | Site search
Passat B2 • Passat B3 • Passat B4 • Passat B5 • Passat B6 • Golf 1, diesel • Golf 1, petrol • Golf 2, petrol • Golf 2 • Golf 3 • Golf 4 • Golf 5 • Polo 3 • Polo 4 • Touareg 1 • Tiguan 1 • Sharan 1 • Transporter T3 • Transporter T4 • LT 28 • LT 2D • Beetle • Caddy 3 •
Our website uses cookies to ensure functionality and convenience.