
English Русский
Български
Беларускі
Український
Српски
Hrvatski
Română
Polski
Slovenský
Magyar
  |  Articles  |  Sitemap  |  Contacts  |    |
Car maintenance Ford Car maintenance Hyundai Car maintenance Chevrolet Car maintenance BMW Car maintenance Audi Car maintenance Opel Car maintenance AvtoVAZ
VWmanual.ru


Main   Passat   Golf   Polo   Touareg   Tiguan   Sharan   Transporter   Others  
Golf 1 (1974-1984, diesel) Golf 1 (1974-1984, petrol) Golf 2 (1984-1993, petrol) Golf 2 (1984-1993) Golf 3 (1991-1997) Golf 4 (1997-2004) Golf 5 (2003-2008)

Checking the crankshaft (VW Golf 2)

  • Main
  • Golf
  • Golf 2
  • Petrol engines 1.3 l
  • Engine repair
  • Checking the crankshaft
            0


Carefully inspect the crankshaft for any signs of damage, then measure the diameter of the main and connecting rod journals. Three repair sizes are provided for regrinding the journals, which allows the crankshaft with repair liners to be used multiple times.

Mount the crankshaft in the lathe centers or with the outer journals on prisms. Using an indicator installed near the central journal, measure the runout. If the runout is greater than 0.06, the shaft should be replaced.

Measure the diameters of the main and connecting rod journals with a micrometer (in two mutually perpendicular directions). Enter the measurement results into the table. Determine which group the neck sizes belong to (nominal, 1, 2, 3 repair).

Determine the calculated clearance value, assuming that the diameter measured by the liners is equal to the diameter of the corresponding repair group - see the Table of dimensional and installation data (Table 3). If the calculated clearance is less than 0.8 mm for main bearings and 0.07 for connecting rod bearings, do not re-grind the journals, but simply replace the bearings with new ones of the same group (although you don't have to change them). If the clearance is greater than 0.17 mm on the main journals and 0.1 mm on the connecting rod journals, then the corresponding journals (either all main or all connecting rod) should be reground to the closest repair diameter and used with new liners of the same group. Determine their ovality and taper. The maximum deviations should be considered to be 0.03 mm for ovality and 0.0 15 mm for taper. If the measurement results exceed those specified above, the journals should be reground, even if their diameter has not yet reached the maximum permissible value.


After regrinding the shaft and purchasing new liners, you should measure the true value of the clearances in the main and connecting rod bearings for verification. To do this, clean the liners, insert them into the sockets in the cylinder block, place the crankshaft on all the main journals and put pieces of plastic wire (figure 84). Install the main caps with the inserted liners and tighten the bolts to a torque of 65 Nm, after which the shaft can no longer be rotated.
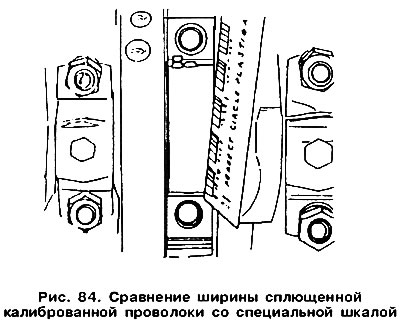
After regrinding the shaft and purchasing new liners, you should measure the true value of the…


To measure the clearance in the connecting rod bearings, the connecting rod should be brought to the journal of the shaft and pieces of plastic wire should be placed under the connecting rod cap, equipped with a liner. Tighten the connecting rod cap fastening nuts with a torque of 30 Nm, but in this case they should not be tightened by another 900. Since the shaft cannot be rotated, the clearance can only be measured on two connecting rod journals occupying the BDC position.

Remove the main bearing caps and both connecting rod bearing caps.

[View the original on this resource: VWMANUAL.ru]

Measure the width of the removed pieces of calibrated wire on the scale (see figure 84). The width value is numerically equal to the bearing clearance. If this clearance is greater than 0.03-0.08 mm for main bearings and 0.02-0.07 mm for connecting rod bearings, then the corresponding bearings must be replaced.


Then turn the crankshaft and measure the remaining connecting rod journals. The measurements should be taken in a similar manner. If the clearance exceeds the permissible value, replace the corresponding set of liners, and then measure the clearances again; they should fall within the permissible value range.

For reground journals and new liners, the clearance should be within 0.03-0.08 mm for main bearings and 0.02-0.07 for connecting rod bearings. If the values of these clearances are greater than these specified, but less than 0.17 and 0.1 mm, respectively, the engine can be operated, but this indicates that the diameters of the shaft journals were reduced more than the norm during grinding. If the clearance is greater than these values, the journals should be reground again.

This article is available at russian, bulgarian, belarusian, ukrainian, serbian, croatian, romanian, polish, slovak, hungarian
The text has been checked: Kolesnikov Artem

Share information:

Previous articles
Removal the crankshaft
Cylinder Block — Check
Installing pistons and connecting rods into cylinders
Assembly of the connecting rod and piston group
Checking piston rings, ring grooves and connecting rods
Measuring cylinder diameters
Next articles
Installing the crankshaft
Removal the crankshaft seals
Installing crankshaft seals
Flywheel replacement
Valve timing mechanism — design description
Replacing the timing belt


Similar articles from other manuals for VW cars:
Checking and adjusting the crankshaft speed of a cold engine at… Passat B3 (1988-1993)
Checking the crankshaft speed sensor Polo 3 (1995-2003)
Checking the condition of the poly V-belt Touareg 1 (2002-2006)
Checking the operation of the intake manifold flap Tiguan 1 (2007-2015)
Checking the crankshaft Sharan 1 (1995-2000)
Checking and adjusting the axial play of the crankshaft Transporter T3 (1979-1992)
Checking and adjusting the crankshaft axial play Beetle (1960-1986)
Link to this page in different formats


Visitor comments


No comments yet


How much will 26 + 33 =


Golf 5 
  • General information
  • User manual
  • Maintenance
  • Troubleshooting
  • Power unit
  • Engine repair
  • Cooling and ventilation system
  • Fuel system
  • Ignition system
  • Transmission
  • Clutch
  • Mechanical gearbox
  • Automatic gearbox
  • Chassis
  • Brake system
  • Car suspension
  • Steering
  • Body
  • Interior (internal elements)
  • Exterior (external elements)
  • Doors and covers
  • Electrical equipment
  • Power devices
  • Washers and wipers
  • Lighting and appliances
  • Electrical circuits
Golf 4 
  • General information
  • User manual
  • Weekly checks
  • Maintenance
  • Power unit
  • Petrol engines
  • Diesel engines
  • Cooling system
  • Fuel system (petrol)
  • Control system (petrol)
  • Fuel system (diesel)
  • Exhaust system
  • Transmission
  • Clutch
  • Car gearbox
  • Drive shafts
  • Chassis
  • Car suspension
  • Steering
  • Wheels and tires
  • Brake system
  • Body
  • Exterior (external elements)
  • Interior (internal elements)
  • Ventilation and heating
  • Car doors and sunroof
  • Washers and glass cleaners
  • Electrical equipment
  • Power devices
  • Lighting and appliances
  • Electrical circuits
Golf 3 
  • Petrol engine
  • Engine repair
  • Lubrication system
  • Cooling system
  • Ignition system
  • Diesel engine
  • Engine repair
  • Diesel injection system
  • Pre-glow system
  • Transmission
  • Clutch
  • Gearbox and drive shafts
  • Chassis
  • Steering
  • Wheels and suspension
  • Brake system
  • Electrical equipment
  • Lighting and appliances
  • Electrical circuits
Golf 2 
  • General information
  • Introduction to guide
  • User manual
  • Petrol engines 1.3 l
  • Engine repair
  • Lubrication system
  • Cooling system
  • Carburetors
  • Supply system
  • Ignition system
  • Petrol engines 1.6/1.8 l
  • Engine repair
  • Supply system
  • Ignition system
  • Diesel engines
  • Engine repair
  • Lubrication system
  • Cooling system
  • Power and exhaust system
  • Transmission
  • Clutch
  • 4-speed gearbox 084
  • 5-speed gearbox 085
  • 4-speed gearbox 020/4R
  • 5-speed gearbox 020/4T
  • Automatic gearbox
  • Drive shafts
  • Chassis
  • Steering
  • Car suspension
  • Brake system
  • Body
  • Body elements
  • Doors, locks and windows
  • Electrical equipment
  • Equipment and devices
  • Power devices
Golf 2 (petrol) 
  • General information
  • Characteristics
  • Car care
  • Maintenance
  • Power unit
  • Engine repair
  • Engine 1.05/1.30
  • Engine 1.60/1.80
  • Cooling and lubrication system
  • Power and exhaust system
  • Transmission
  • Clutch
  • Car gearbox
  • Drive shafts
  • Chassis
  • Brake system
  • Steering
  • Suspension
  • Body
  • Body and equipment
  • Electrical equipment
  • Lighting and appliances
  • Electrical circuits
Golf 1 (petrol) 
  • General information
  • Characteristics
  • User manual
  • Maintenance
  • Power unit
  • Engine adjustment
  • Engine 1.1/1.3
  • Engine 1.5/1.6/1.8
  • Engine electrical equipment
  • Cooling system
  • Fuel system
  • Transmission
  • Clutch and manual gearbox
  • Automatic gearbox
  • Chassis
  • Steering
  • Front suspension
  • Rear suspension
  • Brake system
  • Electrical equipment
  • Lighting and appliances
  • Electrical circuits
  • Body
  • Body and equipment
  • Optional equipment
Golf 1 (diesel) 
  • General information
  • Specifications
  • Maintenance
  • Power unit
  • Engine repair
  • Exhaust and turbocharger
  • Cooling system
  • Fuel system
  • Fuel injection system
  • Transmission
  • Clutch and drive shafts
  • Car gearbox
  • Chassis
  • Suspension and wheels
  • Steering
  • Brake system
  • Wheels and tires
  • Body
  • Heating and ventilation
  • Exterior (external elements)
  • Interior (internal elements)
  • Doors and windows
  • Electrical equipment
  • Equipment and devices
  • Lighting system
  • Power devices
  • Electrical circuits
VWmanual.ru © 2016-2026 | Mobile version | News and articles | Sitemap: EN BG BY UA RS HR RO PL SK HU | Write message | Site search
Passat B2 • Passat B3 • Passat B4 • Passat B5 • Passat B6 • Golf 1, diesel • Golf 1, petrol • Golf 2, petrol • Golf 2 • Golf 3 • Golf 4 • Golf 5 • Polo 3 • Polo 4 • Touareg 1 • Tiguan 1 • Sharan 1 • Transporter T3 • Transporter T4 • LT 28 • LT 2D • Beetle • Caddy 3 •
Our website uses cookies to ensure functionality and convenience.