
English Русский
Български
Беларускі
Український
Српски
Hrvatski
Română
Polski
Slovenský
Magyar
  |  Articles  |  Sitemap  |  Contacts  |    |
Car maintenance Ford Car maintenance Hyundai Car maintenance Chevrolet Car maintenance BMW Car maintenance Audi Car maintenance Opel Car maintenance AvtoVAZ
VWmanual.ru


Main   Passat   Golf   Polo   Touareg   Tiguan   Sharan   Transporter   Others  
Golf 1 (1974-1984, diesel) Golf 1 (1974-1984, petrol) Golf 2 (1984-1993, petrol) Golf 2 (1984-1993) Golf 3 (1991-1997) Golf 4 (1997-2004) Golf 5 (2003-2008)

Replacing the shock absorber and spring (VW Golf 1)

  • Main
  • Golf
  • Golf 1
  • Chassis
  • Suspension and wheels
  • Replacing the shock absorber and spring
            0


To replace the shock absorber and spring, you will need a device for compressing the coil spring. You need to have at least two such devices. Without using such devices, there is a risk that the parts will explode apart after disconnecting the central fixing screw. This can lead to injury! The fact is that the coil spring is installed with high tension. Disassembling the shock absorber is associated with a certain problem. This difficulty is created by the threaded cover in the shock absorber strut housing. The cover does not have an external hexagon, its splined nut can only be unscrewed with a special tool. Extra long pliers can serve as an auxiliary tool.

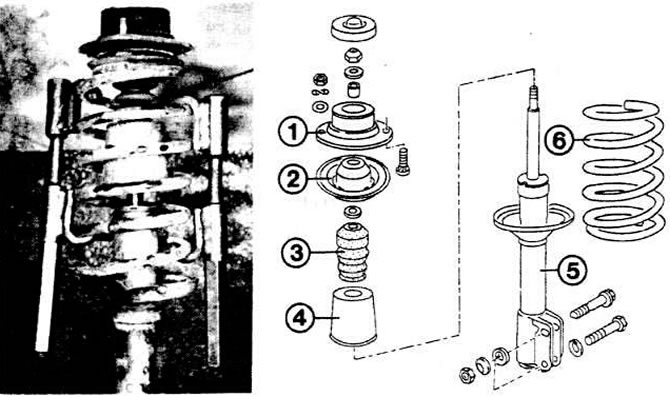
The left illustration shows two spring tensioning devices. They are attached to the front coil…

The left illustration shows two spring tensioning devices. They are attached to the front coil spring.

On the right are shown individual parts of the front shock absorber: 1 - shock absorber support: 2 - upper spring support washer; 3 - stop buffer, 4 - safety cover; 5 - damper (shock absorber); 6 - coil spring.


When installing, you should install a new threaded cover. But it is better to replace the entire shock absorber housing as a set.


Remove the shock absorber strut.

Fix, that is, compress the coil spring.

Unscrew the self-locking nut SW 22 from above; at the same time, use a SW 22 Allen key to hold the shock absorber piston rod.

Remove the parts and arrange them in order.

Slowly release the compression of the coil spring.

Remove the rubber stop and the shock absorber cover.

Unscrew the threaded cap.

Remove the piston and piston rod from the shock absorber housing.

Pour the shock absorber fluid from the housing into the used oil.

After the new shock absorber piston is inserted, tighten the threaded cap to a torque of 150 Nm, which is impossible to do without a special tool.

After installing the cover and rubber buffer, compress the coil spring again, then install the shock absorber support together with its parts.

In the case of the shock absorber strut of the previous design, the damping ring must be inserted between the upper and lower parts of the shock absorber strut support. Talc is added during installation.

Instructions


In the early years of car models, coil springs often broke. Often the cause was a damaged layer of varnish coating on the spring. When you install a used spring, be sure to check the protective coating.

If you hear a cracking sound in the coil springs, it means that their coils are touching. Therefore, it is recommended to stretch special pieces of protective hoses on the ends of the spring when the spring is in a dismantled state.

The original can be viewed on the portal: VWManual.ru

If you are installing used parts, they must be from an identical model. After all, there are some differences between the Golf and Jetta models. The coil springs are marked with colored lines, which you can still see on the old spring. Then, when looking for a replacement spring, find one that is similar to the old one. The heavy diesel model has more powerful springs compared to the carburetor car.

This article is available at russian, bulgarian, belarusian, ukrainian, serbian, croatian, romanian, polish, slovak, hungarian
The text has been checked: Medvedeva Elena

Share information:

Previous articles
Removal the chassis shock absorber strut
Replacing the ball joint
Replacing the triangular suspension arm
Dismantling the stabilizer
Disassembling the front wheel suspension
Installing the shock absorber strut on the supports
Next articles
Wheel angle adjustment
Signs of improper wheel installation
Measuring angles when installing wheels
Replacing the rear shock absorber
Replacing the rear shock absorber and coil spring
Replacing the rear axle


Similar articles from other manuals for VW cars:
Removal and installation the shock absorber with suspension… Passat B2 (1981-1988)
Shock absorber/ shock absorber/ coil spring Polo 4 (2001-2009)
Removal and installation the shock absorber strut Touareg 1 (2002-2006)
Shock absorber and coil spring Tiguan 1 (2007-2015)
Coil spring and shock absorber Sharan 1 (1995-2000)
Rear shock absorber coil spring Transporter T4 (1990-2003)
Front suspension brake components on shock absorber struts Beetle (1960-1986)
Link to this page in different formats


Visitor comments


No comments yet


How much will 23 + 36 =


Golf 5 
  • General information
  • User manual
  • Maintenance
  • Troubleshooting
  • Power unit
  • Engine repair
  • Cooling and ventilation system
  • Fuel system
  • Ignition system
  • Transmission
  • Clutch
  • Mechanical gearbox
  • Automatic gearbox
  • Chassis
  • Brake system
  • Car suspension
  • Steering
  • Body
  • Interior (internal elements)
  • Exterior (external elements)
  • Doors and covers
  • Electrical equipment
  • Power devices
  • Washers and wipers
  • Lighting and appliances
  • Electrical circuits
Golf 4 
  • General information
  • User manual
  • Weekly checks
  • Maintenance
  • Power unit
  • Petrol engines
  • Diesel engines
  • Cooling system
  • Fuel system (petrol)
  • Control system (petrol)
  • Fuel system (diesel)
  • Exhaust system
  • Transmission
  • Clutch
  • Car gearbox
  • Drive shafts
  • Chassis
  • Car suspension
  • Steering
  • Wheels and tires
  • Brake system
  • Body
  • Exterior (external elements)
  • Interior (internal elements)
  • Ventilation and heating
  • Car doors and sunroof
  • Washers and glass cleaners
  • Electrical equipment
  • Power devices
  • Lighting and appliances
  • Electrical circuits
Golf 3 
  • Petrol engine
  • Engine repair
  • Lubrication system
  • Cooling system
  • Ignition system
  • Diesel engine
  • Engine repair
  • Diesel injection system
  • Pre-glow system
  • Transmission
  • Clutch
  • Gearbox and drive shafts
  • Chassis
  • Steering
  • Wheels and suspension
  • Brake system
  • Electrical equipment
  • Lighting and appliances
  • Electrical circuits
Golf 2 
  • General information
  • Introduction to guide
  • User manual
  • Petrol engines 1.3 l
  • Engine repair
  • Lubrication system
  • Cooling system
  • Carburetors
  • Supply system
  • Ignition system
  • Petrol engines 1.6/1.8 l
  • Engine repair
  • Supply system
  • Ignition system
  • Diesel engines
  • Engine repair
  • Lubrication system
  • Cooling system
  • Power and exhaust system
  • Transmission
  • Clutch
  • 4-speed gearbox 084
  • 5-speed gearbox 085
  • 4-speed gearbox 020/4R
  • 5-speed gearbox 020/4T
  • Automatic gearbox
  • Drive shafts
  • Chassis
  • Steering
  • Car suspension
  • Brake system
  • Body
  • Body elements
  • Doors, locks and windows
  • Electrical equipment
  • Equipment and devices
  • Power devices
Golf 2 (petrol) 
  • General information
  • Characteristics
  • Car care
  • Maintenance
  • Power unit
  • Engine repair
  • Engine 1.05/1.30
  • Engine 1.60/1.80
  • Cooling and lubrication system
  • Power and exhaust system
  • Transmission
  • Clutch
  • Car gearbox
  • Drive shafts
  • Chassis
  • Brake system
  • Steering
  • Suspension
  • Body
  • Body and equipment
  • Electrical equipment
  • Lighting and appliances
  • Electrical circuits
Golf 1 (petrol) 
  • General information
  • Characteristics
  • User manual
  • Maintenance
  • Power unit
  • Engine adjustment
  • Engine 1.1/1.3
  • Engine 1.5/1.6/1.8
  • Engine electrical equipment
  • Cooling system
  • Fuel system
  • Transmission
  • Clutch and manual gearbox
  • Automatic gearbox
  • Chassis
  • Steering
  • Front suspension
  • Rear suspension
  • Brake system
  • Electrical equipment
  • Lighting and appliances
  • Electrical circuits
  • Body
  • Body and equipment
  • Optional equipment
Golf 1 (diesel) 
  • General information
  • Specifications
  • Maintenance
  • Power unit
  • Engine repair
  • Exhaust and turbocharger
  • Cooling system
  • Fuel system
  • Fuel injection system
  • Transmission
  • Clutch and drive shafts
  • Car gearbox
  • Chassis
  • Suspension and wheels
  • Steering
  • Brake system
  • Wheels and tires
  • Body
  • Heating and ventilation
  • Exterior (external elements)
  • Interior (internal elements)
  • Doors and windows
  • Electrical equipment
  • Equipment and devices
  • Lighting system
  • Power devices
  • Electrical circuits
VWmanual.ru © 2016-2026 | Mobile version | News and articles | Sitemap: EN BG BY UA RS HR RO PL SK HU | Write message | Site search
Passat B2 • Passat B3 • Passat B4 • Passat B5 • Passat B6 • Golf 1, diesel • Golf 1, petrol • Golf 2, petrol • Golf 2 • Golf 3 • Golf 4 • Golf 5 • Polo 3 • Polo 4 • Touareg 1 • Tiguan 1 • Sharan 1 • Transporter T3 • Transporter T4 • LT 28 • LT 2D • Beetle • Caddy 3 •
Our website uses cookies to ensure functionality and convenience.