
Gas-filled shock absorbers are installed on all vehicles. Shock absorbers can be replaced separately from the rest of the suspension.
To replace a spring or shock absorber:
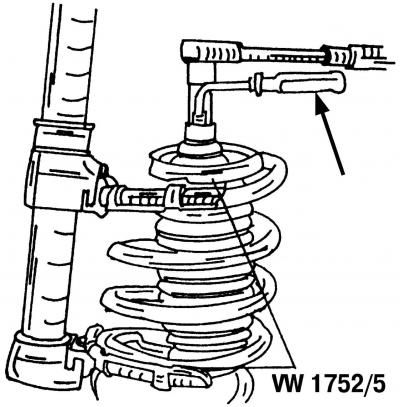
Pic. 288. The helical spring is compressed with the VW1752/5 spring compression tool. Shows how to remove the nut
- compress the suspension spring with a tool that should take all the spring force. There are several options for the spring compression tool, one of them is shown in fig. 288. If staples are used to compress the spring, then wind on them at least 4-5 turns of wire;
- remove the nut in the center of the top strut mount. Since the piston rod can rotate at the same time, insert a 7 mm hexagon into the end of the piston rod and, while holding the piston rod, unscrew the nut with a wrench;
- remove the upper support of the shock absorber strut and remove the bearing located under it;
- remove the coil spring. If you do not plan to change the spring, then leave the tensioner on it;
- remove the protective cover and remove the rubber buffer;
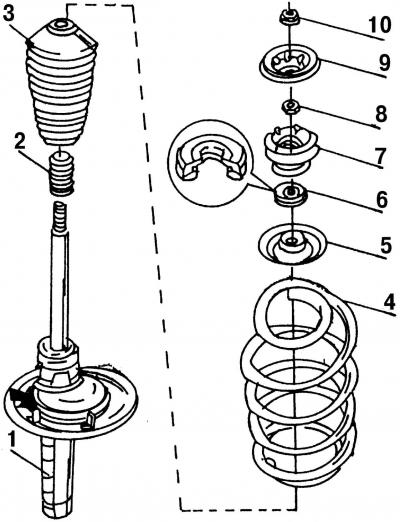
Pic. 287. Shock absorber strut: 1 - shock absorber; 2 - rubber buffer; 3 - protective cover; 4 - helical spring; 5 - upper support cup of the spring; 6 - thrust bearing; 7 - nut, 60 Nm; 8 - nut, 60 Nm; 9 - rubber buffer; 10 - nut, 60 Nm
- check the quality of the shock absorber. To do this, insert the lower end of the shock absorber into a vise and pull out the piston rod, and then insert it again. The resistance should be the same throughout the entire stroke of the shock absorber. Assembly is carried out in the reverse order of the disassembly process. Install removed parts (pic. 287). Pay special attention to the correct installation of the support bearing. Also pay attention to the correct installation of the end of the coils of the spring, which should be adjacent to the limiter in the lower support cup of the spring (arrow on shock absorber). While holding the piston rod stationary with a hexagon, tighten the strut mounting nut to 60 Nm.
Visitor comments