English Русский
Български
Беларускі
Український
Српски
Hrvatski
Română
Polski
Slovenský
Magyar
  |  Articles  |  Sitemap  |  Contacts  |    |
Car maintenance Ford Car maintenance Hyundai Car maintenance Chevrolet Car maintenance BMW Car maintenance Audi Car maintenance Opel Car maintenance AvtoVAZ
VWmanual.ru


Main   Passat   Golf   Polo   Touareg   Tiguan   Sharan   Transporter   Others  
Sharan 1 (1995-2000)

Trailing arm / suspension springs (VW Sharan 1)

  • Main
  • Sharan
  • Sharan 1
  • Chassis
  • Car suspension
  • Trailing arm / suspension springs
            0


When removing the longitudinal arm, the coil spring is also removed:
  • place the rear of the car on stands and remove the rear wheels;

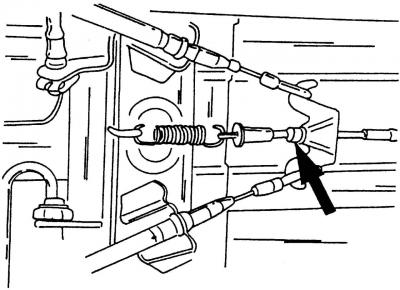
Fig. 305. Bottom view of the parking brake equalizer lever. After loosening the lock nut (shown by…

Fig. 305. Bottom view of the parking brake equalizer lever. After loosening the lock nut (shown by arrow) you can loosen the tension of the parking brake cable

  • loosen the lock nut (Fig. 305) on the bottom of the machine and unscrew the adjusting nut so that the equalizer holding the parking brake cables comes away and the cables themselves become loose;
  • remove the ABS speed sensor (see section "Brake system").
  • disconnect the parking brake cables from the brake mechanism brackets. To do this, remove the spring clamp and unhook the end of the cable from the lever;
  • disconnect the connections of the brake lines and brake hoses (see subsection 14.1);
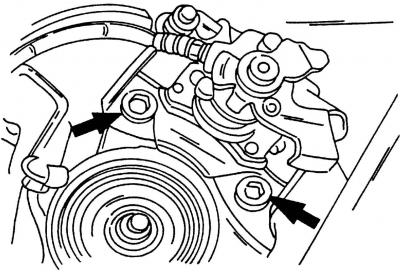
Fig. 299. Two bolts secure the disc brake bracket (disc brake caliper) to the wheel hub beam

Fig. 299. Two bolts secure the disc brake bracket (disc brake caliper) to the wheel hub beam


  • remove the brake mechanism bracket (Fig. 299);

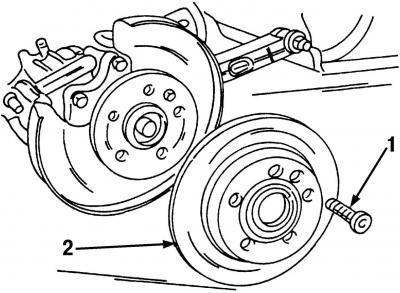
Fig. 306. Brake disc fastening: 1 - bolt; 2 - disk

Fig. 306. Brake disc fastening: 1 - bolt; 2 - disk


The original material is available on the portal: www.VWMANUAL.ru
  • remove the brake disc (Fig. 306). Thoroughly clean the working surfaces of the brake disc and wheel hub;
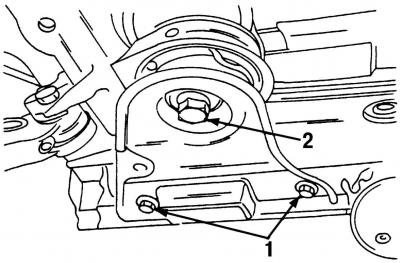
Fig. 301. Rear suspension mounting: 1 - support plate; 2 - the bottom of the car

Fig. 301. Rear suspension mounting: 1 - support plate; 2 - the bottom of the car

  • remove the anti-roll bar (Fig. 301);
  • place a jack under the longitudinal arm, lift it so that the shock absorber is slightly compressed, and remove the lower shock absorber mount;
  • lower the jack and remove the rear spring (the operation is performed by two people);

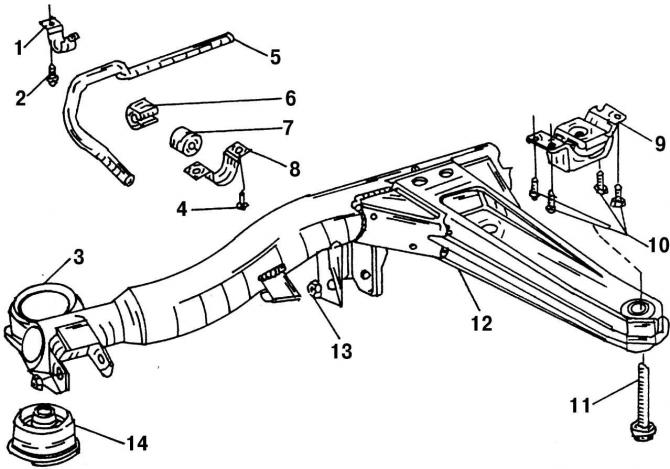
Fig. 304. Fastening the rear suspension wishbone and anti-roll bar: 1 - anti-roll bar mounting…

Fig. 304. Fastening the rear suspension wishbone and anti-roll bar: 1 - anti-roll bar mounting bracket; 2 - bolt, 30 Nm; 3 - rear suspension wishbone; 4 - bolt, 30 Nm; 5 - anti-roll bar; 6 - rubber support; 7 - rubber support; 8 - stabilizer bar clamp; 9 - suspension support; 10 - bolts, 65 Nm; 11 - bolt, 260 Nm; 12 - crossbar; 13 - nut, 170 Nm; 14 - rubber-metal support

  • remove the trailing arm from the inside (the mounting locations are shown in Fig. 304).

The installation of the longitudinal arm is carried out in the reverse order of the removal process.

This article is available at russian, bulgarian, belarusian, ukrainian, serbian, croatian, romanian, polish, slovak, hungarian
The text has been checked: Tarasov Ivan

Share information:

Previous articles
Removal and installation the rear suspension
Rear suspension — design description
Adjusting the front wheel alignment angles
Anti-roll bar
Removal and installation transverse arms
Replacing wheel bearings
Next articles
Removal and installation shock absorbers
Rear wheel bearings


Similar articles from other manuals for VW cars:
Removal and installation of telescopic struts and springs of the… Passat B4 (1988-1996)
Suspension data Golf 1 (1974-1984, petrol)
Rear suspension of Classic, Estate cars Polo 3 (1995-2003)
Using air suspension Touareg 1 (2002-2006)
Parts and units of the hub bearing housing and trailing arm Tiguan 1 (2007-2015)
Front suspension — design description Transporter T4 (1990-2003)
Front wheel suspension — design description Caddy 3 (2003-2010)
Link to this page in different formats


Visitor comments


No comments yet


How much will 19 + 19 =


Sharan 1 
  • General information
  • Introduction to guide
  • Maintenance
  • Petrol engines
  • Engine repair 2.8 l (AAA)
  • Engine repair 2.0 l (ADY)
  • Lubrication system
  • Cooling system
  • Fuel injection system
  • Ignition system
  • Diesel engines
  • Engine repair
  • Lubrication system
  • Cooling system
  • Supply system
  • Transmission
  • Clutch
  • Manual gearbox and shafts
  • Chassis
  • Steering
  • Car suspension
  • Brake system
  • Electrical equipment
  • Equipment and devices
  • Power devices
  • Electrical circuits
VWmanual.ru © 2016-2026 | Mobile version | News and articles | Sitemap: EN BG BY UA RS HR RO PL SK HU | Write message | Site search
Passat B2 • Passat B3 • Passat B4 • Passat B5 • Passat B6 • Golf 1, diesel • Golf 1, petrol • Golf 2, petrol • Golf 2 • Golf 3 • Golf 4 • Golf 5 • Polo 3 • Polo 4 • Touareg 1 • Tiguan 1 • Sharan 1 • Transporter T3 • Transporter T4 • LT 28 • LT 2D • Beetle • Caddy 3 •
Our website uses cookies to ensure functionality and convenience.