
Ride height adjustment
NOTE: Ride height adjustment makes it possible to change the height of the vehicle's chassis above the roadway.
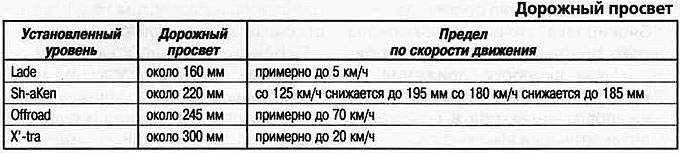
Four chassis levels can be selected (Lade, StraKen, Offroad and X'tra). With all four different chassis settings on both axles, a constant vehicle height above the roadway is maintained depending on the load. Height sensors provide the system with data on the distance between the axles and the body. If the actual distance differs from the nominal value, the air pressure in the suspension is changed by means of the compressor and the receiver and the nominal value of the distance between the axles and the body for a given level is reached.
If using the key «LOCK» If the wheel change lift mode is activated and a hose is connected to the tire inflator, the ride height control is automatically deactivated.
When driving on normal roads, we recommend setting the ground clearance for normal roads to StraKen.
When one of the settings is selected, the corresponding pointer on the instrument panel starts flashing. The indicator stops flashing only when the set ground clearance is reached.
System action when a higher ground clearance is selected.
When the driver selects a higher ride height, the system checks whether there is enough compressed air in the reservoir to increase the ride height. If there is enough compressed air in the reservoir, the process of increasing the ride height takes a few seconds.
If the receiver is empty by the time a new ride height is selected, compressed air begins to flow into the air suspension from the compressor. This process can take several minutes and the duration depends on the operating temperature of the compressor. The fact is that the compressor, when the maximum allowable operating temperature is reached, automatically turns off and turns on again after it cools down.
The process of changing the ride height will not start when the message appears on the display «Air supply to the receiver». In this case, wait a few minutes and set the desired ride height again.
System action when lower ride height is selected
The transition to a lower ground clearance is carried out by releasing compressed air from the air springs.
The only exception is the transition to the Lade level. The lowering of the body to this level occurs only when the supply of compressed air in the receiver is sufficient for the subsequent transition to the StraKen level.
If the supply of compressed air is insufficient, the lowering of the body does not occur. The following message appears on the instrument panel display: «Air supply to the receiver».
Change in ground clearance (body level)
- 1. LOCK key. Speed limit up to 70 km/h with ground clearance Off road. Activate the vehicle lift mode to change the wheel.
- 2. Lade - constant and smallest ground clearance.
- 3. StraKen - ground clearance automatically adjusted depending on the speed of movement.
- 4. Offroad - ground clearance automatically adjusted depending on the speed.
- 5. X'tra - constant and the highest ground clearance.
- 6. Rotary switch for ride height selection.
To set the desired ride height, turn the rotary switch 6 (pic. 1.116) was not drowned. If it is recessed, press it. Set the required ground clearance and push the switch in.
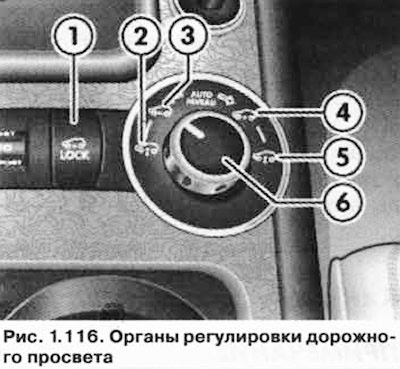
Switch 6 is fixed in positions 3 and 4. If you want to set level 2 or 5, turn the switch to the appropriate position. In these positions, the switch is not fixed. The selection of levels 2 or 5 can be canceled by turning the switch back to the same position.
The selected level is indicated by the illumination of the corresponding icon next to the switch.
In principle, the selection of any level is only possible if the speed limit for the selected ground clearance at the time of its setting is not exceeded (e.g. 5 km/h if the Lade level is selected or 20 km/h if the X'tra level is selected). Otherwise, the specified ride height setting will not occur. The message appears on the display: «Impossible».
Emergency stop
All processes of changing the ride height are immediately stopped, and the previous level is set if the ignition is turned off during the change in ride height.
The values given are valid for a stationary vehicle. When driving, these values may vary due to level control.
NOTE: While the pointer in the instrument cluster is flashing, the selected level has not yet been reached.
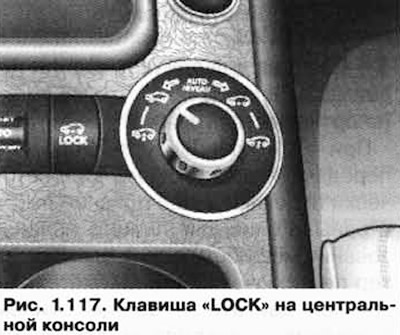
Key «LOCK»
NOTE: Key «LOCK» performs two functions: speed limiting and activation «lift the car to change the wheel».
To limit the speed, select the Offroad level.
Press key «LOCK» the maximum speed will be limited to approximately 70 km/h (pic. 1.117).
To activate lift the vehicle to change a wheel, stop the vehicle and apply the parking brake.
NOTE: Reduced speed limit value «LOW» transmission is set by the engine management system. The maximum speed limit is approximately 70 to 100 km/h.
Leave the ignition on.
Press and hold a key «LOCK» more than five seconds. Mode «lifting the car to change the wheel» is now activated.
Switch off the ignition.
The speed limit is implemented by the engine control unit and is only effective when the vehicle is moving at the set Offroad level.
After pressing the key «LOCK» it turns on the backlight, the maximum speed is limited to 70 km / h. If the car has been moving faster up to this point, the speed limit is not introduced, and the following message appears in the instrument panel: «Impossible».
The speed limit is entered only when the car at the set Offroad level began to move more slowly than 70 km/h and the key «LOCK» was pressed again. When this function is enabled, the vehicle cannot be lowered in off-road conditions. Pressing the key again removes the speed limit. In this case, the pressure on the gas pedal should be further reduced.
Speed limits help improve driving safety on bad roads. Switch off the speed limit before driving on normal roads.
At speeds above 65 km/h, the driver is reminded of the previously set speed limit by a warning signal and a corresponding pictogram on the display. If the speed limit function fails at speeds above approximately 78 km/h, a red icon appears on the display and three warning tones sound. When driving at speeds above approximately 80 km/h, the StraKen level is automatically set and the speed limit is lifted.
To activate the lift the vehicle to change a wheel mode, you must stop the vehicle and leave the ignition on. Then press the key «LOCK» and keep it pressed for more than five seconds. The active state of the vehicle lifting mode for wheel change is indicated by a message on the display and the indicator lamp in the button flashes «LOCK». After activating this mode, you can turn off the ignition.
When the wheel change lift mode is active, ride height adjustment is not possible to prevent the vehicle level from changing when the jack is placed under the vehicle. This maintains the previously set level. After changing a wheel with the ignition on, press and hold the button again «LOCK» more than five seconds, or drive faster than 5 km/h to reactivate ride height adjustment.
Characteristics of individual levels
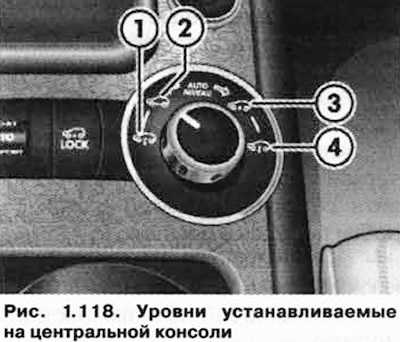
Level 1 (pic. 1.118) can only be installed when the vehicle is stationary or moving at walking speed. It is recommended to set this level when loading and unloading the luggage compartment. At the Lade level, the lowest ground clearance is achieved and maintained unchanged. If you turn off the ignition when the Lade level has not yet been reached, the previous level is set.
When driving at speeds above 5 km, it automatically switches to the StraKen level.
StraKen level 2 (standard installation) recommended for all normal roads. The ground clearance decreases or increases depending on the speed of travel. When reaching a speed of about 125 km/h, the ground clearance is reduced by about 25 mm. With a further increase in speed to a value of more than 180 km / h, the ground clearance is reduced by another 10 mm. When driving at speeds below 150 km/h for more than 15 seconds, the ground clearance increases.
By lowering the ride height when driving at high speeds, vehicle stability is increased, handling is improved and aerodynamic drag is reduced.
Offroad 3 adjustment is recommended when driving on bad roads and off-road. When this adjustment is activated, the highest ground clearance is first set, the value of which is subsequently adjusted depending on the speed. Speed-based ride height control does not take place when the corresponding button lights up.
The Offroad level is only saved at speeds up to 70 km/h. If the speed is higher, the StraKen level is automatically set. If you drive more than half a minute slower than 40 km/h, the Offroad level is automatically set again. to drive on bad roads with the Offroad level for a long time, you must activate the speed limit.
It is recommended to activate the speed limit when driving on bad roads. Thanks to this, it is possible to prevent a constant increase and decrease in ground clearance, and the ground clearance itself will correspond to the condition of the road.
When Offroad and X'tra levels are set, a bar with readings is constantly present on the display. It provides current information about the actual ground clearance of the vehicle.
Setting the X'tra level is recommended when driving over obstacles and when releasing a car that has landed on the ground, since this setting provides the greatest and constant ground clearance. X'tra mode should not be set permanently.
Always go to the next level when it is no longer necessary to have the highest possible ground clearance.
The X'tra level is only maintained up to a speed of 20 km/h. If you drive faster, it will automatically switch to the Offroad level.
NOTE: If a certain level is selected, but before reaching this level, turn off the ignition, the level that was previously set is set.
Visitor comments