



Automatic transmission 09D car Volkswagen Touareg 1

Checking the level and topping up ATF oil
NOTE: If the ATF circuit has been opened, first bleed the air from the ATF circuit. Only then check the ATF oil level and top up if necessary. NOTE: When using the old VAG 1924...
NOTE: If the ATF circuit has been opened, first bleed the air from the ATF circuit. Only then check the ATF oil level and top up if necessary. NOTE: When using the old VAG 1924...

Checking ATF level
Verification conditions The gearbox must not operate in emergency mode, the ATF temperature must not exceed 30°C. The car must be in a horizontal position. The selector is set to...
Verification conditions The gearbox must not operate in emergency mode, the ATF temperature must not exceed 30°C. The car must be in a horizontal position. The selector is set to...

Checking the torque converter
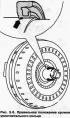
Check the torque converter hub for signs of wear (Fig. 3.4). NOTE: The torque converter is a non-separable unit (welded) and must be replaced if damaged. Removal the torque...
Check the torque converter hub for signs of wear (Fig. 3.4). NOTE: The torque converter is a non-separable unit (welded) and must be replaced if damaged. Removal the torque...

Pumping fluid out of the torque converter
If the ATF oil is contaminated with dust or if the gearbox is being overhauled, the fluid must be pumped out of the torque converter as follows. Pump out the ATF oil from the...
If the ATF oil is contaminated with dust or if the gearbox is being overhauled, the fluid must be pumped out of the torque converter as follows. Pump out the ATF oil from the...
Installing a torque converter
Lubricate the torque converter hub and the lips of the torque converter sealing ring with a drop of ATF (no more). Insert the torque converter into the gearbox until it stops....
Lubricate the torque converter hub and the lips of the torque converter sealing ring with a drop of ATF (no more). Insert the torque converter into the gearbox until it stops....

Gear shift drive repair
Fig. 3.7. Components of the gear shift drive: 1 - selector lever handle; 2 - bracket; 3 - decorative element; 4 - emblem; 5 - bushing; 6 - overlay; 7 - guide plate; 8 - frame; 9 -...
Fig. 3.7. Components of the gear shift drive: 1 - selector lever handle; 2 - bracket; 3 - decorative element; 4 - emblem; 5 - bushing; 6 - overlay; 7 - guide plate; 8 - frame; 9 -...

Removal and installation the selector handle
Removal The following sequence of actions must be followed in order to avoid damaging the selector handle. Remove the decorative cover (Fig. 3.8). Remove the bracket from the...
Removal The following sequence of actions must be followed in order to avoid damaging the selector handle. Remove the decorative cover (Fig. 3.8). Remove the bracket from the...

Checking and adjusting the selector rod
Examination Move the selector to position "P". Remove the sound insulation under the gearbox. Disconnect selector rod 2 from the gear selection lever/rod (Fig. 3.11). Shift the...
Examination Move the selector to position "P". Remove the sound insulation under the gearbox. Disconnect selector rod 2 from the gear selection lever/rod (Fig. 3.11). Shift the...

Removal and installation the selector rod
NOTE: If you secure the cord to the rod before removing it, the rod can be reinserted when reinstalling. Removal Remove the gear shift drive. Press the cuff forward out of the...
NOTE: If you secure the cord to the rod before removing it, the rod can be reinserted when reinstalling. Removal Remove the gear shift drive. Press the cuff forward out of the...

Removal and installation the overlay
Removal Remove the selector handle. It is essential to follow the sequence of disconnecting the battery. Disconnect the ground terminal from the battery with the ignition off....
Removal Remove the selector handle. It is essential to follow the sequence of disconnecting the battery. Disconnect the ground terminal from the battery with the ignition off....

Removal and installation the frame
Removal Remove the cover. Pull the latches on the left and right outward and pull the frame up (Fig. 3.16). Installation Installation is carried out in reverse order. Install the...
Removal Remove the cover. Pull the latches on the left and right outward and pull the frame up (Fig. 3.16). Installation Installation is carried out in reverse order. Install the...

Removal and installation the N380 selector lock solenoid
Removal Remove the gear shift drive. Unlock and disconnect the plug. Unlock the electromagnet in the mount and pull it up from the outside of the locking lever 1 and gear shift...
Removal Remove the gear shift drive. Unlock and disconnect the plug. Unlock the electromagnet in the mount and pull it up from the outside of the locking lever 1 and gear shift...

Removal and installation the N110 selector lock solenoid
Removal Remove the gear shift drive. Unlock and disconnect the plug connection. Unlock the electromagnet in the mount and remove it from the locking lever 1 and the gear shift...
Removal Remove the gear shift drive. Unlock and disconnect the plug connection. Unlock the electromagnet in the mount and remove it from the locking lever 1 and the gear shift...

Removal and installation the selector switch (lever locked in position «P») F319
NOTE: Tiptronic switch-F189 - is integrated into the wiring harness of the two solenoids. Removal Remove the selector handle. It is essential to follow the sequence of...
NOTE: Tiptronic switch-F189 - is integrated into the wiring harness of the two solenoids. Removal Remove the selector handle. It is essential to follow the sequence of...

Removal and installation the gear shift drive
Removal Remove the selector handle. Pull the rod up and switch the selector to the "S" position. It is essential to follow the sequence of disconnecting the battery. Disconnect...
Removal Remove the selector handle. Pull the rod up and switch the selector to the "S" position. It is essential to follow the sequence of disconnecting the battery. Disconnect...

Removal and installation of gearbox, cars with diesel engine R5
Brief description In these vehicles, the gearbox can be removed separately downwards. The engine remains installed in the vehicle. For Touaregs with any engine variant, it is...
Brief description In these vehicles, the gearbox can be removed separately downwards. The engine remains installed in the vehicle. For Touaregs with any engine variant, it is...

Removal and installation of gearbox, cars with petrol engines V6 and V8
NOTE: Vehicles with V6 and V8 petrol engines, V6 TDI, V10 TDI turbodiesel engines and W12 petrol engine. Brief description The 09D automatic transmission is removed together with...
NOTE: Vehicles with V6 and V8 petrol engines, V6 TDI, V10 TDI turbodiesel engines and W12 petrol engine. Brief description The 09D automatic transmission is removed together with...

Removal and installation of ATF lines and radiator
Cleaning of ATF lines and radiator If the ATF is contaminated or before installing a new transmission, blow out the radiator and ATF lines with compressed air (max 10 bar)....
Cleaning of ATF lines and radiator If the ATF is contaminated or before installing a new transmission, blow out the radiator and ATF lines with compressed air (max 10 bar)....

Removal and installation the automatic transmission control unit J217
Removal Before removing the automatic transmission control unit J217, the identification data of the control units and the coding of the old control unit must first be requested....
Removal Before removing the automatic transmission control unit J217, the identification data of the control units and the coding of the old control unit must first be requested....

Replacing the secondary shaft seal ring
Removal Remove the transfer case. To remove the sealing ring, screw a self-tapping screw with a diameter of about 4 mm into the sealing ring. Tighten the screw so that it is...
Removal Remove the transfer case. To remove the sealing ring, screw a self-tapping screw with a diameter of about 4 mm into the sealing ring. Tighten the screw so that it is...

Removal and installation the oil pan
Removal Remove the gearbox sound insulation. Place the VA G 1306 tray underneath. Remove oil drain hole bolt 1 (Fig. 3.69). Drain the ATF oil. Loosen the oil pan bolts 1 in a...
Removal Remove the gearbox sound insulation. Place the VA G 1306 tray underneath. Remove oil drain hole bolt 1 (Fig. 3.69). Drain the ATF oil. Loosen the oil pan bolts 1 in a...

Removal and installation a mesh oil filter
Removal Remove the oil pan. Remove the bolts (Fig. 3.71). Remove the mesh oil filter. Installation Install a new gasket 1 on the suction flange of the mesh oil filter 2 and...
Removal Remove the oil pan. Remove the bolts (Fig. 3.71). Remove the mesh oil filter. Installation Install a new gasket 1 on the suction flange of the mesh oil filter 2 and...

Removal and installation the pressure sensor for hydraulic system 1 in automatic transmission G193 and hydraulic system 2 in automatic transmission G194
NOTE: Always replace sensors together. Removal If this operation has not yet been performed, remove the oil pan and mesh oil filter. Carefully disconnect the plugs of the...
NOTE: Always replace sensors together. Removal If this operation has not yet been performed, remove the oil pan and mesh oil filter. Carefully disconnect the plugs of the...

Removal and installation the valve box
Fig. 3.74. Components of the valve box: 1 - electromagnetic valve 2; 2 - plug connection of the gearbox output shaft speed sensor; 3 - pressure sensor for hydraulic system 2 in...
Fig. 3.74. Components of the valve box: 1 - electromagnetic valve 2; 2 - plug connection of the gearbox output shaft speed sensor; 3 - pressure sensor for hydraulic system 2 in...

Removal, installation and adjustment of the multi-function switch F125
Removal NOTE: For clarity, this process is shown with the gearbox removed. Move the selector to position "P". Unscrew the cap nut 4. Remove cover 3 from the gear selection rod....
Removal NOTE: For clarity, this process is shown with the gearbox removed. Move the selector to position "P". Unscrew the cap nut 4. Remove cover 3 from the gear selection rod....
This section is available on russian, bulgarian, belarusian, ukrainian, serbian, croatian, romanian, polish, slovak, hungarian
Similar sections from other manuals for VW cars:
Transmission: Automatic gearbox Volkswagen Passat B6 (2005-2010)
Transmission: Automatic gearbox Volkswagen Golf 1 (1974-1984, petrol)
Transmission: 6-speed automatic gearbox 09M Volkswagen Tiguan 1 (2007-2015)
Transmission: Automatic gearbox Volkswagen Passat B6 (2005-2010)
Transmission: Automatic gearbox Volkswagen Golf 1 (1974-1984, petrol)
Transmission: 6-speed automatic gearbox 09M Volkswagen Tiguan 1 (2007-2015)
Touareg 1
- General information
- Vehicle device
- Controls and instruments
- Seats and safety
- Maintenance and management
- Power unit
- Engine checks
- Petrol engine 3.2L
- Petrol engine 4.2L
- Diesel engine 5.0L
- Cooling system
- Lubrication system
- Injection system
- Exhaust system
- Fuel supply system
- Transmission
- Automatic gearbox 09D
- Mechanical gearbox 08D
- Cardan shaft
- Chassis
- Wheels and tires
- Front suspension
- Rear suspension
- Steering gear
- Brake system
- Body
- Outdoor elements
- Electrical equipment
- Battery
- Generator and starter
- Instruments and wipers