
Electrical equipment and devices of car Volkswagen Touareg 1

Removal and installation of a combination of devices
Removing NOTE: It is not necessary to remove the steering wheel. However, for clarity, the steering wheel is not shown in the following figures. Place the steering column with...
Removing NOTE: It is not necessary to remove the steering wheel. However, for clarity, the steering wheel is not shown in the following figures. Place the steering column with...

Arrangement of contacts of sockets of a combination of devices
NOTE: The location of the pins of the instrument cluster connectors depends on the vehicle equipment, engine type and country of destination. Connector, 32-pin, blue Pic. 7.75....
NOTE: The location of the pins of the instrument cluster connectors depends on the vehicle equipment, engine type and country of destination. Connector, 32-pin, blue Pic. 7.75....

Front wiper
NOTE: The operation of the front wiper can be tested using the Final Element Diagnostic on the onboard power supply control unit J400. General description NOTE: Hood (Bonnet...
NOTE: The operation of the front wiper can be tested using the Final Element Diagnostic on the onboard power supply control unit J400. General description NOTE: Hood (Bonnet...

Removing the wiper arm from the driver's side
Remove the cap by carefully prying it off with a screwdriver (pic. 7.77). Loosen but do not completely unscrew the fixing nuts (pic. 7.78). Slightly rock the wiper arm to move it...
Remove the cap by carefully prying it off with a screwdriver (pic. 7.77). Loosen but do not completely unscrew the fixing nuts (pic. 7.78). Slightly rock the wiper arm to move it...

Removing the wiper arm on the passenger side
NOTE: The drive is carried out only on the crank shown in the figure on the right. Removing Turn off a fixing nut of 1 axis of a leader of a screen wiper. Unscrew the fixing nut 2...
NOTE: The drive is carried out only on the crank shown in the figure on the right. Removing Turn off a fixing nut of 1 axis of a leader of a screen wiper. Unscrew the fixing nut 2...

Removing the plenum box cover
Open the cover latches by turning them 90° (pic. 7.81.). Carefully lift cover 1 slightly so that you can disconnect the air quality sensor connector. Remove the cover. NOTE: The...
Open the cover latches by turning them 90° (pic. 7.81.). Carefully lift cover 1 slightly so that you can disconnect the air quality sensor connector. Remove the cover. NOTE: The...

Removing the wiper trapezoid with rods and the wiper motor V
Remove the M6 hexagon socket head screw 1 and remove the washer (pic. 7.82). Remove hex bolts 1 (pic. 7.83). Unlock the cable holder 1 from the wiper trapezoid (pic. 7.84)....
Remove the M6 hexagon socket head screw 1 and remove the washer (pic. 7.82). Remove hex bolts 1 (pic. 7.83). Unlock the cable holder 1 from the wiper trapezoid (pic. 7.84)....
Installation of wiper trapezium with rods and wiper motor V
Connect battery. Reset the wiper motor V by connecting the plug to the wiper motor and briefly pressing the wiper switch. NOTE: Hood (Bonnet contact switch F266) must be closed to...
Connect battery. Reset the wiper motor V by connecting the plug to the wiper motor and briefly pressing the wiper switch. NOTE: Hood (Bonnet contact switch F266) must be closed to...
Installing the plenum box cover
Install the plenum box cover in reverse order. Installing wiper arms Install driver side and passenger side leashes on their shafts. Slightly tighten the fixing nut on the drive...
Install the plenum box cover in reverse order. Installing wiper arms Install driver side and passenger side leashes on their shafts. Slightly tighten the fixing nut on the drive...

Setting the initial position of the wiper blades
Driver's side Distance A between the rubber of the brush and the lower edge of the windshield must be 44 mm. Distance B between the brush rubber and the lower edge of the...
Driver's side Distance A between the rubber of the brush and the lower edge of the windshield must be 44 mm. Distance B between the brush rubber and the lower edge of the...

Removal and installation of a screen wiper «aero»
Removing NOTE: Do not interchange driver and passenger side wiper blades when installing. NOTE: Chaero brushes» very flexible, to lift the wipers off the windshield, take them...
Removing NOTE: Do not interchange driver and passenger side wiper blades when installing. NOTE: Chaero brushes» very flexible, to lift the wipers off the windshield, take them...

Removal and installation of headlights
Pic. 7.88. Headlight components: 1 - left headlight corrector servo or right headlight corrector servo; 2 - fixing bolts; 3 - cap; 4 - left low beam lamp or right low beam lamp; 5...
Pic. 7.88. Headlight components: 1 - left headlight corrector servo or right headlight corrector servo; 2 - fixing bolts; 3 - cap; 4 - left low beam lamp or right low beam lamp; 5...

Headlight adjustment
NOTE: The illustrations show the left headlight. If, when checking the position of the headlight after installation, uneven gaps between the headlight and the body are found, it...
NOTE: The illustrations show the left headlight. If, when checking the position of the headlight after installation, uneven gaps between the headlight and the body are found, it...

Removal and installation of the headlight range control servo
NOTE: When removing, installing or replacing corrector servos, check (adjust if necessary) headlight setting. The figures show the replacement of the corrector servo lamp on the...
NOTE: When removing, installing or replacing corrector servos, check (adjust if necessary) headlight setting. The figures show the replacement of the corrector servo lamp on the...
Main headlights with gas discharge lamps
NOTE: Auto-levelling headlights with gas discharge lamps are equipped with a self-diagnostic function. When carrying out repair work, it is necessary to know how lighting...
NOTE: Auto-levelling headlights with gas discharge lamps are equipped with a self-diagnostic function. When carrying out repair work, it is necessary to know how lighting...
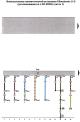
Climatronic air conditioner wiring diagram
Climatronic 2-C air conditioning system wiring diagram (installed from 05.2005).
Climatronic 2-C air conditioning system wiring diagram (installed from 05.2005).
This section is available on russian, bulgarian, belarusian, ukrainian, serbian, croatian, romanian, polish, slovak, hungarian
Similar sections from other manuals for VW cars:
Electrical equipment: Lighting and appliances Volkswagen Passat B5 (1996-2005)
Electrical equipment: Equipment and devices Volkswagen Golf 2 (1984-1993)
Electrical equipment: Equipment and devices Volkswagen Polo 4 (2001-2009)
Electrical equipment: Appliances and lighting Volkswagen Tiguan 1 (2007-2015)
Electrical equipment: Equipment and devices Volkswagen Sharan 1 (1995-2000)
Electrical equipment: Equipment and devices Volkswagen Transporter T4 (1990-2003)
Electrical equipment: Equipment and devices Volkswagen Beetle (1960-1986)
Touareg 1
- General information
- Vehicle device
- Controls and instruments
- Seats and safety
- Maintenance and management
- Power unit
- Engine checks
- Petrol engine 3.2L
- Petrol engine 4.2L
- Diesel engine 5.0L
- Cooling system
- Lubrication system
- Injection system
- Exhaust system
- Fuel supply system
- Transmission
- Automatic gearbox 09D
- Mechanical gearbox 08D
- Cardan shaft
- Chassis
- Wheels and tires
- Front suspension
- Rear suspension
- Steering gear
- Brake system
- Body
- Outdoor elements
- Electrical equipment
- Battery
- Generator and starter
- Instruments and wipers
VWmanual.ru © 2016-2024 | Mobile version | News and articles | Sitemap: EN BG BY UA RS HR RO PL SK HU | Write message | Site search
Passat B2 • Passat B3 • Passat B4 • Passat B5 • Passat B6 • Golf 1, diesel • Golf 1, petrol • Golf 2, petrol • Golf 2 • Golf 3 • Golf 4 • Golf 5 • Polo 3 • Polo 4 • Touareg 1 • Tiguan 1 • Sharan 1 • Transporter T3 • Transporter T4 • Beetle • Caddy 3 •
Passat B2 • Passat B3 • Passat B4 • Passat B5 • Passat B6 • Golf 1, diesel • Golf 1, petrol • Golf 2, petrol • Golf 2 • Golf 3 • Golf 4 • Golf 5 • Polo 3 • Polo 4 • Touareg 1 • Tiguan 1 • Sharan 1 • Transporter T3 • Transporter T4 • Beetle • Caddy 3 •