
Flange removal
Remove poly V-belt.
Remove toothed belt
Then slightly turn the crankshaft back.
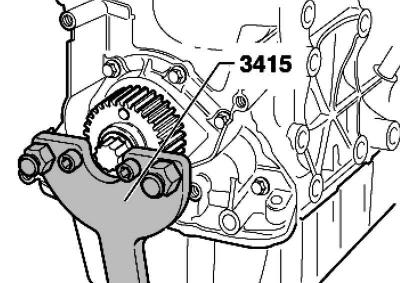
Pic. 2.138. Fixing the crankshaft sprocket
Remove the crankshaft sprocket. To do this, secure the crankshaft gear with a counterhold (pic. 2.138).
Remove the oil pan.
BLX, BLY, BLR, BVX, BVY, BVZ engines
Unscrew the front sealing flange.
Remove the sealing flange, if necessary, dismantle it by lightly tapping with a rubber mallet.
Remove any remaining sealant on the cylinder block with a flat scraper.
Cover the seal with a clean rag.
Note: If the O-ring needs to be replaced, it must be removed.
Remove sealant residues on the sealing flange using a drill with a plastic bristle brush attachment (wear safety goggles).
Clean the seating surfaces. They must be free of oil and grease.
Flange installation
Cut off the tip of the tube at the front mark (W hole about 3mm).
Apply a bead of sealant, approximately 2-3 mm thick, to the clean seating surface of the flange.
Note: The sealant bead should not be thicker than 2-3 mm, otherwise excess sealant may enter the oil pan and clog the strainer in the oil pickup pipe.
Note: Observe the expiration date of the sealant.
Note: The sealing flange must be installed within 5 minutes of applying the silicone sealant.
Use a guide bush to mount the sealing flange with the sealing ring installed.
Allow the sealant to dry for approximately 30 minutes after installation. Only then can you fill in engine oil.
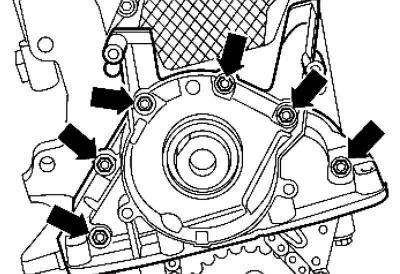
Pic. 2.143. Flange mounting bolts
Immediately press on the sealing flange and lightly tighten all bolts (pic. 2.143).
Tighten the fixing bolts of the sealing flange «cross to cross». Tightening torque 15 Nm.
Remove excess sealant.
Install the oil pan.
BLX, BLY, BLR, BVX, BVY, BVZ engines
Install the O-ring if necessary.
The mating surfaces between the toothed belt drive gear and the crankshaft must be free of oil.
The center bolt must be replaced.
The thread and collar must be free of oil and grease.
Install the crankshaft gear and secure it with a counterhold.
Tighten the new bolt to 90 Nm and tighten it 90° (1/4 turn) (turning can be carried out in several stages).
Further installation and assembly is carried out in the reverse order of removal.
Visitor comments