
Removing the camshafts
Remove the phase shifter.
Note: The lower seating surface of the camshaft frame and the upper cylinder head must not be machined.
Note: The camshaft bearings are integrated into the cylinder head and camshaft frame. Before removing the camshaft frame, the toothed belt must be loosened.
Note: After unscrewing the camshaft frame, be sure to replace the camshaft oil seal and cover.
Remove the toothed belt.

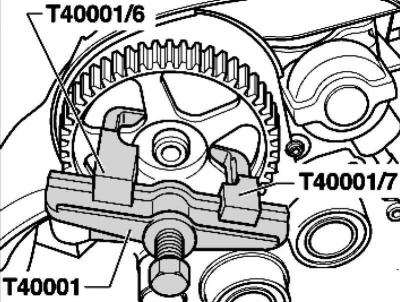
Pic. 2.112. Unscrewing the camshaft gear
Loosen the camshaft gear (use counterhold to secure) (pic. 2.112).
Pic. 2.113. Gear removal
Remove the camshaft gear with a puller, paw (pic. 2.113).
Unscrew the rear timing belt cover from the cylinder head.
Unscrew the camshaft frame mounting bolts evenly from the edges to the center and remove the frame.
Carefully lift the camshafts up and lay them on a clean pad.
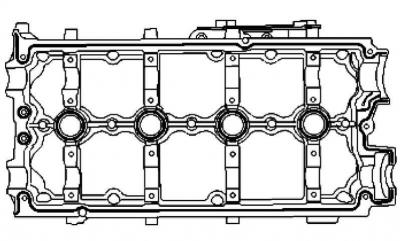
Pic. 2.114. Sealant laying scheme
Remove the old sealant from the groove of the camshaft frame, as well as from the seating surfaces (pic. 2.114).
Keep dirt and sealant residues out of the cylinder head.
Installation of camshafts
Lubricate the running surfaces of the camshafts with engine oil.
Note: The seating surfaces must be free of oil and grease.
Note: Pistons must not be at TDC.
Note: Check that all roller levers are properly seated on the valve stem stems.

Pic. 2.115. Correct placement of camshafts
Carefully insert the camshafts into the cylinder head camshaft bearings. Cams A, 4th cylinder, must face each other (pic. 2.115).
Apply an even, slightly convex bead of sealant (D 154 103 A1) into a clean groove of the camshaft frame (pic. 2.114).
Note: Do not apply sealant too thickly. If necessary, remove excess sealant with a lint-free cloth.
Note: Install and tighten the camshaft frame without interruption, as the sealant begins to harden as soon as the seating surfaces come into contact.
Note: Observe the expiration date of the sealant.
Place the camshaft frame on the cylinder head.
Vehicles with BLR, BLX, BVX and BVY engines
Position the camshaft frame so as not to touch the EGR valve.
Continuation of assembly operations for all vehicles
Loosely tighten the bolts in several passes, starting from the center to the edges.
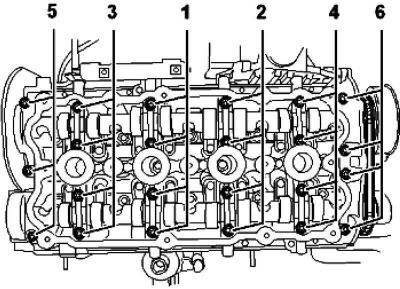
Pic. 2.116. The sequence of tightening the camshaft bearing bolts
Finally, tighten the bolts in the sequence shown in Figure 2.116 to 8 Nm + 90°.
Press the cover with a mandrel to a depth of 1–2 mm.
Install the camshaft seal.
Install the rear toothed belt cover.
Insert the featherkey into the camshaft.
Install the camshaft gear. To tighten the bolt, hold the camshaft gear with a counterhold (pic. 2.114). Tightening torque 65 Nm.
Note: When cranking the camshaft, none of the pistons should be at TDC. There is a risk of damage to the valves/piston.
Make sure the feather key is installed correctly.
Install the toothed belt.
Install the phase shifter.
Install the cylinder head cover.
Further assembly is carried out in the reverse order of dismantling.
Visitor comments