
English Русский
Български
Беларускі
Український
Српски
Hrvatski
Română
Polski
Slovenský
Magyar
  |  Articles  |  Sitemap  |  Contacts  |    |
Car maintenance Ford Car maintenance Hyundai Car maintenance Chevrolet Car maintenance BMW Car maintenance Audi Car maintenance Opel Car maintenance AvtoVAZ
VWmanual.ru


Main   Passat   Golf   Polo   Touareg   Tiguan   Sharan   Transporter   Others  
Golf 1 (1974-1984, diesel) Golf 1 (1974-1984, petrol) Golf 2 (1984-1993, petrol) Golf 2 (1984-1993) Golf 3 (1991-1997) Golf 4 (1997-2004) Golf 5 (2003-2008)

TDC of piston of cylinder No. 1 (petrol engines 1.6 liters, 102 hp, BGU/BSE/BSF) (VW Golf 5)

  • Main
  • Golf
  • Golf 5
  • Power unit
  • Engine repair
  • TDC of piston of cylinder No. 1 (petrol engines 1.6 liters, 102 hp, BGU/BSE/BSF)
            0


Contents: Installing a timing belt ↓ Timing Belt Tension ↓
Caution! Mark the installation position of the upper timing cover, especially at the junction with the middle part of the cover.


1. Turn the top cover latch counterclockwise (see arrow A in the illustration), so that the slot on the latch head is positioned vertically.
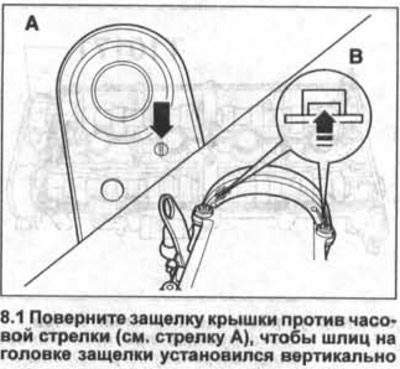
1. Turn the top cover latch counterclockwise (see arrow A in the illustration), so that the slot on…


2. Remove the upper timing cover by pushing the locking tabs upwards (see arrow B in Illustration 8.1).

3. Apply the parking brake and place the transmission in neutral.

4. Turn the crankshaft by the central bolt securing the toothed belt gear clockwise in the direction of engine rotation until the marks on the gear align (see arrow in illustration) and on the crankshaft.
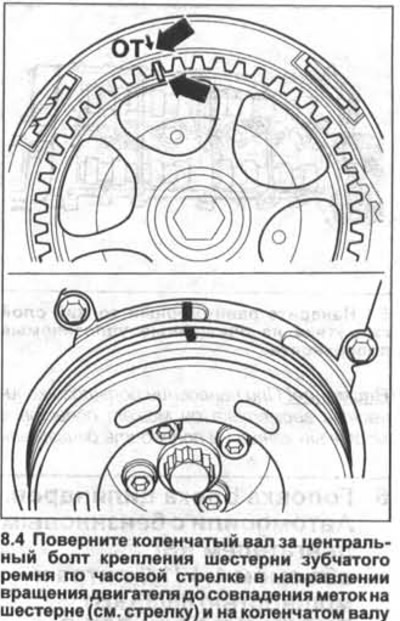
4. Turn the crankshaft by the central bolt securing the toothed belt gear clockwise in the…


Installing a timing belt


Important! This manual does not provide a detailed procedure for removing and installing the timing belt on a 1.6-liter, 74 kW (102 hp) BGU/BSE/BSF petrol engine. Only the main points regarding belt installation are provided.


Caution: Support the engine with a garage lift or secure it to a hoist and remove the right engine mount.


Installation


Attention! If the toothed belt was removed only from the camshaft gear during repair, it is still necessary to install and adjust it.


5. Make sure that the piston of cylinder No.1 is at TDC. If necessary, turn the crankshaft or camshaft.

Caution! When turning the camshaft without a timing belt, none of the pistons should be at TDC. Otherwise, this may lead to significant damage to the valves or pistons.


6. Place the timing belt on the crankshaft gear and water pump gear.

Attention! Maintain the previous direction of rotation of the toothed belt.


7. Replace the middle and lower parts of the timing cover and secure them with bolts.

8. Install the belt pulley onto the crankshaft so that the hole on the belt pulley aligns with the thickening on the toothed belt gear on the crankshaft.

In this position of the belt pulley, screw in the new bolts for its fastening and tighten them with a force of 10 Nm, and then turn them by 90°.

9. Place the timing belt on the tension roller and camshaft gear.

Timing Belt Tension


Caution! The engine must not be hot.


10. Make sure that the markings on the camshaft pinion and the rear cover of the timing chain drive, as well as on the crankshaft belt pulley and the lower part of the safety cover of the timing chain drive match.


11. Check the mounting position of the tension roller. Locking lug (see arrow in illustration) should be in the recess on the cylinder head. Otherwise, turn the roller.
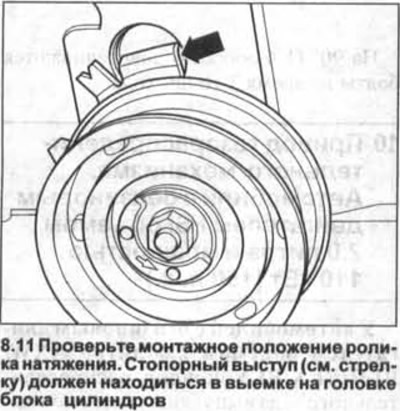
11. Check the mounting position of the tension roller. Locking lug (see arrow in illustration)…


12. Turn the tension roller by the eccentric with the VW-TI0020 or HAZET 2587 cam key five times in both directions until it stops before tensioning the toothed belt.

13. Turn the eccentric with a trunnion key counterclockwise until it stops (see arrow in illustration).
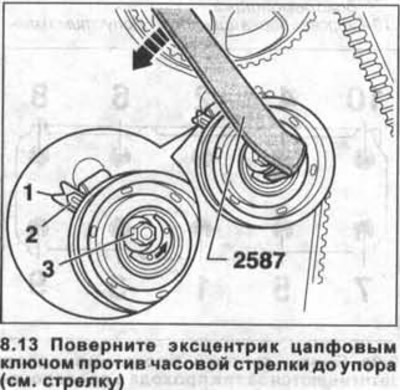
13. Turn the eccentric with a trunnion key counterclockwise until it stops (see arrow in…


14. Slowly release the toothed belt so that notch 1 and arrow 2 are positioned opposite each other. Use a mirror if necessary to check the position of the reference marks. In this position of the roller, tighten nut 3 with a force of 23 Nm (see illustration 8.13).

15. Turn the crankshaft two revolutions in the direction of engine rotation to set the piston of cylinder No.1 to TDC.

When doing this, it is important that the remaining 45° (1/8 turn), remaining until the completion of the revolution were performed in one continuous movement.

All reference marks must match when the timing belt is tensioned. Otherwise, the timing belt must be removed and reinstalled.

16. Check the tension of the toothed belt again. The arrow on the tension roller should match the notch. Otherwise, repeat the adjustment and tension of the toothed belt.

17. Check the operation of the tension roller. To do this, press the toothed belt with your thumb.

Arrow 2 on the roller should move (see illustration 8.13). Release the belt, turn the crankshaft two revolutions in the direction of engine rotation to set the piston of cylinder No.1 to TDC.

When performing this action, it is important that the remaining 45° (1/8 turn), remaining until the end of the revolution, were performed in one continuous movement. The arrow on the tension roller must match the notch. Otherwise, the toothed belt tension roller is faulty and must be replaced.

18 Secure the engine bracket to the mounting location on the cylinder block by screwing in and tightening both upper bolts to 45 Nm.

19. Lower the raised engine, insert the lower bracket mounting bolts and tighten them to 45 Nm.

20. Install the engine mount support, see the relevant chapter.

21. Secure the engine mount support to the bracket (see arrows in the illustration), screw in the bolts and tighten them to 60 Nm + 90°.
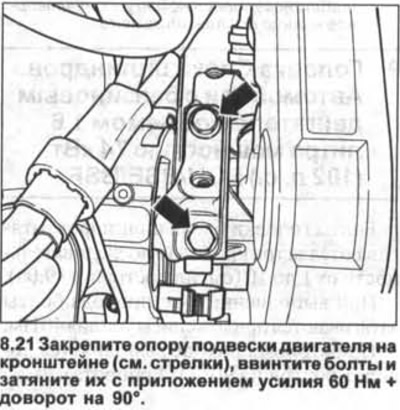
21. Secure the engine mount support to the bracket (see arrows in the illustration), screw in the…


22. Remove the garage jack from under the engine or remove the hoist from the engine eyes.

23. Reinstall the upper part of the timing cover by turning the latches clockwise until the slot on the latch head is horizontal.

24. Lay the V-belt.

25. Reinstall the upper engine cover.

This article is available at russian, bulgarian, belarusian, ukrainian, serbian, croatian, romanian, polish, slovak, hungarian
The text has been checked: Kolesnikov Artem

Share information:

Previous articles
Timing drive (1.6 liter petrol engine, 102 hp)
Cylinder head (1.4/1.6 litre FSI petrol engines, BKG/BLN/BAG/BLF/BLP)
Cylinder head (petrol engine 1.4 liters, 75 hp, VSA)
TDC of piston of cylinder No. 1 (petrol engine 1.4 liters, 75 hp, VSA)
Timing drive (1.4 liter petrol engine, 75 hp)
Upper Engine Cover — Removal and Installation
Next articles
Cylinder head (1.6L petrol engines, 102hp, BGU/BSE/BSF)
Timing drive (petrol engine FSI 2.0 liter, 150 hp)
Cylinder head (petrol engines 2.0 liter, 150 hp, AWX/BLR/BLX/BLY)
Timing drive (diesel engines 1.9/2.0 liters, 55-77 kW)
TDC of piston of cylinder No. 1 (diesel engines 1.9/2.0 liters, 75/90/100/105 hp, AVQ/BRU/BJB/BKC/BLS/BDK)
Timing Belt — Installation (Diesel Engines 1.9/2.0L, 75/90/100/105 HP, AVQ/BRU/BJB/BKC/BLS/BDK)


Similar articles from other manuals for VW cars:
Fuel used — petrol engines Passat B3 (1988-1993)
Cylinder head — AWY petrol engine with a displacement of 1.2… Polo 4 (2001-2009)
Checking pistons, piston rings and cylinder diameter Touareg 1 (2002-2006)
Specifications of the 1.4 litre/110 kW petrol engine (BWK) Tiguan 1 (2007-2015)
Removal the cylinder head Sharan 1 (1995-2000)
Timing Belt Adjustment (4-Cylinder Petrol) Transporter T4 (1990-2003)
Checking the timing belt (4-cylinder petrol engines) Caddy 3 (2003-2010)
Link to this page in different formats


Visitor comments


No comments yet


How much will 40 + 44 =


Golf 5 
  • General information
  • User manual
  • Maintenance
  • Troubleshooting
  • Power unit
  • Engine repair
  • Cooling and ventilation system
  • Fuel system
  • Ignition system
  • Transmission
  • Clutch
  • Mechanical gearbox
  • Automatic gearbox
  • Chassis
  • Brake system
  • Car suspension
  • Steering
  • Body
  • Interior (internal elements)
  • Exterior (external elements)
  • Doors and covers
  • Electrical equipment
  • Power devices
  • Washers and wipers
  • Lighting and appliances
  • Electrical circuits
Golf 4 
  • General information
  • User manual
  • Weekly checks
  • Maintenance
  • Power unit
  • Petrol engines
  • Diesel engines
  • Cooling system
  • Fuel system (petrol)
  • Control system (petrol)
  • Fuel system (diesel)
  • Exhaust system
  • Transmission
  • Clutch
  • Car gearbox
  • Drive shafts
  • Chassis
  • Car suspension
  • Steering
  • Wheels and tires
  • Brake system
  • Body
  • Exterior (external elements)
  • Interior (internal elements)
  • Ventilation and heating
  • Car doors and sunroof
  • Washers and glass cleaners
  • Electrical equipment
  • Power devices
  • Lighting and appliances
  • Electrical circuits
Golf 3 
  • Petrol engine
  • Engine repair
  • Lubrication system
  • Cooling system
  • Ignition system
  • Diesel engine
  • Engine repair
  • Diesel injection system
  • Pre-glow system
  • Transmission
  • Clutch
  • Gearbox and drive shafts
  • Chassis
  • Steering
  • Wheels and suspension
  • Brake system
  • Electrical equipment
  • Lighting and appliances
  • Electrical circuits
Golf 2 
  • General information
  • Introduction to guide
  • User manual
  • Petrol engines 1.3 l
  • Engine repair
  • Lubrication system
  • Cooling system
  • Carburetors
  • Supply system
  • Ignition system
  • Petrol engines 1.6/1.8 l
  • Engine repair
  • Supply system
  • Ignition system
  • Diesel engines
  • Engine repair
  • Lubrication system
  • Cooling system
  • Power and exhaust system
  • Transmission
  • Clutch
  • 4-speed gearbox 084
  • 5-speed gearbox 085
  • 4-speed gearbox 020/4R
  • 5-speed gearbox 020/4T
  • Automatic gearbox
  • Drive shafts
  • Chassis
  • Steering
  • Car suspension
  • Brake system
  • Body
  • Body elements
  • Doors, locks and windows
  • Electrical equipment
  • Equipment and devices
  • Power devices
Golf 2 (petrol) 
  • General information
  • Characteristics
  • Car care
  • Maintenance
  • Power unit
  • Engine repair
  • Engine 1.05/1.30
  • Engine 1.60/1.80
  • Cooling and lubrication system
  • Power and exhaust system
  • Transmission
  • Clutch
  • Car gearbox
  • Drive shafts
  • Chassis
  • Brake system
  • Steering
  • Suspension
  • Body
  • Body and equipment
  • Electrical equipment
  • Lighting and appliances
  • Electrical circuits
Golf 1 (petrol) 
  • General information
  • Characteristics
  • User manual
  • Maintenance
  • Power unit
  • Engine adjustment
  • Engine 1.1/1.3
  • Engine 1.5/1.6/1.8
  • Engine electrical equipment
  • Cooling system
  • Fuel system
  • Transmission
  • Clutch and manual gearbox
  • Automatic gearbox
  • Chassis
  • Steering
  • Front suspension
  • Rear suspension
  • Brake system
  • Electrical equipment
  • Lighting and appliances
  • Electrical circuits
  • Body
  • Body and equipment
  • Optional equipment
Golf 1 (diesel) 
  • General information
  • Specifications
  • Maintenance
  • Power unit
  • Engine repair
  • Exhaust and turbocharger
  • Cooling system
  • Fuel system
  • Fuel injection system
  • Transmission
  • Clutch and drive shafts
  • Car gearbox
  • Chassis
  • Suspension and wheels
  • Steering
  • Brake system
  • Wheels and tires
  • Body
  • Heating and ventilation
  • Exterior (external elements)
  • Interior (internal elements)
  • Doors and windows
  • Electrical equipment
  • Equipment and devices
  • Lighting system
  • Power devices
  • Electrical circuits
VWmanual.ru © 2016-2026 | Mobile version | News and articles | Sitemap: EN BG BY UA RS HR RO PL SK HU | Write message | Site search
Passat B2 • Passat B3 • Passat B4 • Passat B5 • Passat B6 • Golf 1, diesel • Golf 1, petrol • Golf 2, petrol • Golf 2 • Golf 3 • Golf 4 • Golf 5 • Polo 3 • Polo 4 • Touareg 1 • Tiguan 1 • Sharan 1 • Transporter T3 • Transporter T4 • LT 28 • LT 2D • Beetle • Caddy 3 •
Our website uses cookies to ensure functionality and convenience.