



Contents: Fixing the camshaft gears at TDC of…↓ Installing the tension roller of the…↓ Timing belt tension of the gas…↓
Please note: Cylinder #1 is located, when viewed from the direction of travel, on the right side of the engine.
1. Remove the protective cover from the engine.
2. Remove the upper timing cover by unscrewing the mounting bolts.
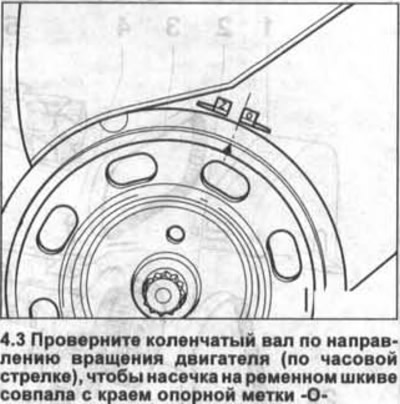
3. Turn the crankshaft in the direction of engine rotation (clockwise), so that the notch on the belt pulley coincides with the edge of the reference mark "0" (see illustration). To turn the crankshaft, engage neutral and rotate the shaft by the central bolt using a bent socket wrench or a 19 mm socket head.
Caution! Do not turn the engine by the bolt securing the toothed belt gear to the camshaft. This will over-tension the toothed belt.
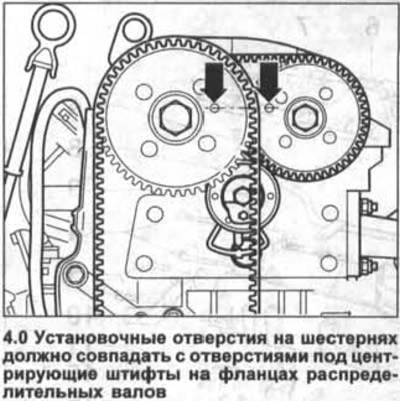
The mounting holes on the gears must match the holes for the centering pins on the camshaft flanges(see arrows in illustration 4.0).
Caution! If the holes for the centering pins on the camshaft flanges are on opposite sides of the gears, the crankshaft must be turned again.
Attention! This manual does not provide a detailed procedure for removing and installing the timing belt on vehicles with a 1.4-liter, 55 kW (75 hp) VSA petrol engine. Only the main points regarding belt installation are provided.
Fixing the camshaft gears at TDC of the piston of cylinder No.1
4. Set the piston of cylinder No.1 to TDC.
5. Insert the pins of the locking device, for example, HAZET-2588-4 or VW-T-10016, into the holes for the seat pins on the camshaft drive gears until they stop. The locking device is considered to be installed correctly if the tips D of its pins are in line with the axis A (see illustration).
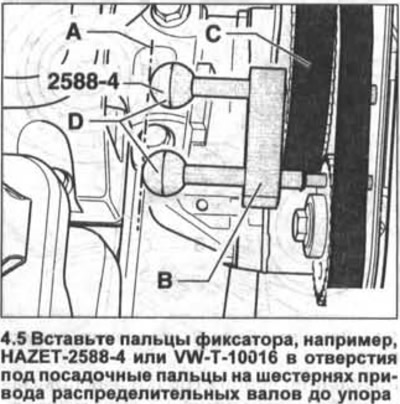
6. Move the holder B until it fits against the gear C of the intake camshaft (see illustration 4.5).
Installing the tension roller of the toothed belt of the exhaust camshaft drive
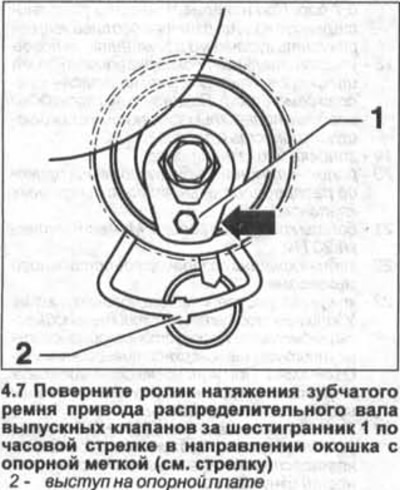
7. Turn the tension roller of the toothed belt of the exhaust camshaft drive by hexagon 1 clockwise in the direction of the window with the reference mark (see arrow in illustration). In this case, the tension of the toothed belt is loosened.
8. Install the tension roller in place and press it together with the laid toothed belt upwards. In this position of the roller, screw in the roller mounting bolt.
9. Tighten the roller mounting bolt by hand. The protrusion on the support plate should enter the hole in the cylinder head 2 (see illustration 4.7).
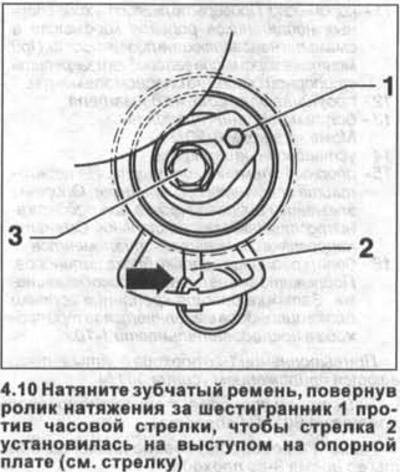
10. Tighten the toothed belt by turning the tension roller by the hexagon 1 counterclockwise so that the arrow 2 is positioned on the protrusion on the support plate (see arrow in illustration). In this position of the roller, tighten its mounting bolt 3 with a force of 20 Nm.
Timing belt tension of the gas distribution mechanism
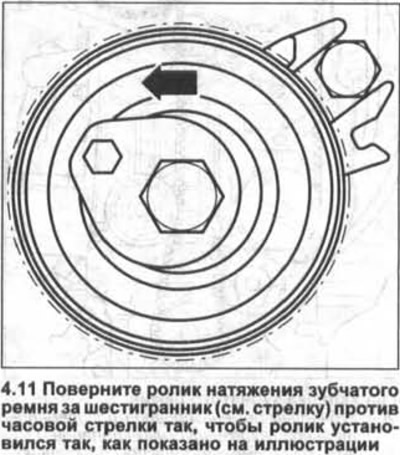
11. Turn the timing belt tension roller by the hexagon (see arrow in illustration) counterclockwise so that the roller is installed as shown in the illustration. This operation is performed in cases where the roller was previously dismantled.
12. Tighten the roller mounting bolt 2 by hand (see illustration). Protrusion 1 on the support plate must be installed above bolt 2.
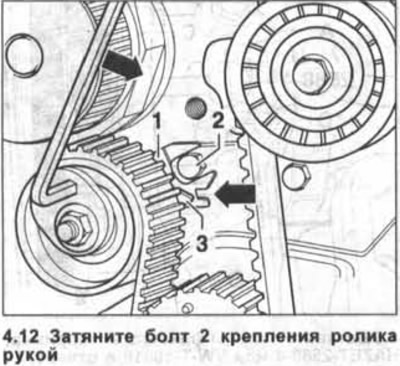
13. Turn the tension roller with a hexagonal socket wrench in the direction of the left arrow, as shown in Illustration 4.12, so that arrow 3 is positioned above the notch on the support plate (see right arrow in illustration 4.12).
Tighten the roller mounting bolt to 20 Nm.
15. Remove the locking device from the camshaft gears.
16. Turn the crankshaft two revolutions and check the position of the timing belt tension roller.
Visitor comments