



If the valves have been ground, they must be placed in the appropriate seats, since the wear pattern of each valve is different.
Lubricate the valve stems well with machine oil and insert them into the appropriate guides.
Using a collet, thread the lower valve spring plates through the valve guide from the other side.
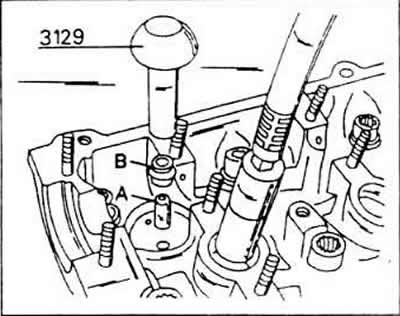
Install the valve stem sealing ring. A special tool is available for this purpose.
Slide the plastic sleeve (A) of the special tool onto the protruding valve guide.
Lubricate the sealing ring (M) well and insert it through the plastic sleeve.
Place tool 3129 on the O-ring and gently press it onto the valve guide. Note that without using this or a similar tool, the stem O-rings may be damaged during installation; the result will be increased oil consumption.
On the opposite side, place a piece of wood under each pair of valve heads to hold the valves in roughly the same position.
Place one inner and one outer spring of the corresponding valve on the cylinder head (in case of reusing the same springs.
Install the upper valve spring retainers. To compress the springs, use the valve lifters, depending on whether it is the intake or exhaust valves. If the end of the stem protrudes from the upper spring retainer, insert the valve half cones into the stem groove and slowly lift the valve lifter back.
Tap the valve stems from above with a plastic hammer, this will pop out the improperly seated valve half cones. As a precaution, place a rag over the ends of the springs so that the disassembled parts cannot fly away from there.
Lubricate the bearing journals of both camshafts thoroughly with oil.
Engage both camshaft gears with the drive chain.
Install the drive chain so that the direction of chain movement, marked with a special symbol, is correct.
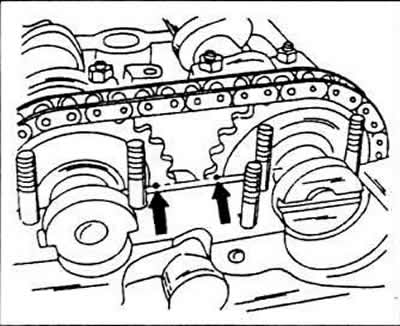
Align the chain sprockets so that both dot marks are opposite each other and intersect with the edge of the cylinder head.
Insert the camshafts into the bearing holes and turn them several times. Then tighten the shafts until both timing marks are aligned.
Straighten the bearing caps of both camshafts, i.e. the notches on the caps should be facing the inlet side of the cylinder head.
Mount the intake valve shaft. To do this, put on bearing caps #6 and #8 evenly, crosswise tighten the nuts to a tightening torque of 15 Nm.
Place the remaining bearing caps correctly and tighten evenly to a torque of 15 Nm.
Mount the exhaust valve shaft. To do this, put on bearing caps #2 and #4 evenly, crosswise tighten the nuts to a tightening torque of 15 Nm.
Place the remaining bearing caps correctly and tighten evenly to a torque of 15 Nm.
Take the camshaft sealing ring and determine which side the spring is on. Orient the ring with the spring inward and lightly lubricate the sealing edge and the working surface of the shaft with oil. To install a new oil sealing ring, use a section of pipe of a suitable diameter. The pipe must be completely seated on the outer perimeter of the sealing ring. Guide the sealing ring without skewing and drive it in until its flange rests against the outer surface. You can also insert the oil sealing ring in the same way as described in the case of replacing the front crankshaft sealing ring.
Place the camshaft flywheel on the shaft (don't forget the key) and screw in the screw with the washer. Hold the flywheel in a way that is convenient for you (for example, using an old toothed belt) and tighten the screw to a torque of 65 Nm.
Rotate both camshafts several times to check for binding.
Install all components installed in the cylinder head.
Install the exhaust port into the cylinder head (use new seals). The suction channel is screwed on when installing the cylinder head.
Visitor comments