
English Русский
Български
Беларускі
Український
Српски
Hrvatski
Română
Polski
Slovenský
Magyar
  |  Articles  |  Sitemap  |  Contacts  |    |
Car maintenance Ford Car maintenance Hyundai Car maintenance Chevrolet Car maintenance BMW Car maintenance Audi Car maintenance Opel Car maintenance AvtoVAZ
VWmanual.ru


Main   Passat   Golf   Polo   Touareg   Tiguan   Sharan   Transporter   Others  
Passat B2 (1981-1988) Passat B3 (1988-1993) Passat B4 (1988-1996) Passat B5 (1996-2005) Passat B6 (2005-2010)

Replacing spark plugs (VW Passat B5)

  • Main
  • Passat
  • Passat B5
  • General information
  • Maintenance
  • Replacing spark plugs
            0


Contents: Engine 1.6-I ↓ Engine 1.8-I ↓ Engines 2.3-I (5 cylinders) ↓ Engines 2.8-I (6 cylinders) ↓ All engines ↓
Spark plugs are replaced during scheduled maintenance.

If you ever have to replace spark plugs outside of routine maintenance, keep the following in mind.

Spark plugs and the entire ignition system as a whole are selected for this engine, and this helps to reduce the amount of harmful substances in the exhaust gases.

To avoid engine failures, reduced engine power, poor throttle response, increased emissions and interference with radio reception, only use spark plugs recommended by Volkswagen for this engine. Particularly important spark plug characteristics are the number of electrodes, heat rating and, in some cases, the ability not to interfere with radio reception.

Correct functioning of spark plugs is one of the most important conditions for efficient engine operation. It is necessary that only the prescribed type of spark plugs are installed on the engine. If the engine is in good condition, cleaning the spark plugs is a rare operation.

Tools needed to remove the spark plug and adjust the gap
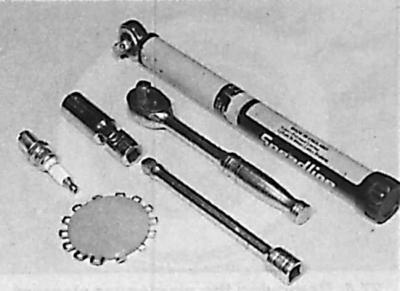


Tools needed to remove the spark plug and adjust the gap


Engine 1.6-I


Location of screws (1) for fastening the upper engine casing 1.6-I
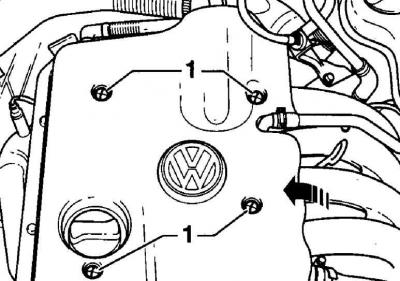


Location of screws (1) for fastening the upper engine casing 1.6-I


Location of high-voltage wire tips (2) on spark plugs
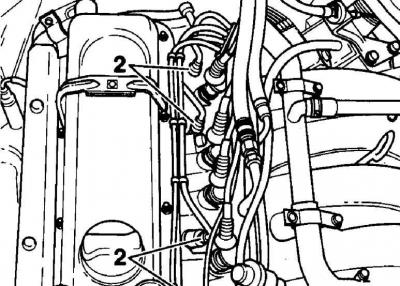


Location of high-voltage wire tips (2) on spark plugs


1. Unscrew the screws and remove the upper engine casing, see Fig. Location of screws (1) for fastening the upper engine casing 1.6-I.

2. Mark the high-voltage wires with numbers and remove the high-voltage wire tips from the spark plugs, see Fig. "Location of the high-voltage wire tips (2) on the spark plugs".

3. Clean the spark plugs using a brush, vacuum cleaner or compressed air to prevent dirt from getting into the engine cylinders after the spark plugs are removed. Unscrew the spark plugs using a spark plug wrench.

Engine 1.8-I


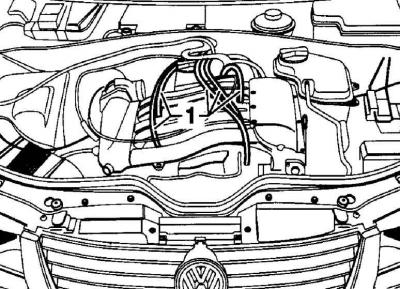
Location of brackets (1) for fastening the upper engine casing 1.8-I
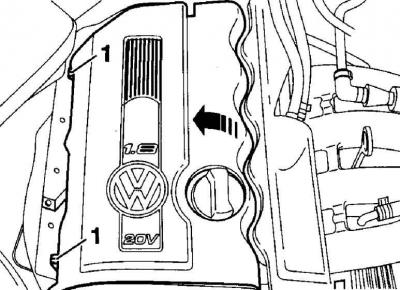


Location of brackets (1) for fastening the upper engine casing 1.8-I


Location of high-voltage wire tips on spark plugs of 1.8-I engine
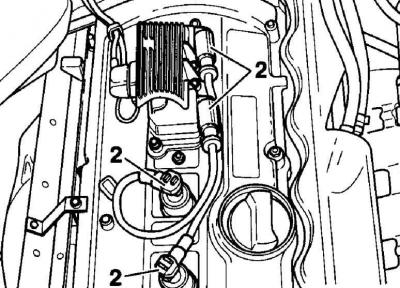


Location of high-voltage wire tips on spark plugs of 1.8-I engine


1. Release the two clamps and remove the upper engine casing, see Fig. Location of the clamps (1) for fastening the upper engine casing 1.8-I.


2. Mark the high-voltage wires with numbers and remove the high-voltage wire tips from the spark plugs, see Fig. Location of high-voltage wire tips on spark plugs of the 1.8-I engine.

3. Clean the spark plugs using a brush, vacuum cleaner or compressed air to prevent dirt from getting into the engine cylinders after the spark plugs are removed. Unscrew the spark plugs using a spark plug wrench.

Engines 2.3-I (5 cylinders)


Location of high-voltage wire tips on spark plugs of 2.3-I engine


Location of high-voltage wire tips on spark plugs of 2.3-I engine


1. Open the hood.

2. Mark the high-voltage wires with numbers and remove the high-voltage wire tips from the spark plugs, see Fig. Location of high-voltage wire tips on spark plugs of the 2.3-I engine.

3. Clean the spark plugs using a brush, vacuum cleaner or compressed air to prevent dirt from getting into the engine cylinders after the spark plugs are removed. Unscrew the spark plugs using a spark plug wrench.

Engines 2.8-I (6 cylinders)


Location of the screws for fastening the upper engine casing 2.8-I
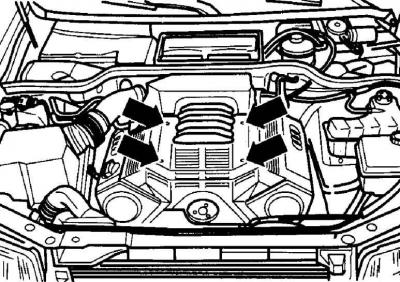


Location of the screws for fastening the upper engine casing 2.8-I


1. Unscrew the screws and remove the upper engine casing, see Fig. Location of the screws securing the upper engine casing 2.8-I.

2. Mark the high-voltage wires with numbers and remove the high-voltage wire caps from the spark plugs.

3. Clean the spark plugs using a brush, vacuum cleaner or compressed air to prevent dirt from getting into the engine cylinders after the spark plugs are removed. Unscrew the spark plugs using a spark plug wrench.

All engines


Visual inspection of the working part of the spark plugs can show the condition of the engine. If the nose of the spark plug insulator is clean and white, without any deposits, this indicates that the mixture is too lean. This also indicates that the plug is too hot, i.e. the heat from the central electrode is slowly removed. If this is the case, it is necessary to adjust the fuel mixture or replace the plug.

If the nose of the insulator is covered with a black coating, this indicates that the mixture is too rich. If the coating is black and oily, this indicates engine wear and the need for inspection and repair. If the nose of the insulator is covered with a light brown coating, the mixture composition is optimal and the engine is in good condition.

The spark plug gap is very important because if the gap is too big or too small, the spark size changes, which leads to a decrease in engine efficiency. The gap must always meet technical requirements.

Measuring spark plug gap with a wire gauge
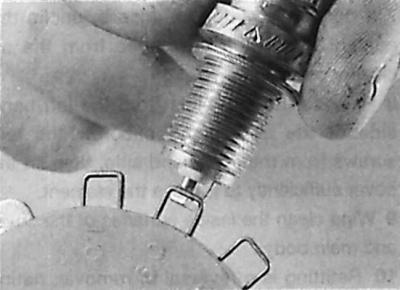


Measuring spark plug gap with a wire gauge


Measuring spark plug gap with feeler gauge
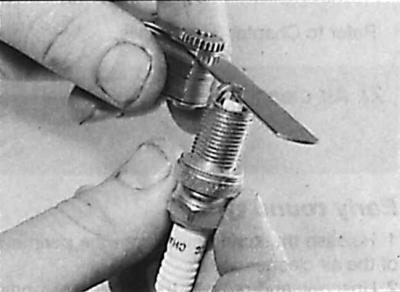


Measuring spark plug gap with feeler gauge


The gap is checked with a wire template or feeler gauge. The gap is adjusted by bending the side electrode. The central electrode should never be bent, as this can lead to breakage of the insulator and failure of the spark plug.

To bend the side electrode of the spark plug, you need to use a special tool.

Before installing the spark plug into the engine, check that the threads are clean and all threads are intact.

Screw in the spark plugs by hand and then tighten them to the specified torque.

Connect the high-voltage wires to the spark plugs.

This article is available at russian, bulgarian, belarusian, ukrainian, serbian, croatian, romanian, polish, slovak, hungarian
The text has been checked: Tarasov Ivan

Share information:

Previous articles
Spark plugs
Cooling system fan
Engine cooling system
Checking the exhaust system
Oil and oil filter change
Types of motor oils
Next articles
Draining water from the fuel filter (diesel engines)
Replacing the fuel filter (diesel engines)
Checking the tightness of the hoses and fluid leakage
Replacing the air filter element
Checking the condition of the poly V-belt
V-belts


Similar articles from other manuals for VW cars:
Replacing spark plugs Golf 4 (1997-2004)
Replacing spark plugs Polo 3 (1995-2003)
Replacing the crankshaft oil seal on the vibration damper side Touareg 1 (2002-2006)
Installing hinges after replacing the B-pillar Tiguan 1 (2007-2015)
Spark plugs — removal, installation and adjustment Sharan 1 (1995-2000)
Replacing spark plugs Transporter T4 (1990-2003)
Replacing spark plugs Caddy 3 (2003-2010)
Link to this page in different formats


Visitor comments


No comments yet


How much will 16 + 19 =


Passat B6 
  • General information
  • User manual
  • Maintenance
  • Petrol engine 1.6L
  • Engine repair
  • Cooling and lubrication system
  • Fuel injection system
  • Petrol engine 2.0L
  • Engine repair
  • Lubrication system
  • Cooling system
  • Fuel and exhaust systems
  • Diesel engine 2.0L
  • Engine repair
  • Cooling and lubrication system
  • Fuel and exhaust systems
  • Transmission
  • Clutch
  • Mechanical gearbox
  • Automatic gearbox
  • Drive shafts
  • Chassis
  • Wheels and tires
  • Car suspension
  • Steering
  • Brake system
  • Body
  • Exterior (external elements)
  • Electrical equipment
  • Power devices
  • Lighting and appliances
  • Electrical circuits
Passat B5 
  • General information
  • User manual
  • Weekly checks
  • Maintenance
  • Power unit
  • Engine repair
  • Cooling system
  • Fuel system (petrol)
  • Fuel system (diesel)
  • Engine management
  • Exhaust system
  • Transmission
  • Clutch
  • Car gearbox
  • Drive shafts
  • Chassis
  • Car suspension
  • Wheels and tires
  • Steering
  • Brake system
  • Body
  • Exterior (external elements)
  • Interior (internal elements)
  • Doors and covers
  • Ventilation and heating
  • Electrical equipment
  • Power devices
  • Lighting and appliances
  • Electrical circuits
Passat B4 
  • General information
  • User manual
  • Maintenance
  • Technical data
  • 8-valve engine
  • Engine repair
  • Cooling and lubrication system
  • Supply system
  • Ignition system
  • Fuel injection «Mono-Jetronic»
  • Control system «Mono-Motronic»
  • Control system «Digifant»
  • Control system «Simos»
  • 16-valve engine
  • Engine repair
  • Cooling and lubrication system
  • Fuel injection «K-Jetronic»
  • Control system «KE-Motronic»
  • Control system «Digifant»
  • Diesel engine
  • Engine repair
  • Cooling and lubrication system
  • Power and control system
  • Turbocharging system
  • Digital control system
  • Transmission
  • Clutch
  • Manual gearbox
  • Hydromechanical gearbox
  • Front wheel drive
  • Chassis
  • Car suspension
  • Steering
  • Brake system
  • Body
  • Body elements
  • Electrical equipment
  • Power devices
  • Lighting and appliances
  • Electrical circuits
Passat B3 
  • General information
  • User manual
  • Driving Tips
  • Maintenance instructions
  • Technical data
  • Power unit
  • Engine repair
  • Ignition system
  • Lubrication system
  • Cooling system
  • Supply system
  • Petrol injection system
  • Diesel engine
  • Exhaust system
  • Transmission
  • Clutch
  • Car gearbox
  • Chassis
  • Suspension
  • Steering
  • Brake system
  • Wheels and tires
  • Body
  • Exterior
  • Interior
  • Heating system
  • Electrical equipment
  • Power devices
  • Lighting system
  • Equipment and devices
  • Wiper system
  • Electrical circuits
Passat B2 
  • General information
  • Introduction to instructions
  • User manual
  • Power unit
  • Engines 4-cylinder FZ
  • Engines 4-cylinder
  • Engines 5-cylinder
  • Transmission
  • Clutch
  • Four-speed gearbox
  • Five-speed gearbox
  • Hydromechanical gearbox
  • Front wheel drive
  • Chassis
  • Front suspension
  • Rear suspension
  • Steering
  • Brake system
  • Body
  • Body elements
  • Electrical equipment
  • Equipment and devices
  • Electrical circuits
VWmanual.ru © 2016-2026 | Mobile version | News and articles | Sitemap: EN BG BY UA RS HR RO PL SK HU | Write message | Site search
Passat B2 • Passat B3 • Passat B4 • Passat B5 • Passat B6 • Golf 1, diesel • Golf 1, petrol • Golf 2, petrol • Golf 2 • Golf 3 • Golf 4 • Golf 5 • Polo 3 • Polo 4 • Touareg 1 • Tiguan 1 • Sharan 1 • Transporter T3 • Transporter T4 • LT 28 • LT 2D • Beetle • Caddy 3 •
Our website uses cookies to ensure functionality and convenience.