



Fuel filter for diesel engines
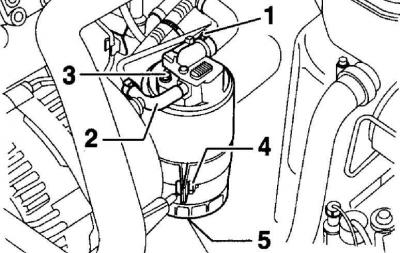
- 1 - fuel supply from the fuel tank,
- 2 - fuel supply to the high-pressure fuel pump,
- 3 - ventilation bolt,
- 4 - clamp,
- 5 - drain plug
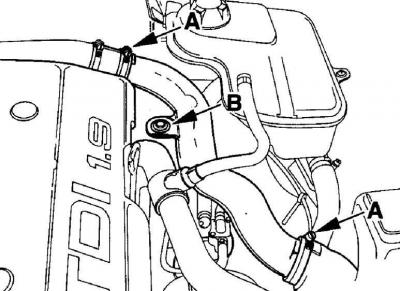
Location of clamps (A) and mounting bolt (B) of fuel hoses
Execution order
1. Drain all fluid from the fuel filter.
2. Clean the fuel line connections to the fuel filter.
3. Remove the clamps securing the fuel lines to the fuel filter.
4. Loosen the clamp (4) securing the fuel filter to the bracket, see Fig. Diesel engine fuel filter.
5. Unscrew the fuel filter from the upper part of the filter. To hold the upper part of the filter from turning, you can only use a 17 mm spanner placed on the head of the ventilation bolt (3), see Fig. Diesel engine fuel filter.
6. Lubricate the new seals and new gasket with diesel fuel.
7. Fill the filter with diesel fuel, which will help the engine start faster.
8. Hand tighten the fuel filter to the top of the filter until secure.
9. Install the filter on the bracket and secure it with a clamp.
10. Connect the fuel lines to the filter and secure them with clamps. The arrow on the filter indicates the direction of fuel flow.
11. To close the air supply to the fuel system, tighten the clamp (A) and screw in the bolt (B) securing the hose to the bracket, see Fig. Location of clamps (A) and bolt (B) securing the fuel hoses.
12. The fuel system will be bled automatically after the engine is started. After several presses of the accelerator pedal, the fuel without bubbles should flow through the transparent pipe to the high-pressure fuel pump.
13. Visually check the fuel system for leaks, especially at the fuel filter connections.
Visitor comments