
English Русский
Български
Беларускі
Український
Српски
Hrvatski
Română
Polski
Slovenský
Magyar
  |  Articles  |  Sitemap  |  Contacts  |    |
Car maintenance Ford Car maintenance Hyundai Car maintenance Chevrolet Car maintenance BMW Car maintenance Audi Car maintenance Opel Car maintenance AvtoVAZ
VWmanual.ru


Main   Passat   Golf   Polo   Touareg   Tiguan   Sharan   Transporter   Others  
Passat B2 (1981-1988) Passat B3 (1988-1993) Passat B4 (1988-1996) Passat B5 (1996-2005) Passat B6 (2005-2010)

Replacing valve stem seals (VW Passat B3)

  • Main
  • Passat
  • Passat B3
  • Power unit
  • Engine repair
  • Replacing valve stem seals
            0


Contents: Removal ↓ Installation ↓

All engines


Worn valve stem seals are the cause of high oil consumption by the engine. The seals are installed on the top of the guides and remove oil from the valve stems. Since the valve springs must be removed to replace the valve stem seals, the corresponding valve could fall into the cylinder when the cylinder head is installed on the engine. However, the seals can be removed with the cylinder head installed if special tools VW-2036 with VW-541 /1A or HAZET 2577-2 are used, and for a gasoline engine also compressed air.

Note: The diesel engine does not require compressed air. The piston of the corresponding cylinder must first be set to the TDC position so that the valves can rest on it.


Removal


Remove the camshaft and tappets, see above.

Gasoline engine


Set the piston of the corresponding cylinder to the BDC position. To do this, use a socket wrench to turn the crankshaft by the belt pulley mounting bolt so that the notch on the belt pulley coincides with the installation mark on the toothed belt cover (pistons of cylinders 1 and 4 are now at TDC). At the same time, pistons of cylinders 2 and 3 are at BDC. Mark the crankshaft belt pulley at the bottom with chalk, then turn the belt pulley 1/2 turn (180°) until the chalk mark coincides with the installation mark. Now pistons of cylinders 1 and 4 are at BDC.

Remove all spark plugs.

Screw the compressed air hose adapter VW 653/3 or HAZET 3428 into the spark plug hole of the corresponding cylinder.


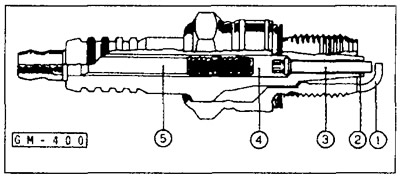
If there is no adapter, it can be made from an old spark plug. To do this, remove the ground electrode "1". Use a screwdriver to destroy the ceramic insulator "2", then, swinging the central electrode in different directions, break it off and pull it out. Knock out the remainder of the central electrode together with the fiberglass "4" and the connecting electrode "5" with a suitable punch (approximately 3 mm). In this case, clamp the spark plug in a vice or insert it into the appropriate socket head.

Caution: To avoid damaging the threads in the cylinder head, the spark plug threads must not be damaged.


Screw the prepared spark plug into the appropriate cylinder and connect it to the compressed air hose.

Continuously pump compressed air into the cylinder at a pressure of at least 6 bar.
Continuously pump compressed air into the cylinder at a pressure of at least 6 bar.


Diesel engine


Set the piston of the corresponding cylinder to the TDC position. To do this, use a socket wrench to turn the crankshaft by the belt pulley mounting bolt so that the mark on the flywheel coincides with the mark in the inspection hole of the gearbox housing (pistons of cylinders 1 and 4 are now at TDC), see chapter "Diesel engine".


When the pistons of cylinders 1 and 4 are at TDC, pistons of cylinders 2 and 3 are at BDC. Mark the bottom of the crankshaft pulley with chalk, then turn the pulley 1/2 turn (180°) until the chalk mark coincides with the timing mark. Now pistons of cylinders 1 and 4 are at BDC, while pistons of cylinders 2 and 3 are at TDC.
When the pistons of cylinders 1 and 4 are at TDC, pistons of cylinders 2 and 3 are at BDC. Mark the…


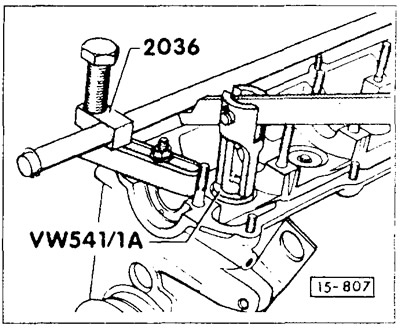
Screw the special tool VW 2036 onto bearing stands 1 and 4 and compress the valve springs with the VW 541/1A tool. You can also use the HAZET 2577-2 tool. In this case, screw the support device supplied with the tool onto the camshaft mounting studs and compress the valve springs with a puller.

Note: The piston must be at BDC.


Remove the crackers and loosen the springs.

Note: Loosen tightly seated crackers by lightly hitting the pry bar with a hammer.


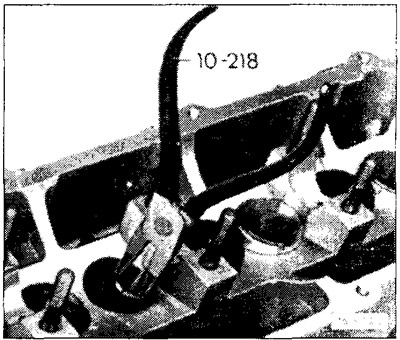
Remove the valve spring plates and valve springs.
Remove the valve spring plates and valve springs.


Remove the oil seal. Workshops use special tools for removal (VW 10-218, VW3047A, HAZET791-5 or impact puller HAZET791-2). As a rule, valve stem seals are very tightly seated. Therefore, an impact puller must be used to remove them.

Installation


Installation


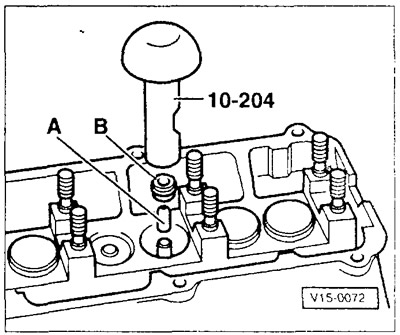
Plastic bushing "A" (comes with valve stem seals) put on the valve stem.

Lightly lubricate the valve stem seal "B" with oil, insert it into the VW 10-204 or HAZET 2577 retaining device and carefully push it onto the valve guide. Remove the bushing and retaining device.

Please note: Engines built from 11/94 onwards require the VW 3129 pre-tensioner.


Caution: If assembly is carried out without using a plastic bushing, the oil seals will be damaged! As a result, the engine consumes too much oil.


Install the valve springs and valve spring plate, compress the springs.

Insert crackers, loosen springs.

Replace all valve stem seals in the same manner. Install the tappets and camshaft, see above.

This article is available at russian, bulgarian, belarusian, ukrainian, serbian, croatian, romanian, polish, slovak, hungarian
The text has been checked: Medvedeva Elena

Share information:

Previous articles
Removal and installation valves
Checking hydraulic tappets
Removal and installation the cylinder head 6-cylinder
6-cylinder camshaft chain drive
Removal and installation the cylinder head
Cylinder head
Next articles
Checking the valve guides
Finishing of the seat/valve seat chamfer
Lapping valve seats
Tensioning/replacing the V-belt
Tensioning/replacing the poly V-belt
Jump starting from another car


Similar articles from other manuals for VW cars:
Replacing valve stem seals (oil seals) Golf 1 (1974-1984, diesel)
Replacing incandescent lamps Polo 3 (1995-2003)
Replacing valve stem seals Touareg 1 (2002-2006)
Replacing hatch seals Tiguan 1 (2007-2015)
Checking the engine oil level and replacing it Sharan 1 (1995-2000)
Replacing the valve stem seals Transporter T4 (1990-2003)
Replacing wheel hub bearing seals Beetle (1960-1986)
Link to this page in different formats


Visitor comments


No comments yet


How much will 26 + 25 =


Passat B6 
  • General information
  • User manual
  • Maintenance
  • Petrol engine 1.6L
  • Engine repair
  • Cooling and lubrication system
  • Fuel injection system
  • Petrol engine 2.0L
  • Engine repair
  • Lubrication system
  • Cooling system
  • Fuel and exhaust systems
  • Diesel engine 2.0L
  • Engine repair
  • Cooling and lubrication system
  • Fuel and exhaust systems
  • Transmission
  • Clutch
  • Mechanical gearbox
  • Automatic gearbox
  • Drive shafts
  • Chassis
  • Wheels and tires
  • Car suspension
  • Steering
  • Brake system
  • Body
  • Exterior (external elements)
  • Electrical equipment
  • Power devices
  • Lighting and appliances
  • Electrical circuits
Passat B5 
  • General information
  • User manual
  • Weekly checks
  • Maintenance
  • Power unit
  • Engine repair
  • Cooling system
  • Fuel system (petrol)
  • Fuel system (diesel)
  • Engine management
  • Exhaust system
  • Transmission
  • Clutch
  • Car gearbox
  • Drive shafts
  • Chassis
  • Car suspension
  • Wheels and tires
  • Steering
  • Brake system
  • Body
  • Exterior (external elements)
  • Interior (internal elements)
  • Doors and covers
  • Ventilation and heating
  • Electrical equipment
  • Power devices
  • Lighting and appliances
  • Electrical circuits
Passat B4 
  • General information
  • User manual
  • Maintenance
  • Technical data
  • 8-valve engine
  • Engine repair
  • Cooling and lubrication system
  • Supply system
  • Ignition system
  • Fuel injection «Mono-Jetronic»
  • Control system «Mono-Motronic»
  • Control system «Digifant»
  • Control system «Simos»
  • 16-valve engine
  • Engine repair
  • Cooling and lubrication system
  • Fuel injection «K-Jetronic»
  • Control system «KE-Motronic»
  • Control system «Digifant»
  • Diesel engine
  • Engine repair
  • Cooling and lubrication system
  • Power and control system
  • Turbocharging system
  • Digital control system
  • Transmission
  • Clutch
  • Manual gearbox
  • Hydromechanical gearbox
  • Front wheel drive
  • Chassis
  • Car suspension
  • Steering
  • Brake system
  • Body
  • Body elements
  • Electrical equipment
  • Power devices
  • Lighting and appliances
  • Electrical circuits
Passat B3 
  • General information
  • User manual
  • Driving Tips
  • Maintenance instructions
  • Technical data
  • Power unit
  • Engine repair
  • Ignition system
  • Lubrication system
  • Cooling system
  • Supply system
  • Petrol injection system
  • Diesel engine
  • Exhaust system
  • Transmission
  • Clutch
  • Car gearbox
  • Chassis
  • Suspension
  • Steering
  • Brake system
  • Wheels and tires
  • Body
  • Exterior
  • Interior
  • Heating system
  • Electrical equipment
  • Power devices
  • Lighting system
  • Equipment and devices
  • Wiper system
  • Electrical circuits
Passat B2 
  • General information
  • Introduction to instructions
  • User manual
  • Power unit
  • Engines 4-cylinder FZ
  • Engines 4-cylinder
  • Engines 5-cylinder
  • Transmission
  • Clutch
  • Four-speed gearbox
  • Five-speed gearbox
  • Hydromechanical gearbox
  • Front wheel drive
  • Chassis
  • Front suspension
  • Rear suspension
  • Steering
  • Brake system
  • Body
  • Body elements
  • Electrical equipment
  • Equipment and devices
  • Electrical circuits
VWmanual.ru © 2016-2026 | Mobile version | News and articles | Sitemap: EN BG BY UA RS HR RO PL SK HU | Write message | Site search
Passat B2 • Passat B3 • Passat B4 • Passat B5 • Passat B6 • Golf 1, diesel • Golf 1, petrol • Golf 2, petrol • Golf 2 • Golf 3 • Golf 4 • Golf 5 • Polo 3 • Polo 4 • Touareg 1 • Tiguan 1 • Sharan 1 • Transporter T3 • Transporter T4 • LT 28 • LT 2D • Beetle • Caddy 3 •
Our website uses cookies to ensure functionality and convenience.