
Input shaft
1. If the clutch pusher has a gap in the input shaft sleeve, it is necessary to remove the sleeve from the end of the input shaft along with the seal, press in a new sleeve and seal (pic. 6.16). Press in a new seal using a tube with a diameter approximately equal to the diameter of the seal. The seal must hide in the shaft to a depth of 0.8 to 1.3 mm
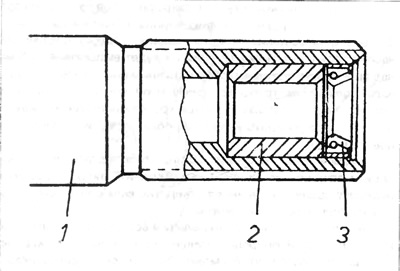
Pic. 6.16. Laying the clutch pusher
1 - input shaft, 2 - pusher bushing, 3 - seal.
2. Gears are supplied as spare parts in pairs and must also be replaced if broken.
3. The control of synchronizer nodes is described in paragraph 16.
4. When mounting the input shaft, lightly lubricate all parts.
5. Installation of the input shaft must be carried out in the reverse order of disassembly. Care must be taken to ensure that elements such as the synchronizer hub or sliding clutch face the correct direction.
6. Installation is completed after installing the 4-speed gear. Place the distance washer between the box body and the ball bearing (if there was), ball bearing and bearing disk is inserted into the housing and screwed with three bolts with slotted sockets. The gearbox housing with the installed ball bearing is superimposed on the input shaft only after assembling all the elements inside the gearbox.
7. Please note that the input shaft end play is not adjustable and the thickness of the bearing spacer remains constant.
Output shaft
Mounting of the output shaft is carried out in the reverse order to dismantling.
8. If necessary, replace the output shaft. the large final drive gear should also be replaced, as these elements make up the kit. Replace the main gear gears, and the repair of the differential mechanism, as noted earlier, is carried out at a specialized enterprise.
Visitor comments