
English Русский
Български
Беларускі
Український
Српски
Hrvatski
Română
Polski
Slovenský
Magyar
  |  Articles  |  Sitemap  |  Contacts  |    |
Car maintenance Ford Car maintenance Hyundai Car maintenance Chevrolet Car maintenance BMW Car maintenance Audi Car maintenance Opel Car maintenance AvtoVAZ
VWmanual.ru


Main   Passat   Golf   Polo   Touareg   Tiguan   Sharan   Transporter   Others  
Golf 1 (1974-1984, diesel) Golf 1 (1974-1984, petrol) Golf 2 (1984-1993, petrol) Golf 2 (1984-1993) Golf 3 (1991-1997) Golf 4 (1997-2004) Golf 5 (2003-2008)

Carburetor cable and gas pedal cable (VW Golf 2)

  • Main
  • Golf
  • Golf 2
  • Transmission
  • Car gearbox
  • Carburetor cable and gas pedal cable
            0


VW cars with automatic transmission have a system that makes it possible to automatically downshift during acceleration. For example, when driving in third gear, there is a need to overtake. In most cases, just opening the throttle all the way does not help. The driver of a car with a manual transmission has the option of downshifting when achieving significantly greater acceleration.

The above-mentioned system was designed to provide this capability to the driver of a car with an automatic transmission. Its main elements are the gas pedal cable between the gas pedal and the gearshift lever on the gearbox and a second cable, the "carburetor cable", between the gearbox and the throttle lever. During normal driving, the driver, by pressing the gas pedal, opens the carburetor throttle from the closed position to the full open position. When pressing the gas pedal, resistance is felt. The carburetor throttle is fully open. When pressing the gas pedal harder, the resistance of the gearshift lever spring on the gearbox increases and causes the gear to be changed to a lower one, which allows better use of the engine power reserve. As a result, better dynamics are achieved during acceleration.

Cable adjustment - carburetor 2E2


1. Start the engine and warm it up to operating temperature and until it reaches normal idle speed. This will ensure that the throttle is in the normal position required for adjustment.

2. With the gear selector lever in position P, loosen the gas pedal cable adjusting nut and disconnect the cable from the gearbox (figure 6.25).
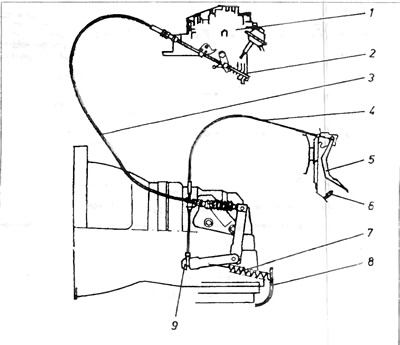


Figure 6.25. Automatic transmission throttle cables

1 - carburetor; 2 - transition spring; 3 - throttle cable; 4 - gas pedal cable; 5 - gas pedal; 6 - limiter; 7 - spring; 8 - protective tin plate; 9 - shift lever.


3. Remove the air filter assembly.

4. Loosen nut 4, which secures the carburetor cable to the bracket on the carburetor (figure 3.30).
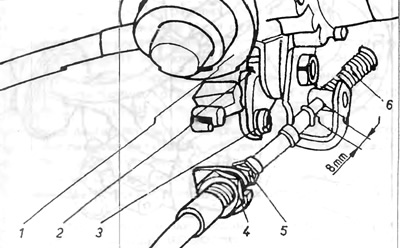
Figure 3.30. Adjusting the 1st pass throttle 2E2

1 - servomotor; 2 - cam of the starting equipment; 3 - lever; 4 - adjusting nut of metal protection of cable 8 mm bend of spring during checking of adjustment of carburetor cable (automatic transmission).


5. Turn the choke lever 2 so that the carburetor adjusting bolt does not touch it, then secure it in this position, supporting it with a screwdriver.


6. Remove and disconnect the low pressure pipes from the four-output servomotor 17 (figure 3.21).
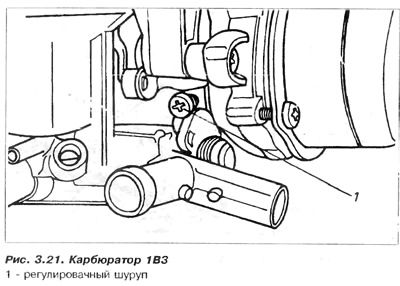
6. Remove and disconnect the low pressure pipes from the four-output servomotor 17 (figure 3.21).


7. Connect the low pressure pump to the lower connection (A) on the servomotor. Connections B and C must be open (figure 3.21).

8. Using the pump, create a reduced pressure so that the servomotor pusher remains in the overload position and there is a gap between the adjusting bolt 3 and the servomotor pusher 5. Pull the metal throttle cable guard away from the carburetor to eliminate the gap, while simultaneously leaving the throttle closed and setting the gear lever resting on the overload limiter. Tighten nut 4 of the carburetor cable clamp so that it fits with the bracket and is not tense, then tighten the safety lock nut 5.

9. Reinstall the accelerator pedal cable, then have an assistant press the accelerator pedal to the downshift limiter. Turn the accelerator pedal cable adjusting nut until the transmission control lever aligns with the downshift limiter, then tighten the lock nut.

10. To check the correct adjustment, the carburetor servo motor must be in the overload position, and the control lever at the gearbox must be connected to the overload limiter. Press the acceleration pedal to the point of full throttle opening (before selecting a lower gear), then check whether the carburetor throttle lever rests against the full opening limiter. The input spring 2 should not be tensioned (Fig. 6.25).

The original can be viewed on the portal: www.vwmanual.ru

11. Then press the acceleration pedal to the full throttle position, to the downshift selection position, and then check whether the control lever is at the downshift selection limiter and whether the spring of passage 2 is compressed by 8 mm.

12. Install the air filter.

This article is available at russian, bulgarian, belarusian, ukrainian, serbian, croatian, romanian, polish, slovak, hungarian
The text has been checked: Semenova Anna

Share information:

Previous articles
Automatic transmission gear selector cable
Overload test
Removal the automatic transmission
Automatic transmission service
General characteristics of automatic transmission
Gear selection mechanism for gearbox 020
Next articles
Gearbox fault table


Similar articles from other manuals for VW cars:
Replacing the clutch cable Passat B3 (1988-1993)
Adjusting the accelerator cable Polo 3 (1995-2003)
Disconnecting the flexible cable Touareg 1 (2002-2006)
Checking the cable traction Tiguan 1 (2007-2015)
Throttle drive cable Sharan 1 (1995-2000)
Adjusting the carburetor cable 34 PICT Transporter T3 (1979-1992)
Throttle Pedal Cable — adjustment LT 28 (1975-1991)
Link to this page in different formats


Visitor comments


No comments yet


How much will 41 + 20 =


Golf 5 
  • General information
  • User manual
  • Maintenance
  • Troubleshooting
  • Power unit
  • Engine repair
  • Cooling and ventilation system
  • Fuel system
  • Ignition system
  • Transmission
  • Clutch
  • Mechanical gearbox
  • Automatic gearbox
  • Chassis
  • Brake system
  • Car suspension
  • Steering
  • Body
  • Interior (internal elements)
  • Exterior (external elements)
  • Doors and covers
  • Electrical equipment
  • Power devices
  • Washers and wipers
  • Lighting and appliances
  • Electrical circuits
Golf 4 
  • General information
  • User manual
  • Weekly checks
  • Maintenance
  • Power unit
  • Petrol engines
  • Diesel engines
  • Cooling system
  • Fuel system (petrol)
  • Control system (petrol)
  • Fuel system (diesel)
  • Exhaust system
  • Transmission
  • Clutch
  • Car gearbox
  • Drive shafts
  • Chassis
  • Car suspension
  • Steering
  • Wheels and tires
  • Brake system
  • Body
  • Exterior (external elements)
  • Interior (internal elements)
  • Ventilation and heating
  • Car doors and sunroof
  • Washers and glass cleaners
  • Electrical equipment
  • Power devices
  • Lighting and appliances
  • Electrical circuits
Golf 3 
  • Petrol engine
  • Engine repair
  • Lubrication system
  • Cooling system
  • Ignition system
  • Diesel engine
  • Engine repair
  • Diesel injection system
  • Pre-glow system
  • Transmission
  • Clutch
  • Gearbox and drive shafts
  • Chassis
  • Steering
  • Wheels and suspension
  • Brake system
  • Electrical equipment
  • Lighting and appliances
  • Electrical circuits
Golf 2 
  • General information
  • Introduction to guide
  • User manual
  • Petrol engines 1.3 l
  • Engine repair
  • Lubrication system
  • Cooling system
  • Carburetors
  • Supply system
  • Ignition system
  • Petrol engines 1.6/1.8 l
  • Engine repair
  • Supply system
  • Ignition system
  • Diesel engines
  • Engine repair
  • Lubrication system
  • Cooling system
  • Power and exhaust system
  • Transmission
  • Clutch
  • 4-speed gearbox 084
  • 5-speed gearbox 085
  • 4-speed gearbox 020/4R
  • 5-speed gearbox 020/4T
  • Automatic gearbox
  • Drive shafts
  • Chassis
  • Steering
  • Car suspension
  • Brake system
  • Body
  • Body elements
  • Doors, locks and windows
  • Electrical equipment
  • Equipment and devices
  • Power devices
Golf 2 (petrol) 
  • General information
  • Characteristics
  • Car care
  • Maintenance
  • Power unit
  • Engine repair
  • Engine 1.05/1.30
  • Engine 1.60/1.80
  • Cooling and lubrication system
  • Power and exhaust system
  • Transmission
  • Clutch
  • Car gearbox
  • Drive shafts
  • Chassis
  • Brake system
  • Steering
  • Suspension
  • Body
  • Body and equipment
  • Electrical equipment
  • Lighting and appliances
  • Electrical circuits
Golf 1 (petrol) 
  • General information
  • Characteristics
  • User manual
  • Maintenance
  • Power unit
  • Engine adjustment
  • Engine 1.1/1.3
  • Engine 1.5/1.6/1.8
  • Engine electrical equipment
  • Cooling system
  • Fuel system
  • Transmission
  • Clutch and manual gearbox
  • Automatic gearbox
  • Chassis
  • Steering
  • Front suspension
  • Rear suspension
  • Brake system
  • Electrical equipment
  • Lighting and appliances
  • Electrical circuits
  • Body
  • Body and equipment
  • Optional equipment
Golf 1 (diesel) 
  • General information
  • Specifications
  • Maintenance
  • Power unit
  • Engine repair
  • Exhaust and turbocharger
  • Cooling system
  • Fuel system
  • Fuel injection system
  • Transmission
  • Clutch and drive shafts
  • Car gearbox
  • Chassis
  • Suspension and wheels
  • Steering
  • Brake system
  • Wheels and tires
  • Body
  • Heating and ventilation
  • Exterior (external elements)
  • Interior (internal elements)
  • Doors and windows
  • Electrical equipment
  • Equipment and devices
  • Lighting system
  • Power devices
  • Electrical circuits
VWmanual.ru © 2016-2026 | Mobile version | News and articles | Sitemap: EN BG BY UA RS HR RO PL SK HU | Write message | Site search
Passat B2 • Passat B3 • Passat B4 • Passat B5 • Passat B6 • Golf 1, diesel • Golf 1, petrol • Golf 2, petrol • Golf 2 • Golf 3 • Golf 4 • Golf 5 • Polo 3 • Polo 4 • Touareg 1 • Tiguan 1 • Sharan 1 • Transporter T3 • Transporter T4 • LT 28 • LT 2D • Beetle • Caddy 3 •
Our website uses cookies to ensure functionality and convenience.