
English Русский
Български
Беларускі
Український
Српски
Hrvatski
Română
Polski
Slovenský
Magyar
  |  Articles  |  Sitemap  |  Contacts  |    |
Car maintenance Ford Car maintenance Hyundai Car maintenance Chevrolet Car maintenance BMW Car maintenance Audi Car maintenance Opel Car maintenance AvtoVAZ
VWmanual.ru


Main   Passat   Golf   Polo   Touareg   Tiguan   Sharan   Transporter   Others  
Golf 1 (1974-1984, diesel) Golf 1 (1974-1984, petrol) Golf 2 (1984-1993, petrol) Golf 2 (1984-1993) Golf 3 (1991-1997) Golf 4 (1997-2004) Golf 5 (2003-2008)

Automatic Transmission — Checking Transmission Oil Level (VW Golf 5)

  • Main
  • Golf
  • Golf 5
  • General information
  • Maintenance
  • Automatic Transmission — Checking Transmission Oil Level
            0


Contents: Checking the oil level ↓ Filling transmission oil ↓
The transmission fluid level in an automatic transmission depends on the oil temperature.

Since a VW diagnostic device (tester) is required to obtain the exact oil temperature, it is recommended that this work be entrusted to a workshop.

The transmission oil level in the automatic transmission is checked and topped up only as part of maintenance.

A sufficient amount of transmission oil in the gearbox is essential for the normal functioning of the automatic transmission.

When the oil level is low, as well as when it is too high, the performance of the automatic transmission is reduced.

Necessary tools and equipment:
  • oiler;
  • protective glasses;
  • transmission oil collection container;
  • device for measuring oil temperature.

Necessary consumables:
  • VW transmission oil specification G 052 025;
  • sealing ring for filler plug thread;
  • protective cap for the threaded plug of the filler hole.

Warning! Do not start the engine if the oil has been drained from the automatic transmission. The vehicle cannot be towed if there is no oil in the transmission.


When performing all work, carefully observe cleanliness.

The slightest contamination that gets into the automatic transmission can cause it to fail.

Checking the oil level


Caution! The transmission oil temperature must be less than +30°C or less before checking its level. This oil temperature is reached almost immediately after starting the engine. In Volkswagen car repair shops, a diagnostic device is used to monitor the oil temperature, which is connected to the diagnostic connector on the car. Without a diagnostic device, the transmission oil temperature can only be determined approximately.


Warning! Transmission oil may leak out when performing work. Wear protective glasses.


1. Make sure that the transmission control unit has not entered the emergency program.

2. Move the automatic transmission control lever to position P and turn off the air conditioner and heater.

Warning! Jacking up a vehicle or placing it on jack stands is dangerous. Therefore, it is recommended that you familiarize yourself with the safety precautions set out in Chapter "Jacking up a car".


3. Place the vehicle horizontally on jack stands.

4. Start the engine and let it idle.

5. Place a container under the vehicle to collect the leaking transmission fluid and when the oil warms up to a temperature of approximately +35°-45°C, unscrew the threaded plug (see arrow in illustration). This will cause the transmission oil that has accumulated in the bypass tube to flow out.
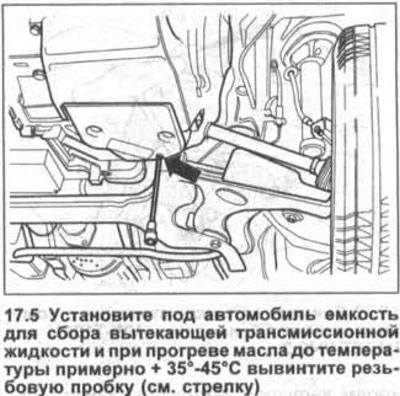
5. Place a container under the vehicle to collect the leaking transmission fluid and when the oil…


If the transmission oil level is normal, then at a temperature of approximately +35°...45°C it will begin to flow out of the bypass tube in the form of drops.

When the oil temperature rises, about one drop per second should flow out. In this case, there is no need to replenish the transmission oil.


The threaded plug with a new sealing ring should be screwed in and tightened to 15 Nm. The old sealing ring on the plug should be cut with side cutters and removed.

If, when the transmission oil is heated to the temperatures specified above, it does not flow out through the bypass tube or almost does not flow out, then the volume of oil in the gearbox should be replenished.

To do this, the plug with the old sealing ring should be screwed tightly by hand and the engine should be turned off immediately so that the transmission oil does not heat up unnecessarily.

Filling transmission oil


6. Attach a container of transmission oil of the required specification to the hood (see illustration).

View the original article on the resource [www.VWManual.ru]
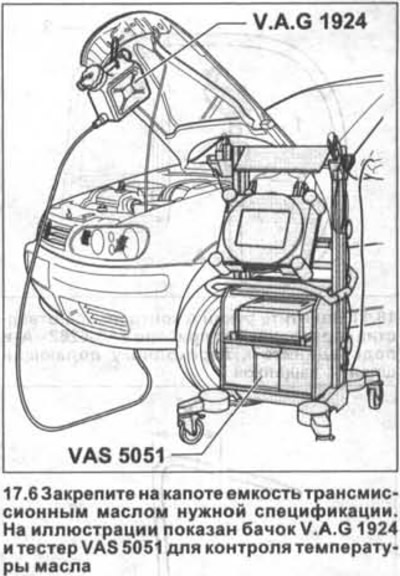
6. Attach a container of transmission oil of the required specification to the hood (see…


7. Remove the vacuum pump together with the bracket to provide access to the oil filler neck. Place the vacuum pump together with the bracket away from the work area so that it does not get into the impeller of the radiator fan.

8. Remove the safety cap from the filler plug by prying it off with a screwdriver (see illustration). The cap is damaged and should be replaced with a new one. The cap ensures the tightness of the stopper fit.
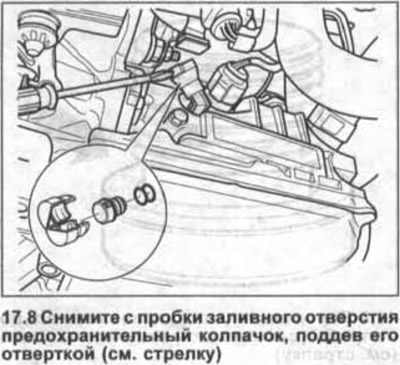
8. Remove the safety cap from the filler plug by prying it off with a screwdriver (see…


9. Remove the filler cap.

10. Insert the VAG 1924 filling tube into the filler neck and fill with transmission fluid (see illustration). You should pour in the liquid until it starts to flow out of the inspection hole (bypass tube).
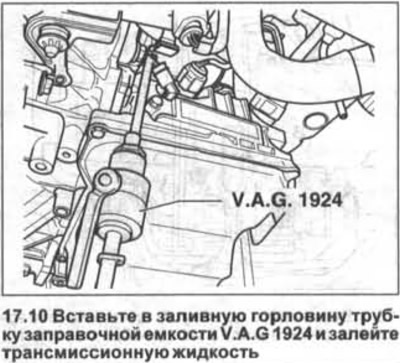
10. Insert the VAG 1924 filling tube into the filler neck and fill with transmission fluid (see…


11. Screw plug 1, replacing its old sealing ring with a new one, into the inspection hole (bypass tube) and tighten the plug with a force of 15 Nm (see arrow in illustration).
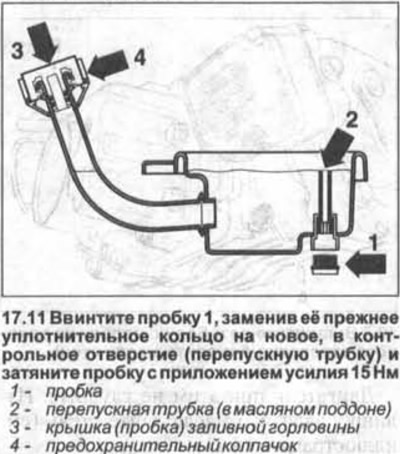
11. Screw plug 1, replacing its old sealing ring with a new one, into the inspection hole (bypass…


12. Turn off the ignition and disconnect the diagnostic tester, if used.

13. Install plug 3 on the filler hole, put the safety cap4 on it (see illustration 17.11) and fix the plug.

Attention! The safety cap must be replaced without fail, because it blocks the plug.


14. Install the bracket with the vacuum pump in place over the filler neck.

15. Lower the car onto its wheels.

This article is available at russian, bulgarian, belarusian, ukrainian, serbian, croatian, romanian, polish, slovak, hungarian
The text has been checked: Kolesnikov Artem

Share information:

Previous articles
Gearbox. Main gear
Spark plugs — replacement
Toothed Belt — Check
Exhaust system — visual inspection
V-belt — check
Air filter — replacing the filter element
Next articles
Automatic transmission DSG — oil and oil filter change
Haldex Differential — Oil Change
Front suspension and steering
Brakes. Tires. Wheels
Brake lining thickness — check
Brake lines — check


Similar articles from other manuals for VW cars:
Checking the oil level / changing the oil in the automatic… Passat B3 (1988-1993)
Automatic Transmission: Checking ATF Level Polo 4 (2001-2009)
Automatic transmission Touareg 1 (2002-2006)
Checking the oil level in a manual transmission Tiguan 1 (2007-2015)
Torque converter drive pulley (for vehicles with automatic… Sharan 1 (1995-2000)
Checking the oil level in an automatic transmission Transporter T4 (1990-2003)
Checking the oil level in the manual transmission Caddy 3 (2003-2010)
Link to this page in different formats


Visitor comments


No comments yet


How much will 12 + 19 =


Golf 5 
  • General information
  • User manual
  • Maintenance
  • Troubleshooting
  • Power unit
  • Engine repair
  • Cooling and ventilation system
  • Fuel system
  • Ignition system
  • Transmission
  • Clutch
  • Mechanical gearbox
  • Automatic gearbox
  • Chassis
  • Brake system
  • Car suspension
  • Steering
  • Body
  • Interior (internal elements)
  • Exterior (external elements)
  • Doors and covers
  • Electrical equipment
  • Power devices
  • Washers and wipers
  • Lighting and appliances
  • Electrical circuits
Golf 4 
  • General information
  • User manual
  • Weekly checks
  • Maintenance
  • Power unit
  • Petrol engines
  • Diesel engines
  • Cooling system
  • Fuel system (petrol)
  • Control system (petrol)
  • Fuel system (diesel)
  • Exhaust system
  • Transmission
  • Clutch
  • Car gearbox
  • Drive shafts
  • Chassis
  • Car suspension
  • Steering
  • Wheels and tires
  • Brake system
  • Body
  • Exterior (external elements)
  • Interior (internal elements)
  • Ventilation and heating
  • Car doors and sunroof
  • Washers and glass cleaners
  • Electrical equipment
  • Power devices
  • Lighting and appliances
  • Electrical circuits
Golf 3 
  • Petrol engine
  • Engine repair
  • Lubrication system
  • Cooling system
  • Ignition system
  • Diesel engine
  • Engine repair
  • Diesel injection system
  • Pre-glow system
  • Transmission
  • Clutch
  • Gearbox and drive shafts
  • Chassis
  • Steering
  • Wheels and suspension
  • Brake system
  • Electrical equipment
  • Lighting and appliances
  • Electrical circuits
Golf 2 
  • General information
  • Introduction to guide
  • User manual
  • Petrol engines 1.3 l
  • Engine repair
  • Lubrication system
  • Cooling system
  • Carburetors
  • Supply system
  • Ignition system
  • Petrol engines 1.6/1.8 l
  • Engine repair
  • Supply system
  • Ignition system
  • Diesel engines
  • Engine repair
  • Lubrication system
  • Cooling system
  • Power and exhaust system
  • Transmission
  • Clutch
  • 4-speed gearbox 084
  • 5-speed gearbox 085
  • 4-speed gearbox 020/4R
  • 5-speed gearbox 020/4T
  • Automatic gearbox
  • Drive shafts
  • Chassis
  • Steering
  • Car suspension
  • Brake system
  • Body
  • Body elements
  • Doors, locks and windows
  • Electrical equipment
  • Equipment and devices
  • Power devices
Golf 2 (petrol) 
  • General information
  • Characteristics
  • Car care
  • Maintenance
  • Power unit
  • Engine repair
  • Engine 1.05/1.30
  • Engine 1.60/1.80
  • Cooling and lubrication system
  • Power and exhaust system
  • Transmission
  • Clutch
  • Car gearbox
  • Drive shafts
  • Chassis
  • Brake system
  • Steering
  • Suspension
  • Body
  • Body and equipment
  • Electrical equipment
  • Lighting and appliances
  • Electrical circuits
Golf 1 (petrol) 
  • General information
  • Characteristics
  • User manual
  • Maintenance
  • Power unit
  • Engine adjustment
  • Engine 1.1/1.3
  • Engine 1.5/1.6/1.8
  • Engine electrical equipment
  • Cooling system
  • Fuel system
  • Transmission
  • Clutch and manual gearbox
  • Automatic gearbox
  • Chassis
  • Steering
  • Front suspension
  • Rear suspension
  • Brake system
  • Electrical equipment
  • Lighting and appliances
  • Electrical circuits
  • Body
  • Body and equipment
  • Optional equipment
Golf 1 (diesel) 
  • General information
  • Specifications
  • Maintenance
  • Power unit
  • Engine repair
  • Exhaust and turbocharger
  • Cooling system
  • Fuel system
  • Fuel injection system
  • Transmission
  • Clutch and drive shafts
  • Car gearbox
  • Chassis
  • Suspension and wheels
  • Steering
  • Brake system
  • Wheels and tires
  • Body
  • Heating and ventilation
  • Exterior (external elements)
  • Interior (internal elements)
  • Doors and windows
  • Electrical equipment
  • Equipment and devices
  • Lighting system
  • Power devices
  • Electrical circuits
VWmanual.ru © 2016-2026 | Mobile version | News and articles | Sitemap: EN BG BY UA RS HR RO PL SK HU | Write message | Site search
Passat B2 • Passat B3 • Passat B4 • Passat B5 • Passat B6 • Golf 1, diesel • Golf 1, petrol • Golf 2, petrol • Golf 2 • Golf 3 • Golf 4 • Golf 5 • Polo 3 • Polo 4 • Touareg 1 • Tiguan 1 • Sharan 1 • Transporter T3 • Transporter T4 • LT 28 • LT 2D • Beetle • Caddy 3 •
Our website uses cookies to ensure functionality and convenience.