
ball joints. Check the condition of the dust caps.
Cuffs CV joints. Inspect and make sure there are no leaks or damage.
Ball joints and tie rod ends - check and replacement
Required fixtures and tools:
- garage lift;
- electric lantern.
Ball joints - checking protective caps
Attention! There is a risk of injury when the vehicle is jacked up or placed on jack stands. Before starting work, it is recommended that you familiarize yourself with the safety precautions in chapter «car jacking».
1. Place the front of the car on jack stands. The wheels of the car standing on the goats must hang freely.
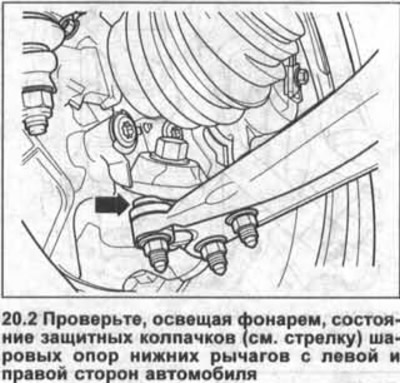
2. Check, by lighting with a flashlight, the condition of the protective caps (see arrow in illustration) ball joints of the lower arms on the left and right sides of the car.
Ball joint play - check
3. Squeeze, with sufficient force, the transverse lever up, and then feed it down, while watching the ball joint (see illustration).
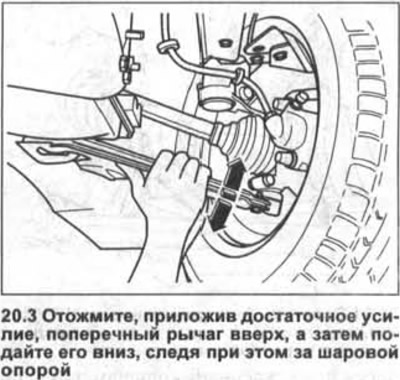
4. Depress the wheel by holding it at the bottom, outwards and towards the middle of the car, also keeping an eye on the ball joint. In both cases, the ball joint must have no play.
Attention! When performing this check, do not forget to check and take into account the possible play of the hub bearing or the play of the fastening of the upper support of the suspension strut.
Replacement
5. Remove the shaft shank from the hub, see the relevant chapter.
6. Mark the position of the three mounting nuts on the transverse arm by circling the places where they fit with a scriber, and then unscrew the nuts.
7. Remove the transverse lever by pushing it down, and press the ball joint pin with a puller 1, for example, HAZET 779-1, from the steering knuckle 2 (see illustration).
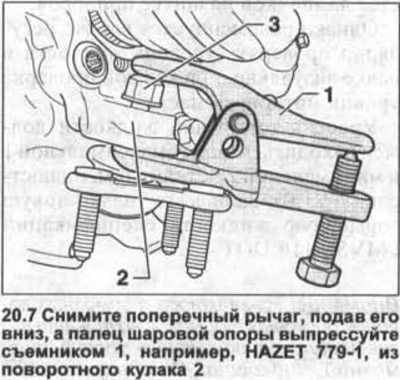
Attention! When pressing out the pin, leave the nut 3 on the upper threads.
Attention! Mark and observe the mounting position of the ball joint during installation. If installed incorrectly, the wheel alignment changes.
8. Secure the ball joint to the steering knuckle with a new self-locking nut by hand-tightening it.
9. Attach the driveshaft shank to the hub.
10. Tighten the ball joint nut to 60 Nm while holding the ball joint pin from turning with a socket wrench.
11. Attach the ball joint to the transverse arm, taking care not to twist the anther of the support or damage it.
12. Install the transverse arm with new self-locking nuts and tighten them to 75 Nm.
13. Screw in and tighten the bolt that secures the drive shaft shank in the hub, see the relevant chapter.
14. Reinstall the wheel, observing the same direction of rotation, and screw in the wheel bolts.
15. Lower the vehicle onto the wheels and only then tighten the wheel bolts in a cross pattern to 120 Nm.
Protective caps of the ball bearings of the tips and cuffs of the transverse steering rod - check
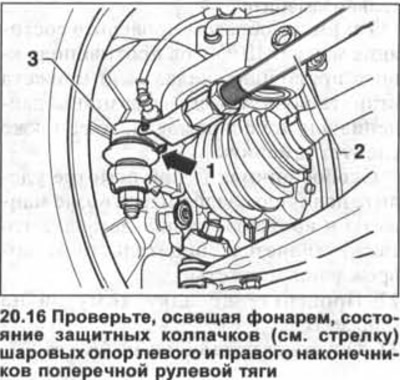
16. Check, by lighting with a flashlight, the condition of the protective caps (see arrow in illustration) ball bearings of the left and right tie rod ends.
If the protective cap of the ball joint is damaged, then it is recommended to contact the workshop to replace the ball joint itself, because dirt that has entered through the damaged cap will break the ball joint over time.
17. Check up presence of backlash at cross steering drafts. To do this, grab the traction with your 2nd hand and feed it in one, and then in the opposite direction. Backlash should not be felt.
Otherwise, replace the corresponding tip 3 (see illustration 20.16).
18. Check up fit of a counternut and a nut of fastening of a tip to cross-section steering draft. At the same time, do not turn both nuts.
19. Check up a condition of corrugated covers of the steering mechanism. Replace covers if damaged.
Cuffs of CV joints of drive shafts - check
Special fixtures and tools:
- garage lift;
- electric lantern.
Attention! There is a risk of injury when the vehicle is jacked up or placed on jack stands. Before starting work, it is recommended that you familiarize yourself with the safety precautions in chapter «car jacking».
20. Jack up the vehicle and place it on jack stands.
21. Shine a flashlight on the cuffs of the CV joints (see arrows in illustration) and inspect them for porosity or cracks. Replace torn cuffs immediately.
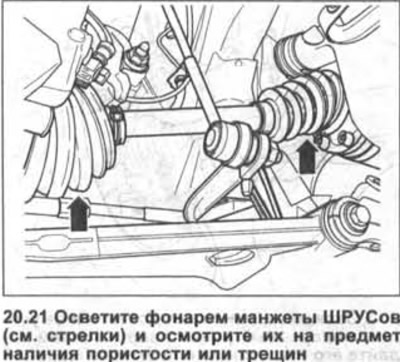
In the same way, check the condition of the CV joints of the opposite drive shaft. If the cuff is retracted inward due to pressure difference or is damaged, it should also be replaced.
When inspecting, pay special attention to the presence of traces of oil near the cuff and on nearby parts, which is also evidence of damage to the cuff.
22. Check the fit of the collars on the cuffs.
23. Lower the car on wheels.
Visitor comments