



Contents: Fuel filter with threaded plug for…↓ Removal ↓ Installation ↓ Fuel filter without threaded plug…↓
Caution! Do not allow diesel fuel to come into contact with rubber parts, especially the cooling system hoses. Remove any fuel that comes into contact with these parts immediately. Otherwise, the rubber of these parts will become unusable over time.
Attention! Cars with diesel engines are equipped with two types of fuel filters - with and without a plug for condensate collection.
Fuel filter with threaded plug for condensate collection
Necessary tools and equipment:
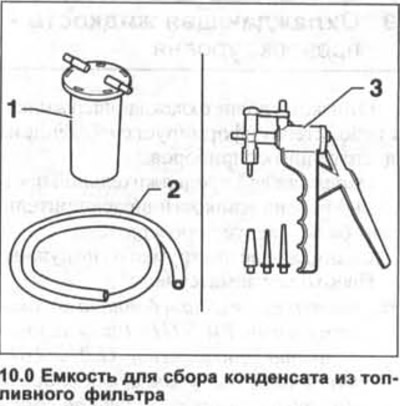
- suitable container 1 for collecting condensate from the fuel filter. for example, VAG-1390/1 (see illustration 10.0).
- hose 2, diesel resistant (see illustration 10.0).
- hand pump 3 for creating low pressure, for example, VAG-1390 (see illustration 10.0).
Materials required:
- o-ring seal round section for plug;
- gasket and replaceable filter element.
Removal
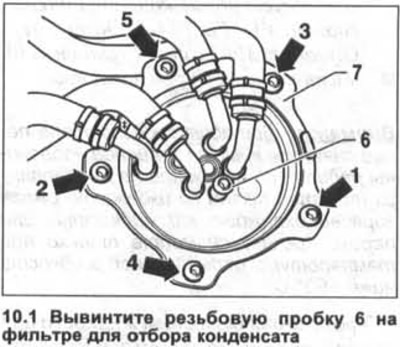
1. Unscrew the threaded plug 6 on the condensate filter (see illustration).
2. Connect a hose to the condensate collection container and lower the other end of the hose through the plug hole into the fuel filter.
3. Connect a hand pump to the second nipple of the container and pump out approximately 100 ml of liquid from the fuel filter, which is equivalent in volume to one coffee cup.
4. Remove the hose from the fuel filter and screw in the plug, placing a new sealing ring on it.
The tightening torque of the plug is 3 Nm.
5. Loosen all bolts in sequence from 1 to 7 by approximately 1.5-2 turns (see illustration 10.1).
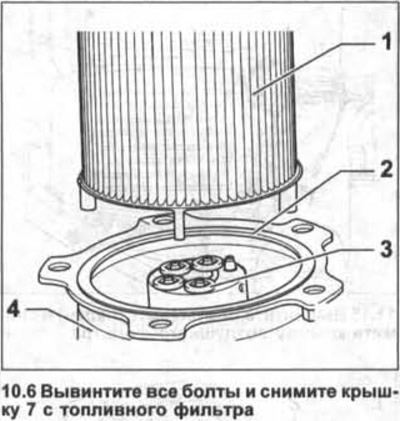
6. Unscrew all bolts and remove cover 7 from the fuel filter (see illustration).
The information is posted on this website: www.VWManual.ru
7. Remove filter element 1 and gasket 2 from filter housing 4 (see illustration 10.6).
Installation
8. Install new seal 3 (see illustration 10.6).
9. Insert the new filter element into the filter housing.
10. Attach a new sealing gasket 2 to the filter cover and screw the cover to the filter housing with bolts (see illustration 10.6).
11. Screw in the filter cover mounting bolts in sequence from 1 to 5 until it fits against the housing, and then tighten them with a force of 5 Nm (see illustration 10.1).
Caution! Tighten the bolts in a cross pattern as shown in the illustration. Otherwise, the filter housing and sealing gasket may be damaged.
12. Start the engine and let it idle.
13. Inspect the fuel system and make sure it is tight.
14. Press the accelerator pedal several times to remove air from the fuel system.
Fuel filter without threaded plug for condensate collection
Removal
15. Remove the upper engine protective cover, see the relevant chapter.
16. Loosen all bolts in sequence from 1 to 7 by approximately 1.5-2 turns (see illustration 10.1).
17. Unscrew all bolts and remove cover 7 from the fuel filter (see illustration 10.1).
18. Remove the sealing gasket from the filter cover.
19. Remove the filter element from the filter housing.
20. Remove condensation and possible contaminants from the filter housing by unscrewing it.
Installation
21. Screw on the filter housing if it was unscrewed and tighten it with a force of 10 Nm.
22. Insert a new filter element 3 into the filter housing 4 (see illustration).
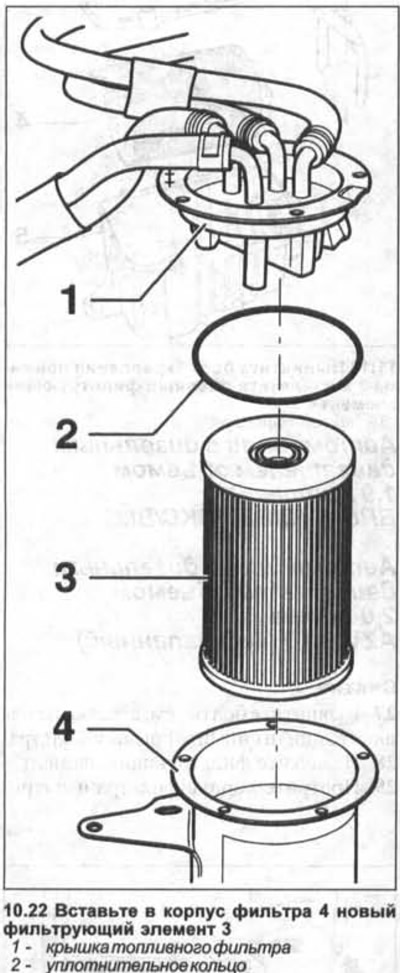
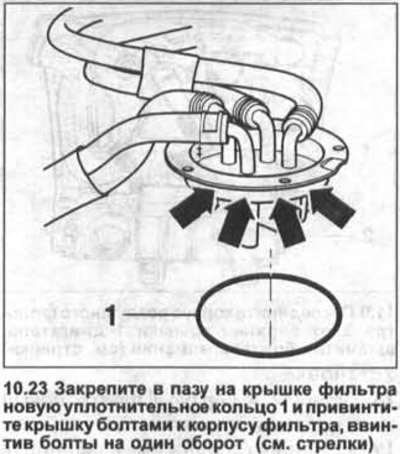
23. Fix a new sealing ring 1 in the groove on the filter cover and screw the cover to the filter housing with bolts, screwing the bolts in one turn (see arrows in the illustration).
24. Screw in the filter cover mounting bolts in sequence from 1 to 5 until the cover is flush with the housing, and then tighten them with a force of 5 Nm (see illustration 10.1).
Caution! Tighten the bolts in a cross pattern as shown in the illustration. Otherwise, the filter housing and sealing gasket may be damaged.
Visitor comments