
English Русский
Български
Беларускі
Український
Српски
Hrvatski
Română
Polski
Slovenský
Magyar
  |  Articles  |  Sitemap  |  Contacts  |    |
Car maintenance Ford Car maintenance Hyundai Car maintenance Chevrolet Car maintenance BMW Car maintenance Audi Car maintenance Opel Car maintenance AvtoVAZ
VWmanual.ru


Main   Passat   Golf   Polo   Touareg   Tiguan   Sharan   Transporter   Others  
Golf 1 (1974-1984, diesel) Golf 1 (1974-1984, petrol) Golf 2 (1984-1993, petrol) Golf 2 (1984-1993) Golf 3 (1991-1997) Golf 4 (1997-2004) Golf 5 (2003-2008)

Coolant — Checking the Level (VW Golf 5)

  • Main
  • Golf
  • Golf 5
  • General information
  • Maintenance
  • Coolant — Checking the Level
            0


Contents: Coolant - Checking Antifreeze Content ↓ Increasing the antifreeze content in…↓
The driver is informed of a low coolant level by a message on the instrument panel display.

Before each long trip, the fluid level in the expansion tank should be checked.

No special tools are required.

Materials required:
  • VW coolant concentrate "G12 Plus" purple (designation G 012 ABF) or another product whose packaging contains a note that it complies with the Volkswagen Group standard VW-TL-774-F, for example, Glysantin-Alu-Protect-Premium/G30.
  • pure distilled water.

Caution! When the engine is hot, place a thick cloth on the radiator filler cap before removing it to avoid being burned by hot coolant or steam. Remove the cap only when the coolant temperature is below +90°C.


The coolant level when the engine is cold (coolant temperature is about +20°C) should be between the maximum and minimum marks on the expansion tank.

When the engine is warm, the fluid level may rise slightly above the maximum mark (see illustration 9.0).
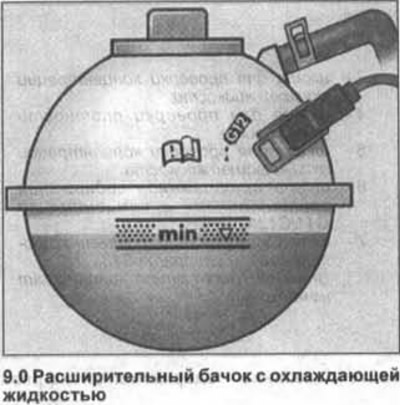
When the engine is warm, the fluid level may rise slightly above the maximum mark (see illustration…


To avoid engine damage, add large quantities of cold coolant only when the engine is cold.


Attention! If VW "G12 Plus" concentrate or another concentrate corresponding to the Volkswagen Group standard VW-TL-774-F is not available to top up the coolant volume, do not pour in the wrong concentrate. It is necessary to bring the coolant level up to the standard by pouring in distilled water. Subsequently, at the first opportunity, bring the concentration of the coolant in the system to the prescribed value.


1 Unscrew the expansion tank cap slightly to release excess pressure, then unscrew the cap completely and remove it.

If the fluid level drops significantly within a short period of time, inspect the system to check for leaks.

Coolant - Checking Antifreeze Content


To avoid malfunctions, it is recommended to check the concentration of antifreeze in the coolant regularly and especially before the winter period of vehicle operation. This is especially important if water was poured into the system.

Tools required:
  • hydrometer or refractometer A, for example, VWT10007 or HAZET-481 O-V (see illustration 9.0a). When using a refractometer, you can also measure the density of the electrolyte in the battery and the concentration of the washing fluid in the washer reservoir.

Materials required:
  • VW coolant concentrate "G12 Plus" purple (designation G 012 ABF) or other, on the packaging of which there is a note that it complies with the Volkswagen Group standard VW-TL-774-F, for example, Glysantin-Alu-Protect-Premium/G3 0.
  • pure distilled water.

Examination


1. Drive the car for a short time to raise the coolant temperature. The upper radiator hose should be just warm enough.


When checking the concentration of antifreeze in the coolant, its temperature should be approximately +20°C.

Caution! When the engine is hot, place a thick cloth on the radiator filler cap before removing it to avoid being burned by hot coolant or steam. Remove the cap only when the coolant temperature is below +90°C.


2. Unscrew and remove the cap from the expansion tank, taking precautions.

Checking the concentration of coolant with a hydrometer


3. Use a hydrometer to take coolant from the expansion tank and determine its concentration based on the position of the float (see illustration).
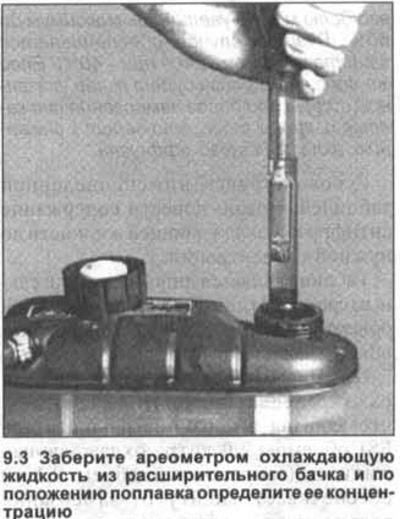
3. Use a hydrometer to take coolant from the expansion tank and determine its concentration based…


Protection against freezing in our latitudes should be provided down to -25°C, and in latitudes with extremely cold climates - down to -35°C.

Checking the concentration of coolant with a refractometer


4. Draw a small amount of cooling liquid into a pipette, apply it to prism 1 of refractometer A and close the lid 2 (see illustration 9.0a).
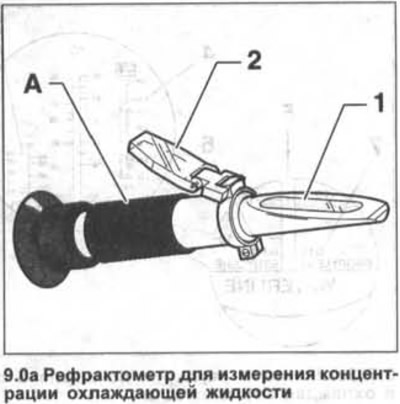
4. Draw a small amount of cooling liquid into a pipette, apply it to prism 1 of refractometer A and…


5. Look into the eyepiece and read the antifreeze content in the coolant on scale 6 (see illustration).
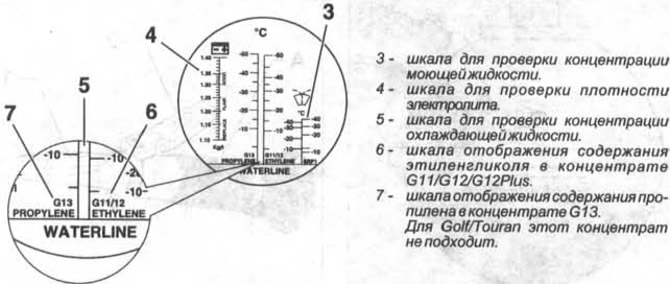
5. Look into the eyepiece and read the antifreeze content in the coolant on scale 6 (see…


Increasing the antifreeze content in the coolant


If protection against freezing at -25°C is required, the coolant should contain 40% antifreeze. If protection is required at -35°C, water and concentrate should be mixed in a 1:1 ratio.

Attention! If it is necessary to use a coolant with a higher antifreeze content, its share can be increased to a maximum of 60%. In this case, protection against freezing at -40°C is provided. If the antifreeze share is higher than the specified figure, the freezing threshold is reduced and, in addition, this leads to a decrease in the cooling effect.


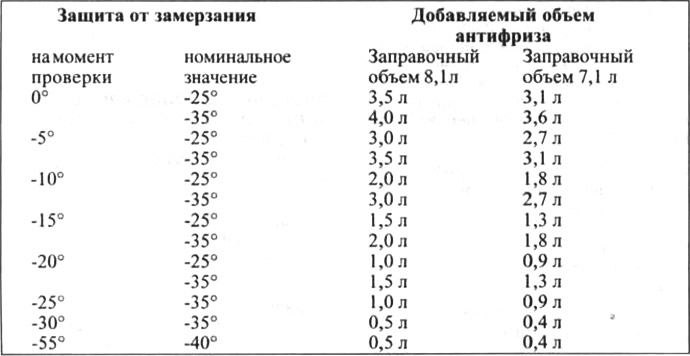
Using the table below, you can bring the antifreeze content in the coolant to the desired concentration.

The table is only an aid because the information in it is approximate. The exact filling volumes depend on the engine type.

Example: When measuring the concentration of the coolant, it turned out that the coolant poured into the FS1 2.0 liter gasoline engine(filling volume 8.1 l) provides freeze protection only at ambient temperatures of -10°C. To provide freeze protection at temperatures of -25°C, drain 2.0 l of coolant from the system and add 2.0 l of clean antifreeze.

6. Close the expansion tank cap and check the coolant concentration again after a test drive.
6. Close the expansion tank cap and check the coolant concentration again after a test drive.

This article is available at russian, bulgarian, belarusian, ukrainian, serbian, croatian, romanian, polish, slovak, hungarian
The text has been checked: Kolesnikov Artem

Share information:

Previous articles
Engine Oil and Oil Filter — Replacement
Engine oil level — check
Maintenance — works
Maintenance — Work Plan
Maintenance — General Information
Jacking up a car
Next articles
Fuel filter — replacement (diesel)
Air filter — replacing the filter element
V-belt — check
Exhaust system — visual inspection
Toothed Belt — Check
Spark plugs — replacement


Similar articles from other manuals for VW cars:
Checking the coolant level Passat B4 (1988-1996)
Checking/filling coolant level Polo 4 (2001-2009)
Checking the engine oil level (diesel engine) Touareg 1 (2002-2006)
Checking the oil level in the transfer case Tiguan 1 (2007-2015)
Checking the coolant level Sharan 1 (1995-2000)
Checking the coolant level Transporter T4 (1990-2003)
Checking the condition of antifreeze and coolant level Caddy 3 (2003-2010)
Link to this page in different formats


Visitor comments


No comments yet


How much will 30 + 38 =


Golf 5 
  • General information
  • User manual
  • Maintenance
  • Troubleshooting
  • Power unit
  • Engine repair
  • Cooling and ventilation system
  • Fuel system
  • Ignition system
  • Transmission
  • Clutch
  • Mechanical gearbox
  • Automatic gearbox
  • Chassis
  • Brake system
  • Car suspension
  • Steering
  • Body
  • Interior (internal elements)
  • Exterior (external elements)
  • Doors and covers
  • Electrical equipment
  • Power devices
  • Washers and wipers
  • Lighting and appliances
  • Electrical circuits
Golf 4 
  • General information
  • User manual
  • Weekly checks
  • Maintenance
  • Power unit
  • Petrol engines
  • Diesel engines
  • Cooling system
  • Fuel system (petrol)
  • Control system (petrol)
  • Fuel system (diesel)
  • Exhaust system
  • Transmission
  • Clutch
  • Car gearbox
  • Drive shafts
  • Chassis
  • Car suspension
  • Steering
  • Wheels and tires
  • Brake system
  • Body
  • Exterior (external elements)
  • Interior (internal elements)
  • Ventilation and heating
  • Car doors and sunroof
  • Washers and glass cleaners
  • Electrical equipment
  • Power devices
  • Lighting and appliances
  • Electrical circuits
Golf 3 
  • Petrol engine
  • Engine repair
  • Lubrication system
  • Cooling system
  • Ignition system
  • Diesel engine
  • Engine repair
  • Diesel injection system
  • Pre-glow system
  • Transmission
  • Clutch
  • Gearbox and drive shafts
  • Chassis
  • Steering
  • Wheels and suspension
  • Brake system
  • Electrical equipment
  • Lighting and appliances
  • Electrical circuits
Golf 2 
  • General information
  • Introduction to guide
  • User manual
  • Petrol engines 1.3 l
  • Engine repair
  • Lubrication system
  • Cooling system
  • Carburetors
  • Supply system
  • Ignition system
  • Petrol engines 1.6/1.8 l
  • Engine repair
  • Supply system
  • Ignition system
  • Diesel engines
  • Engine repair
  • Lubrication system
  • Cooling system
  • Power and exhaust system
  • Transmission
  • Clutch
  • 4-speed gearbox 084
  • 5-speed gearbox 085
  • 4-speed gearbox 020/4R
  • 5-speed gearbox 020/4T
  • Automatic gearbox
  • Drive shafts
  • Chassis
  • Steering
  • Car suspension
  • Brake system
  • Body
  • Body elements
  • Doors, locks and windows
  • Electrical equipment
  • Equipment and devices
  • Power devices
Golf 2 (petrol) 
  • General information
  • Characteristics
  • Car care
  • Maintenance
  • Power unit
  • Engine repair
  • Engine 1.05/1.30
  • Engine 1.60/1.80
  • Cooling and lubrication system
  • Power and exhaust system
  • Transmission
  • Clutch
  • Car gearbox
  • Drive shafts
  • Chassis
  • Brake system
  • Steering
  • Suspension
  • Body
  • Body and equipment
  • Electrical equipment
  • Lighting and appliances
  • Electrical circuits
Golf 1 (petrol) 
  • General information
  • Characteristics
  • User manual
  • Maintenance
  • Power unit
  • Engine adjustment
  • Engine 1.1/1.3
  • Engine 1.5/1.6/1.8
  • Engine electrical equipment
  • Cooling system
  • Fuel system
  • Transmission
  • Clutch and manual gearbox
  • Automatic gearbox
  • Chassis
  • Steering
  • Front suspension
  • Rear suspension
  • Brake system
  • Electrical equipment
  • Lighting and appliances
  • Electrical circuits
  • Body
  • Body and equipment
  • Optional equipment
Golf 1 (diesel) 
  • General information
  • Specifications
  • Maintenance
  • Power unit
  • Engine repair
  • Exhaust and turbocharger
  • Cooling system
  • Fuel system
  • Fuel injection system
  • Transmission
  • Clutch and drive shafts
  • Car gearbox
  • Chassis
  • Suspension and wheels
  • Steering
  • Brake system
  • Wheels and tires
  • Body
  • Heating and ventilation
  • Exterior (external elements)
  • Interior (internal elements)
  • Doors and windows
  • Electrical equipment
  • Equipment and devices
  • Lighting system
  • Power devices
  • Electrical circuits
VWmanual.ru © 2016-2026 | Mobile version | News and articles | Sitemap: EN BG BY UA RS HR RO PL SK HU | Write message | Site search
Passat B2 • Passat B3 • Passat B4 • Passat B5 • Passat B6 • Golf 1, diesel • Golf 1, petrol • Golf 2, petrol • Golf 2 • Golf 3 • Golf 4 • Golf 5 • Polo 3 • Polo 4 • Touareg 1 • Tiguan 1 • Sharan 1 • Transporter T3 • Transporter T4 • LT 28 • LT 2D • Beetle • Caddy 3 •
Our website uses cookies to ensure functionality and convenience.