



Contents: Engine oil filling volumes when…↓ Draining engine oil ↓ Replacing the oil filter ↓ Refilling engine oil ↓
To change the oil you will need the following tools and equipment:
- special tool for removing oil filter (pliers or keys);
- 32 mm socket head or HAZET 2169-32 for unscrewing the oil filter cover;
If the engine oil is collected rather than drained, then
- oil sampling syringe with nozzle diameter up to 10 mm;
- container for collecting oil.
If the oil is going to drain:
- inspection pit or hydraulic garage lift with support trestles;
- a container for collecting motor oil with a capacity of at least 5 liters.
Necessary parts for replacement of worn parts and fluids:
- depending on the engine type, 3.5-5.0 liters of engine oil. Fill only with oil recommended by VW;
- appropriate oil filter;
- new sealing ring for oil filter cover;
- new drain plug with sealing ring. A new plug is needed if the oil is drained rather than taken away.
Replacement paper filter elements are available for sale. Their advantage is that the oil filter itself does not need to be changed. Only the filter insert needs to be replaced.
The oil filter consists of a housing 1, a cover 2 and a replaceable filter element (insert) 3 (see illustration 8.0).
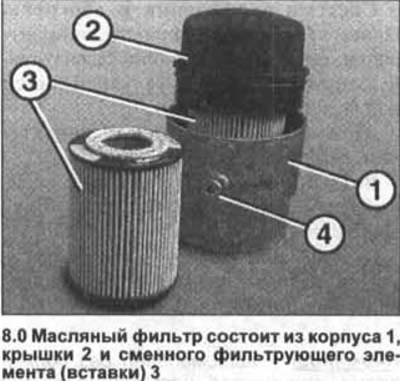
The oil filter is screwed to the cylinder block. Depending on the filter model, there may be a drain plug on its housing 4 (see illustration 8.0). Regardless of the filter housing, replaceable filter elements from different manufacturers are suitable for it.
The retail network has inserts from HENGST (see illustration 8.0), MANN+HUMMEL, as well as MAHLE/ KNECHT.
Engine oil filling volumes when replacing the filter
- 1.4 liter engine VSA - 3.5 l
- 1.4 liter FSI engine BKG/BLN - 3.8 l
- 1.4 liter TSI engine - 3.6 l
- 1.6 liter engine BGU/BSE/BSF - 4.0 l
- 1.6 liter FSI engine BAG/BLF/BLP - 3.8 l
- fS1 engine 2.0 liter AXW/BLR/BLX/BLY - 5.3 l
- 2.0 liter TFSI engine AXX - 4.85 l
- 1.9 liter diesel engine BRU/AVQ/BJB/BKC/BLS — 4.2 l
- 2.0 liter diesel engine BDK 55 kW - 4.0 l
- 2.0 liter diesel engine AZV/BKD 100/103 kW - 3.8 l
Attention! The volumes given are approximate. After changing the oil, its level should be checked with a dipstick and, if necessary, brought to normal.
Engine oil can be drawn through the guide tube of the oil level indicator rod or drained through the drain hole closed with a threaded plug.
To draw off engine oil, you need a suitable syringe.
When selecting it, it is necessary to be guided by the internal diameter of the guide tube of the rod oil level indicator, into which the syringe intake hose is inserted.
Since syringes can be supplied with hoses of different diameters, this circumstance should be taken into account.
Otherwise, it will simply be impossible to insert the siphon intake hose into the measuring probe tube.
Draining engine oil
1. Vehicles with 1.4-/1.6-liter FSI and diesel engines: Unscrew the oil filter cap to allow the oil to drain from the filter into the oil pan.
2. Draw engine oil using a syringe through the dipstick guide tube.
If there is no syringe for oil sampling, then the engine oil should be drained. To do this, place the car horizontally on trestles or stand on an inspection pit.
Warning! Jacking up the vehicle and placing it on stands may pose a risk of injury. Read the safety precautions in Chapter "Jacking up a car".
3. Remove the engine splash guard, see the relevant chapter.
4. Place a container under the oil pan to collect the drained oil.
Caution: Use caution when draining hot oil to avoid burns.
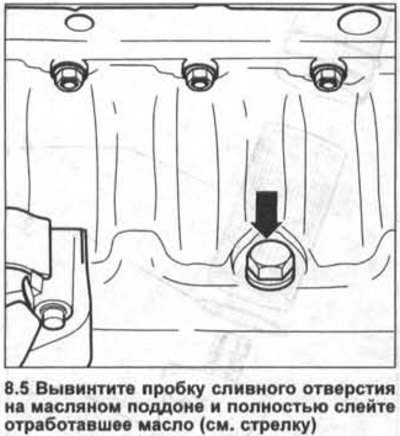
5. Unscrew the drain plug on the oil pan and completely drain the used oil (see arrow in illustration).
Caution! If large amounts of metal shavings and metal abrasion products are found in the engine oil, this indicates the presence of scoring, for example, in the crankshaft bearings or connecting rod bearings. To avoid further damage, after repairing the engine, it is necessary to thoroughly clean the oil channels and oil circulation hoses.
As an additional measure, if installed, the oil cooler must be replaced.
6. After the oil has drained, screw in a new plug with a new sealing ring.
The tightening torque of the drain plug thread is 30 Nm.
Attention! The nominal tightening torque of the drain plug thread must not be exceeded. Otherwise, it may become leaky or damaged.
7. Lower the car onto its wheels.
Replacing the oil filter
Cars with a 1.4-liter VSA petrol engine
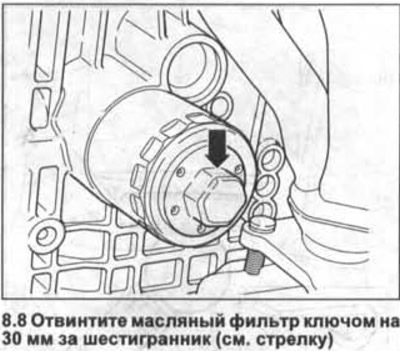
8. Unscrew the oil filter with a 30 mm Allen key (see arrow in illustration), and then unscrew the filter by hand. Collect the oil flowing out of the filter in a container or with an oil-absorbing rag.
9. Clean the oil filter mounting flange on the cylinder block with alcohol. If necessary, remove any remaining sealant.
10. Lubricate the O-ring of the new oil filter with a thin layer of engine oil.
11. Install the new oil filter in place and screw it in by hand until the sealing gasket is seated. Once the sealing gasket is seated against the cylinder block, tighten the filter an additional 1/2 turn.
It is also recommended that you first read the instructions from the manufacturer of the oil filter you are installing.
12. Lower the car onto its wheels.
Vehicles with 1.4-/1.6-liter FSI engine BKG/BLN/BAG/BLF/BLP
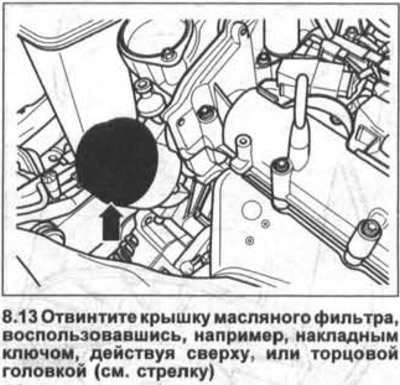
13. Unscrew the oil filter cap using, for example, a socket wrench, acting from above, or a socket head (see arrow in illustration).
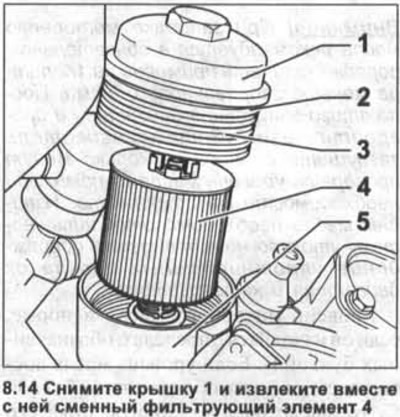
14. Remove cover 1 and remove the replaceable filter element 4 with it. Collect the leaked engine oil with a rag (see illustration).
15. Remove the replaceable filter element from the filter cover.
16. Remove the O-ring 2 (see illustration 8.14).
17. Attach the new filter element to the cover.
18. Clean the mating surface of the cover and the filter housing 5 (see illustration 8.14).
19. Install a new sealing ring 2 and lubricate it with a thin layer of fresh engine oil (see illustration 8.14).
20. Clean thread 3 on the filter cover and lubricate it with a thin layer of fresh engine oil (see illustration 8.14).
21. Insert the filter element with the cover attached to it into the filter housing and screw the cover on with a tightening torque of 25 Nm.
Cars with 1.6 liter engine BGU/BSE/BSF
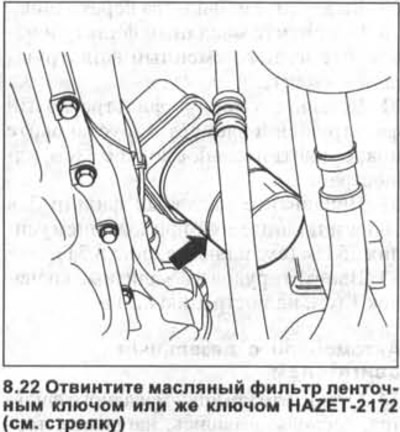
22. Unscrew the oil filter with a strap wrench or a HAZET-2172 wrench (see arrow in illustration).
23. Clean the surface where the filter meets the oil radiator.
24. Lubricate the rubber seal of the new filter with a thin layer of fresh engine oil, which will ensure an optimal seal and make it easier to tighten the filter.
25. Screw on the oil filter and tighten it by hand.
Vehicles with 2.0 litre (T)FSI engine AXW/BLR/BLX/BLY/AXX
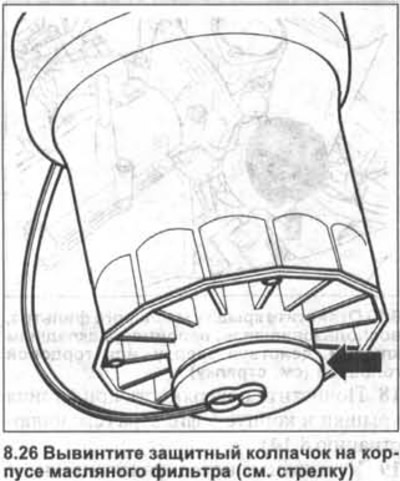
26. Unscrew the protective cap on the oil filter housing (see arrow in illustration).
27. Drain the oil from the filter using the VW-T40057-A adapter, which is screwed into the filter housing. The hose connected to the adapter should be directed into a container for collecting used oil (see illustration).
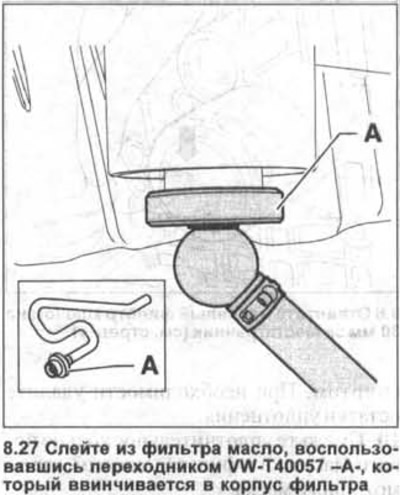
Attention! When screwing the adapter into the oil filter, a valve inside the filter opens. The valve automatically closes when unscrewing the adapter.
28. Completely drain the used oil from the filter.
29. Unscrew the adapter from the filter.
30. Unscrew the oil filter and remove the replaceable filter element from it.
31. Insert a new filter element 4 into the filter housing and install a new sealing ring 3 (see illustration).
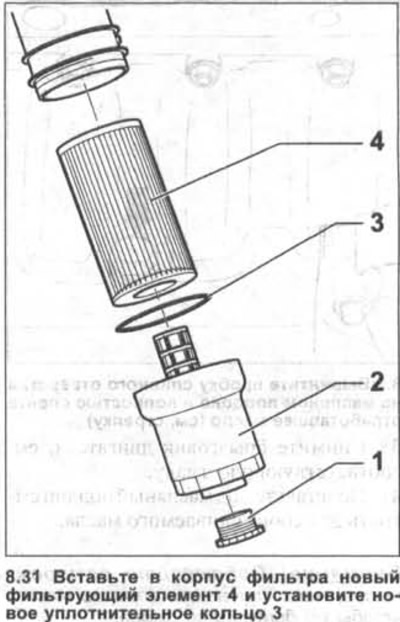
32. Screw on the oil filter 2 assembly and tighten it to 25 Nm (see illustration 8.31).
33. Screw the protective cap 1 into 2 by hand (see illustration 8.31).
Diesel Engine Cars
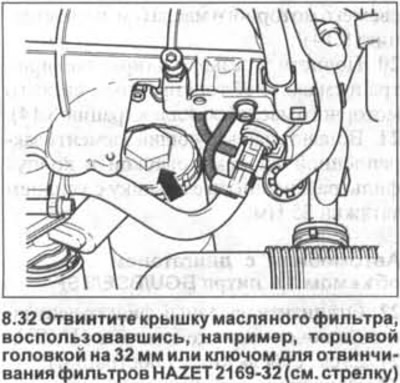
34. Unscrew the oil filter cover using, for example, a 32 mm socket head or a HAZET2169-32 filter wrench (see arrow in illustration).
33. Remove the cover and take out the replaceable filter element along with it. Collect the leaked oil with a rag.
34. Clean the cover mating surface and the filter housing.
35. Insert the filter element with the cover attached to it into the filter housing and screw the cover on with a tightening torque of 25 Nm.
36. Lower the car onto its wheels.
Refilling engine oil
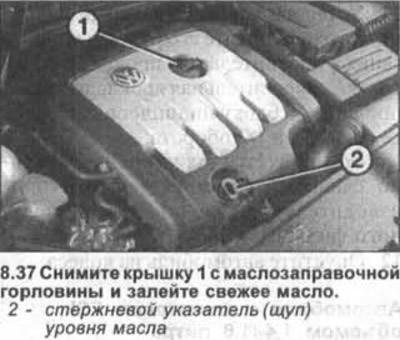
37. Remove cap 1 from the oil filler neck and fill with fresh oil (see illustration).
Attention! When adding engine oil, it is recommended to fill it with about 1/2 liter less than the filling volume. After that, start the engine and warm it up. Then turn off the engine and after a few minutes check the oil level with a dipstick and add oil if necessary. Excess oil must be removed because it can cause damage to the engine and catalytic converter seals.
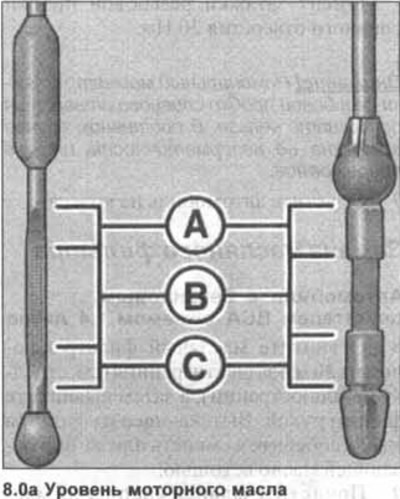
The engine oil level is normal if it is within the range indicated by the letter B. If the oil level only reaches the zone indicated by the letter C, then oil should be added until its level rises to range B.
Warning! Excess oil (above range A) should be selected, because in this case the cylinder head gasket or the catalytic converter will be damaged.
38. Perform a test drive and after its completion check the tightness of the drain plug and oil filter. If necessary, tighten them, being careful.
39. Check the oil level 3 minutes after stopping the engine and, if necessary, bring the oil level up to normal.
40. Reinstall the engine splash guard.
Visitor comments