



Contents: Cars with 1.4 liter petrol engine…↓ Cars with 1.6 litre FSI petrol…↓ Installation ↓ Cars with 1.6 liter petrol engine…↓ Cars with 2.0 liter diesel…↓ Cars with 2.0 liter diesel BDK…↓ Cars with a 2.0-liter petrol engine…↓ Cars with 1.9 liter diesel engine…↓ Cars with 2.0 litre diesel engine…↓
No special tools required.
Materials needed: Replacement air filter element.
Caution! The air filter mounting bolts are self-locking. Do not unscrew or tighten them with an impact wrench. Otherwise, the threads on the intake pipe or on the bottom of the filter housing may be damaged. Bolts should be unscrewed and tightened by hand. The tightening torque of the bolts is 3 Nm.
Cars with 1.4 liter petrol engine BCA/BKG/BLN
Removal
1. Remove the upper engine protective cover and place it upside down on a soft surface to avoid scratches, see the relevant chapter.
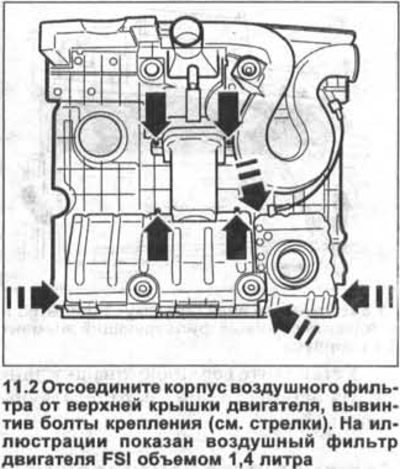
2. Disconnect the air filter housing from the upper engine cover by unscrewing the mounting bolts (see arrows in the illustration).
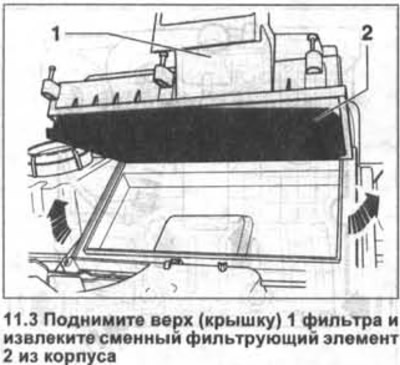
3. Lift the top (cover) 1 of the filter and remove the replaceable filter element 2 from the housing (see illustration).
4. Wipe the inside of the air filter housing.
Installation
5. Insert the new filter element into the filter housing.
6. Secure the air filter housing to the engine cover by screwing in the bolts and tightening them by hand to 3 Nm.
7. Reinstall the top engine cover, see the relevant chapter.
Cars with 1.6 litre FSI petrol engine BAG/BLF/BLP
Removal
8. Remove the upper engine protective cover and place it with the upper side on a soft surface to avoid scratches, see the relevant chapter.
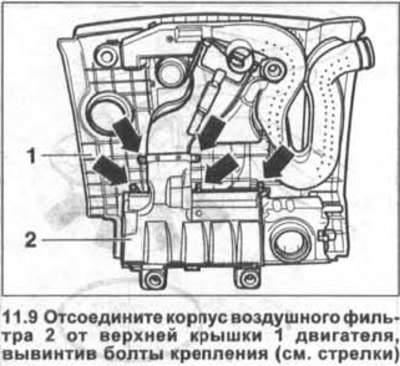
9. Disconnect the air filter housing 2 from the upper cover 1 of the engine by unscrewing the mounting bolts (see arrows in the illustration).
10. Lift the top of the filter and remove the replaceable filter element 2 from the housing (see illustration 11.3).
11. Wipe the inside of the air filter housing.
Installation
12. Insert the new filter element into the filter housing.
13. Secure the air filter housing to the engine cover by screwing in the bolts and tightening them by hand to 3 Nm.
14. Reinstall the top engine cover, see the relevant chapter.
Cars with 1.6 liter petrol engine BGU/BSE/BSF
Cars with 2.0 liter diesel AXW/BLR/BLX/BLY
Cars with 2.0 liter diesel BDK (2-valve)
Removal
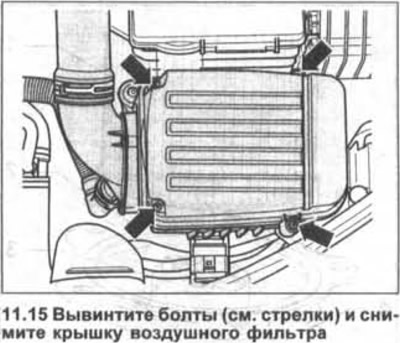
15. Unscrew the bolts (see arrows in the illustration) and remove the air filter cover.
16. Unscrew bolt 1 securing clamp 2 and remove replaceable filter element 4 (see illustration).
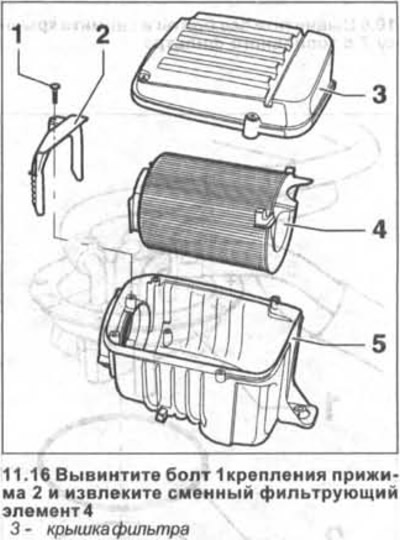
17. Wipe the inside of the filter housing 5 (see illustration 11.16).
Installation
18. Insert the new filter element into the filter housing.
19. Install the clamp and close the filter with the lid.
The tightening torque of the clamp bolt is 2 Nm, and the cover bolts are 3 Nm.
Cars with a 2.0-liter petrol engine with 147 kW (200 hp) AXX
Removal
20. Remove the upper engine protective cover and place it upside down on a soft surface to avoid scratches, see the relevant chapter.
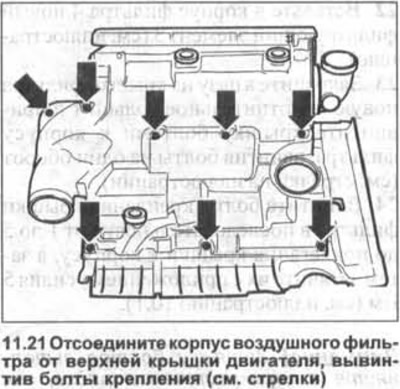
21. Disconnect the air filter housing from the upper engine cover by unscrewing the mounting bolts (see arrows in the illustration).
22. Remove the replaceable filter element.
23. Wipe the inside of the filter housing.
Installation
24. Insert the new filter element into the filter housing.
25. Secure the air filter housing to the engine cover by screwing in the bolts and tightening them by hand to 3 Nm.
26. Reinstall the top engine cover, see the relevant chapter.
Cars with 1.9 liter diesel engine BRU/A VQ/BJB/BKC/BLS
Cars with 2.0 litre diesel engine AZV/BKD (4-valve)
Removal
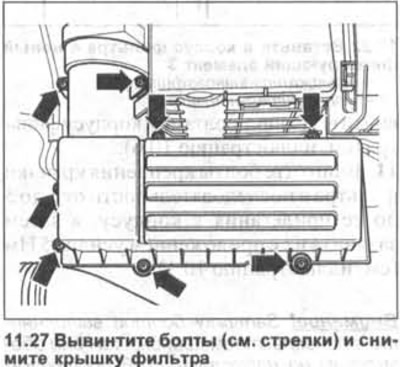
27. Unscrew the bolts (see arrows in the illustration) and remove the filter cover.
28. Remove the filter element.
29. Wipe the inside of the filter housing.
Installation
30. Insert a new filter element into the filter housing.
The original article is available at www.VWMANUAL.ru
31. Replace the filter cover and secure it with bolts to a tightening torque of 9 Nm.
Visitor comments