
English Русский
Български
Беларускі
Український
Српски
Hrvatski
Română
Polski
Slovenský
Magyar
  |  Articles  |  Sitemap  |  Contacts  |    |
Car maintenance Ford Car maintenance Hyundai Car maintenance Chevrolet Car maintenance BMW Car maintenance Audi Car maintenance Opel Car maintenance AvtoVAZ
VWmanual.ru


Main   Passat   Golf   Polo   Touareg   Tiguan   Sharan   Transporter   Others  
Golf 1 (1974-1984, diesel) Golf 1 (1974-1984, petrol) Golf 2 (1984-1993, petrol) Golf 2 (1984-1993) Golf 3 (1991-1997) Golf 4 (1997-2004) Golf 5 (2003-2008)

Valve clearances (VW Golf 2)

  • Main
  • Golf
  • Golf 2
  • Power unit
  • Engine 1.05/1.30
  • Valve clearances
            0


Examination


1. Valve clearances can be checked and adjusted with the cylinder head removed (before putting it on after repair) or during periodic maintenance.

2. Two clearance values are given - for a cold and warm engine (coolant temperature above 35°C). If checking clearances when the engine is in the car, warm the engine up to normal operating temperature (it's better to drive 3-4 km), then turn it on and remove the valve cover.
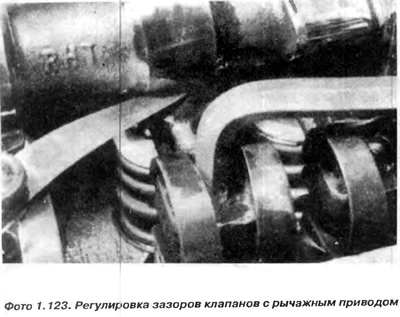
2. Two clearance values are given - for a cold and warm engine (coolant temperature above 35°C). If…


3. With the valve cover removed, rotate the crankshaft (or the camshaft if the head is removed) until the upper convex points of the two cams of the first cylinder are set at the top, and the cylindrical parts of the cams are directed toward the sliding surfaces of the two valve rockers. There is only one such position, so you can not worry about its determination. Minimal shifts to the left or right are not significant. It is important that the cylindrical parts of the two cams of one cylinder fit against the sliding surface of the valve levers.

4. Insert a gap gauge plate of the required thickness between the cam and the lever. If the plate moves freely, without resistance, it is necessary to rotate the adjusting bolt with a ball head until the plate passes with noticeable resistance. How to determine the magnitude of this resistance? Obviously, skill and experience are important here, but even a novice mechanic can handle it. The setting is definitely incorrect when the plate passes without any resistance. Also incorrect is the setting when the plate does not pass at all. Therefore, we will discuss intermediate settings:


a) when resistance to progress begins to be felt;
b) when the plate, although with great resistance, was still able to be moved forward.

It is this second setting that is more unambiguous. If there are doubts about the size of the valve clearances, we turn the adjusting bolt so that the plate advances with obvious resistance, but it is possible. Then we turn the adjusting bolt a little in the other direction, increasing the clearance so much that the resistance to advancement decreases. You cannot go beyond the lower limit of the adjustment, which is the setting (a).
It is this second setting that is more unambiguous. If there are doubts about the size of the valve…


This is all a secret related to valve adjustment. It is known from practice that the gap size in position (b) is 0.05 mm less than the gap size in position (a). Moving in the interval between (a) and (b), the error that can be made will be equal to 0.03 mm. In comparison with the price of the gap size, for example, 0.35 mm - this error is minimal and you can not worry about the condition of the engine.

Another important piece of information is that a very small clearance can be more harmful to the engine than a very large one. A very small clearance can cause the valves to burn out, requiring expensive repairs. A large clearance can cause a loss of engine power, a louder engine noise, especially at low revs, and knocking out the valve levers where they contact the valve stem or further increasing the clearance. Even if it were necessary to grind the contact surface of the lever, this operation is much simpler. It is necessary to remove the lever as in point 5 when removing the camshaft, and eliminate the dents on a grinding machine, making sure only that the grinding surface has the shape of a shaft with a diameter of about 30 mm.


In 1.1 and 1.3 l engines with a distributor, the valve order is as follows, if viewed from the timing belt side: intake-exhaust; inlet-outlet; inlet-outlet: inlet-outlet.

5. Repeat the steps described in subparagraphs 3 and 4 for the valves of the remaining cylinders. If the engine is rotated clockwise (if you look from the timing belt side), it is necessary to adjust the valves one by one, starting with cylinder 3, then 4 and 2. This is in accordance with the ignition sequence in the engine 1-3-4-2.

6. Install the valve cover with a new gasket.

7. If the clearances were adjusted after repair for a cold engine or when the valves were adjusted with the head removed, they must be checked again after 1000 km at normal engine operating temperature.

Note: It is recommended to adjust the valves on a hot engine.

This article is available at russian, bulgarian, belarusian, ukrainian, serbian, croatian, romanian, polish, slovak, hungarian
The text has been checked: Semenova Anna

Share information:

Previous articles
Installing the head on the engine
Engine head installation
Grinding of engine head valves
Removal the engine head
Crankshaft seals
Next articles
Pistons and connecting rods. Extraction
Piston inspection and repair
Installation of pistons and connecting rods
Crankshaft: extraction, inspection, repair, installation
Installing the engine in a car


Similar articles from other manuals for VW cars:
Checking and adjusting clearances in the valve drive mechanism Passat B2 (1981-1988)
Valve seat machining Polo 3 (1995-2003)
Checking the valve timing Touareg 1 (2002-2006)
Removal and installation the throttle valve control unit and the… Tiguan 1 (2007-2015)
Replacing the valve stem seals Transporter T4 (1990-2003)
Adjusting valve clearances Beetle (1960-1986)
Link to this page in different formats


Visitor comments


No comments yet


How much will 45 + 32 =


Golf 5 
  • General information
  • User manual
  • Maintenance
  • Troubleshooting
  • Power unit
  • Engine repair
  • Cooling and ventilation system
  • Fuel system
  • Ignition system
  • Transmission
  • Clutch
  • Mechanical gearbox
  • Automatic gearbox
  • Chassis
  • Brake system
  • Car suspension
  • Steering
  • Body
  • Interior (internal elements)
  • Exterior (external elements)
  • Doors and covers
  • Electrical equipment
  • Power devices
  • Washers and wipers
  • Lighting and appliances
  • Electrical circuits
Golf 4 
  • General information
  • User manual
  • Weekly checks
  • Maintenance
  • Power unit
  • Petrol engines
  • Diesel engines
  • Cooling system
  • Fuel system (petrol)
  • Control system (petrol)
  • Fuel system (diesel)
  • Exhaust system
  • Transmission
  • Clutch
  • Car gearbox
  • Drive shafts
  • Chassis
  • Car suspension
  • Steering
  • Wheels and tires
  • Brake system
  • Body
  • Exterior (external elements)
  • Interior (internal elements)
  • Ventilation and heating
  • Car doors and sunroof
  • Washers and glass cleaners
  • Electrical equipment
  • Power devices
  • Lighting and appliances
  • Electrical circuits
Golf 3 
  • Petrol engine
  • Engine repair
  • Lubrication system
  • Cooling system
  • Ignition system
  • Diesel engine
  • Engine repair
  • Diesel injection system
  • Pre-glow system
  • Transmission
  • Clutch
  • Gearbox and drive shafts
  • Chassis
  • Steering
  • Wheels and suspension
  • Brake system
  • Electrical equipment
  • Lighting and appliances
  • Electrical circuits
Golf 2 
  • General information
  • Introduction to guide
  • User manual
  • Petrol engines 1.3 l
  • Engine repair
  • Lubrication system
  • Cooling system
  • Carburetors
  • Supply system
  • Ignition system
  • Petrol engines 1.6/1.8 l
  • Engine repair
  • Supply system
  • Ignition system
  • Diesel engines
  • Engine repair
  • Lubrication system
  • Cooling system
  • Power and exhaust system
  • Transmission
  • Clutch
  • 4-speed gearbox 084
  • 5-speed gearbox 085
  • 4-speed gearbox 020/4R
  • 5-speed gearbox 020/4T
  • Automatic gearbox
  • Drive shafts
  • Chassis
  • Steering
  • Car suspension
  • Brake system
  • Body
  • Body elements
  • Doors, locks and windows
  • Electrical equipment
  • Equipment and devices
  • Power devices
Golf 2 (petrol) 
  • General information
  • Characteristics
  • Car care
  • Maintenance
  • Power unit
  • Engine repair
  • Engine 1.05/1.30
  • Engine 1.60/1.80
  • Cooling and lubrication system
  • Power and exhaust system
  • Transmission
  • Clutch
  • Car gearbox
  • Drive shafts
  • Chassis
  • Brake system
  • Steering
  • Suspension
  • Body
  • Body and equipment
  • Electrical equipment
  • Lighting and appliances
  • Electrical circuits
Golf 1 (petrol) 
  • General information
  • Characteristics
  • User manual
  • Maintenance
  • Power unit
  • Engine adjustment
  • Engine 1.1/1.3
  • Engine 1.5/1.6/1.8
  • Engine electrical equipment
  • Cooling system
  • Fuel system
  • Transmission
  • Clutch and manual gearbox
  • Automatic gearbox
  • Chassis
  • Steering
  • Front suspension
  • Rear suspension
  • Brake system
  • Electrical equipment
  • Lighting and appliances
  • Electrical circuits
  • Body
  • Body and equipment
  • Optional equipment
Golf 1 (diesel) 
  • General information
  • Specifications
  • Maintenance
  • Power unit
  • Engine repair
  • Exhaust and turbocharger
  • Cooling system
  • Fuel system
  • Fuel injection system
  • Transmission
  • Clutch and drive shafts
  • Car gearbox
  • Chassis
  • Suspension and wheels
  • Steering
  • Brake system
  • Wheels and tires
  • Body
  • Heating and ventilation
  • Exterior (external elements)
  • Interior (internal elements)
  • Doors and windows
  • Electrical equipment
  • Equipment and devices
  • Lighting system
  • Power devices
  • Electrical circuits
VWmanual.ru © 2016-2026 | Mobile version | News and articles | Sitemap: EN BG BY UA RS HR RO PL SK HU | Write message | Site search
Passat B2 • Passat B3 • Passat B4 • Passat B5 • Passat B6 • Golf 1, diesel • Golf 1, petrol • Golf 2, petrol • Golf 2 • Golf 3 • Golf 4 • Golf 5 • Polo 3 • Polo 4 • Touareg 1 • Tiguan 1 • Sharan 1 • Transporter T3 • Transporter T4 • LT 28 • LT 2D • Beetle • Caddy 3 •
Our website uses cookies to ensure functionality and convenience.