
English Русский
Български
Беларускі
Український
Српски
Hrvatski
Română
Polski
Slovenský
Magyar
  |  Articles  |  Sitemap  |  Contacts  |    |
Car maintenance Ford Car maintenance Hyundai Car maintenance Chevrolet Car maintenance BMW Car maintenance Audi Car maintenance Opel Car maintenance AvtoVAZ
VWmanual.ru


Main   Passat   Golf   Polo   Touareg   Tiguan   Sharan   Transporter   Others  
LT 28 (1975-1991) LT 2D (1996-2003) Beetle (1960-1986) Caddy 3 (2003-2010)

Adjusting valve clearances (VW Beetle)

  • Main
  • Volkswagen
  • Beetle
  • Power unit
  • Engine repair
  • Adjusting valve clearances
            0


A certain gap must be maintained between the valve stem and its rocker arm at all times. An increased or decreased clearance leads to poor engine performance and intensive wear.

When the clearance is reduced, the valve timing changes, the cylinder sealing deteriorates, engine power drops, and it starts to run intermittently. In extreme cases, the valves or their seats become deformed or burn out.

When the gap is increased, loud noises arise, the valve timing changes, the engine loses power due to insufficient filling of the cylinders, and its operation becomes uneven.

Due to differences in the coefficient of thermal expansion of different parts of the engine, the thermal clearance of the valves also depends on the operating temperature of the engine.

Caution! Valve clearances must be checked and adjusted on a cold engine.


Valve clearances should be checked every 10,000 km. The nominal clearance values for all vehicle variants are as follows:
  • intake valves - 0.15 mm;
  • exhaust valves - 0.15 mm.

Raise the rear of the vehicle and place it on supports.

[The original text can be found on the portal: vwmanual]

Using a large screwdriver, remove the retaining clips on the valve cover and remove the cover.

Adjustment of thermal valve clearances is performed in the following sequence: 1st, 2nd, 3rd and 4th cylinders. The first cylinder is located at the front right side as the vehicle moves. The corresponding marking is located on the engine cover next to the spark plug hole.

The clearance must be adjusted when the piston is at TDC on the compression stroke. In this position, both valves are closed.
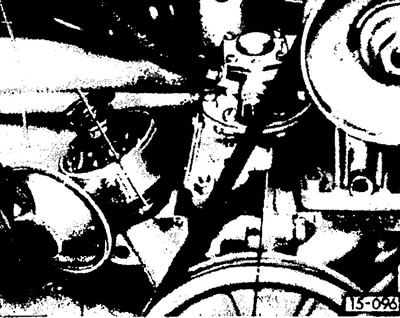


Set cylinder 1 to TDC. To do this, remove the distributor cap and crank the engine using the V-belt…


Set cylinder 1 to TDC. To do this, remove the distributor cap and crank the engine using the V-belt until the mark on the pulley aligns with the joint between the crankcase halves. At the same time, the middle of the movable contact of the distributor must coincide with the mark on the edge of the latter's housing. In this position, the thermal clearance of the valves of the 1st cylinder is checked and adjusted.
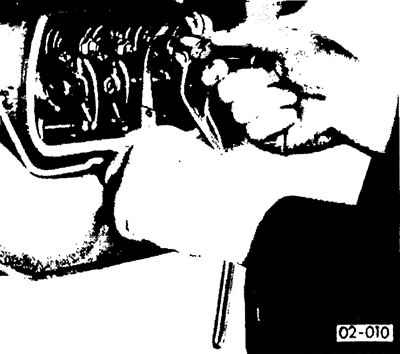
Insert a 0.15 mm feeler gauge between the valve rocker arm and its stem. If the valve clearance is…


Insert a 0.15 mm feeler gauge between the valve rocker arm and its stem. If the valve clearance is greater or less than the nominal value, loosen the adjusting screw lock nut and adjust the clearance using a screwdriver. The gap is set correctly if the feeler gauge is inserted and removed with little friction.


While holding the adjusting screw in the proper position with a screwdriver, tighten the lock nut.

Check the valve clearance again. To adjust the thermal clearances in

valves of other cylinders, it is necessary to set the piston of the corresponding cylinder to TDC by rotating the crankshaft. Adjustment is made much easier if you use a scriber to make appropriate marks on the edge of the distributor housing.
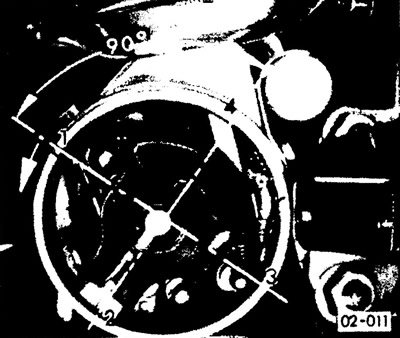
To adjust the valve clearances of other cylinders, the crankshaft must be installed according to…


To adjust the valve clearances of other cylinders, the crankshaft must be installed according to the markings shown in the picture, each time turning it to the left at an angle of 90°.

Wash the valve cover with gasoline, install a new sealing gasket and secure the cover with a clamp.

Check the oil level and test drive to see if the valve cover gasket is leaking oil.

This article is available at russian, bulgarian, belarusian, ukrainian, serbian, croatian, romanian, polish, slovak, hungarian
The text has been checked: Kolesnikov Artem

Share information:

Previous articles
Valve seat machining
Checking the valve guides
Checking valve seats for leaks
Lapping valves
Valve grinding
Removal, checking and installation valves
Next articles
Checking the compression in the cylinders
Removal and installation of cylinders, pistons and piston rings
Checking the pistons
Checking piston rings
Checking the inner diameter of the cylinders
Removal and installation the rear engine cover


Similar articles from other manuals for VW cars:
Checking and adjusting clearances in the valve drive mechanism Passat B2 (1981-1988)
Adjusting valve clearances Golf 2 (1984-1993)
Removal and adjusting headrests Polo 3 (1995-2003)
Adjusting the valve timing Touareg 1 (2002-2006)
Removal and installation the throttle valve control unit and the… Tiguan 1 (2007-2015)
Adjusting the tension of the drive belt of engine units Sharan 1 (1995-2000)
Checking and adjusting the shut-off damper and the slow-down… Transporter T3 (1979-1992)
Link to this page in different formats


Visitor comments


No comments yet


How much will 42 + 21 =


Caddy 3 
  • General information
  • User manual
  • Daily care
  • Maintenance
  • Petrol engines 1.4 l
  • Engine repair
  • Cooling and lubrication system
  • Power and exhaust system
  • Petrol engines 1.6 l
  • Engine repair
  • Cooling and lubrication system
  • Power and exhaust system
  • Diesel engines
  • Engine repair
  • Cooling and lubrication system
  • Power and exhaust system
  • Transmission
  • Mechanical gearbox 0AH
  • Mechanical gearbox 0A4
  • Drive shafts
  • Chassis
  • Car suspension
  • Steering
  • Brake system
  • Body and wiring diagrams
  • Interior and exterior
  • Electrical circuits
Beetle 
  • General information
  • Maintenance
  • Power unit
  • Engine repair
  • Cooling and lubrication system
  • Supply system
  • Exhaust system
  • Transmission
  • Clutch
  • Car gearbox
  • Chassis
  • Front suspension
  • Rear suspension
  • Steering
  • Brake system
  • Wheels and tires
  • Body
  • Exterior
  • Electrical equipment
  • Equipment and devices
  • Power devices
  • Electrical circuits
LT 2D 
  • General information
  • User manual
  • Maintenance
  • Power unit
  • Petrol engines 2.3 l
  • Diesel engines 2.5 l
  • Diesel engines 2.8 l
  • Injection system (diesel 2.8 l)
  • Transmission
  • Clutch
  • Manual gearbox
  • Differential
  • Chassis
  • Car suspension
  • Steering system
  • Brake system
  • Body
  • Body elements
  • Heating system
  • Electrical equipment
  • Equipment and devices
  • Electrical circuits
LT 28 
  • General information
  • Maintenance
  • Power unit
  • Petrol engines 2.0L
  • Petrol engines 2.4L
  • Diesel engines
  • Cooling and heating
  • Fuel and exhaust system
  • Ignition system
  • Transmission
  • Clutch
  • Car gearbox
  • Cardan shaft
  • Rear axle
  • Chassis
  • Brake system
  • Car suspension
  • Steering system
  • Body
  • Body elements
  • Doors, locks and windows
  • Electrical equipment
  • Power devices
  • Equipment and devices
  • Electrical circuits
VWmanual.ru © 2016-2026 | Mobile version | News and articles | Sitemap: EN BG BY UA RS HR RO PL SK HU | Write message | Site search
Passat B2 • Passat B3 • Passat B4 • Passat B5 • Passat B6 • Golf 1, diesel • Golf 1, petrol • Golf 2, petrol • Golf 2 • Golf 3 • Golf 4 • Golf 5 • Polo 3 • Polo 4 • Touareg 1 • Tiguan 1 • Sharan 1 • Transporter T3 • Transporter T4 • LT 28 • LT 2D • Beetle • Caddy 3 •
Our website uses cookies to ensure functionality and convenience.