
English Русский
Български
Беларускі
Український
Српски
Hrvatski
Română
Polski
Slovenský
Magyar
  |  Articles  |  Sitemap  |  Contacts  |    |
Car maintenance Ford Car maintenance Hyundai Car maintenance Chevrolet Car maintenance BMW Car maintenance Audi Car maintenance Opel Car maintenance AvtoVAZ
VWmanual.ru


Main   Passat   Golf   Polo   Touareg   Tiguan   Sharan   Transporter   Others  
LT 28 (1975-1991) LT 2D (1996-2003) Beetle (1960-1986) Caddy 3 (2003-2010)

Removal, checking and installation valves (VW Beetle)

  • Main
  • Volkswagen
  • Beetle
  • Power unit
  • Engine repair
  • Removal, checking and installation valves
            0


Contents: Removal ↓ Installation ↓

Removal


Remove the cylinder head (see section "Removal and installation cylinder heads").

Attention! Old valves must be installed in their original locations. Mark all valves before disassembling. After prolonged engine operation, a burr may form on the contact surface of the crackers with the valve stem. It must be removed using a velvet file so that the burr does not leave scratches when the valve passes through the guide sleeve.
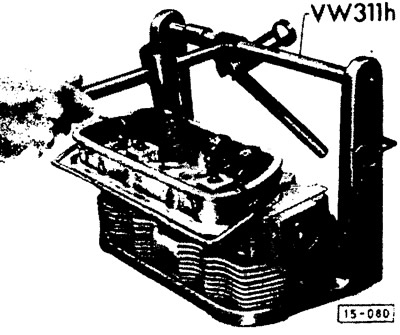

Press down on the valve spring plates and remove the crackers. In workshops, a clamping device is…


Press down on the valve spring plates and remove the crackers. In workshops, a clamping device is used for this purpose (see photo) or a valve spring compressor (see the "Tools" chapter). The valve spring retainer can also be pressed down using two strong screwdrivers. Then (by any method of pressing) insert a tab into the combustion chamber so that the valve does not fall through when pressed. At the same time, the assistant should take out the crackers.

Remove the spring plate, valve spring and seal. Examination

Clean the disassembled valves with a wire brush.

Check the valves for carbon deposits on the seats, runout and signs of wear on the stems, and damage to the grooves for the crackers.


Caution! The valve stem must not be machined or straightened. Damaged valves must be replaced.


If only the end surface of the rod is broken, then only the valve cuff can be replaced. Cuffs are available at VW/Audi service stations (catalog number - 113 109 621).
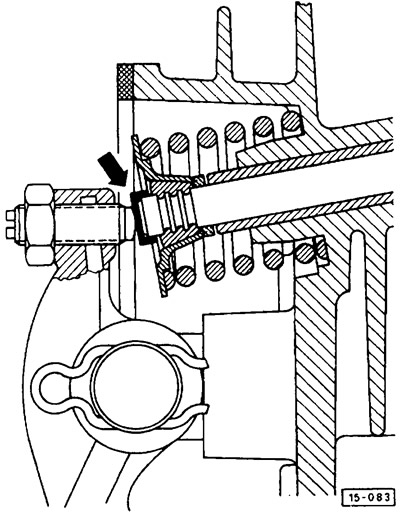
The cuff is placed on the valve stem before installing the rocker arm and does not require…


The cuff is placed on the valve stem before installing the rocker arm and does not require additional locking.

Installation


Before installing the valves in this case, the following work must be carried out: check the valves and their guide bushings in the cylinder head, grind the valve seats in the cylinder head, grind and grind the valves, and check their seats for leaks.

Apply a layer of M0S2-based paste to the valve stems and install the valves in their original locations as marked.

Install new seals on the valve stems.

Install the valve springs and spring retainers.

Caution! Install the valve springs so that the coils with the smaller pitch are directed towards the cylinder head.


Compress the springs using a suitable tool and install the crackers.

Note: The run-in crackers must be ground to the surface of the joint so that the valve stem can rotate in them.

This article is available at russian, bulgarian, belarusian, ukrainian, serbian, croatian, romanian, polish, slovak, hungarian
The text has been checked: Kolesnikov Artem

Share information:

Previous articles
Removal and installation cylinder heads
Disassembling and assembling the engine
Removal and installation the engine
Lifting a car
General description of engines
Next articles
Valve grinding
Lapping valves
Checking valve seats for leaks
Checking the valve guides
Valve seat machining
Adjusting valve clearances


Similar articles from other manuals for VW cars:
Checking the injector valves / idle switch Passat B3 (1988-1993)
Checking the valves Golf 2 (1984-1993)
Checking the levels of the main working fluids Polo 3 (1995-2003)
Checking the condition of the poly V-belt Touareg 1 (2002-2006)
Checking the operation of the intake manifold flap Tiguan 1 (2007-2015)
Checking the engine oil level and replacing it Sharan 1 (1995-2000)
Checking tire valves Transporter T4 (1990-2003)
Link to this page in different formats


Visitor comments


No comments yet


How much will 32 + 16 =


Caddy 3 
  • General information
  • User manual
  • Daily care
  • Maintenance
  • Petrol engines 1.4 l
  • Engine repair
  • Cooling and lubrication system
  • Power and exhaust system
  • Petrol engines 1.6 l
  • Engine repair
  • Cooling and lubrication system
  • Power and exhaust system
  • Diesel engines
  • Engine repair
  • Cooling and lubrication system
  • Power and exhaust system
  • Transmission
  • Mechanical gearbox 0AH
  • Mechanical gearbox 0A4
  • Drive shafts
  • Chassis
  • Car suspension
  • Steering
  • Brake system
  • Body and wiring diagrams
  • Interior and exterior
  • Electrical circuits
Beetle 
  • General information
  • Maintenance
  • Power unit
  • Engine repair
  • Cooling and lubrication system
  • Supply system
  • Exhaust system
  • Transmission
  • Clutch
  • Car gearbox
  • Chassis
  • Front suspension
  • Rear suspension
  • Steering
  • Brake system
  • Wheels and tires
  • Body
  • Exterior
  • Electrical equipment
  • Equipment and devices
  • Power devices
  • Electrical circuits
LT 2D 
  • General information
  • User manual
  • Maintenance
  • Power unit
  • Petrol engines 2.3 l
  • Diesel engines 2.5 l
  • Diesel engines 2.8 l
  • Injection system (diesel 2.8 l)
  • Transmission
  • Clutch
  • Manual gearbox
  • Differential
  • Chassis
  • Car suspension
  • Steering system
  • Brake system
  • Body
  • Body elements
  • Heating system
  • Electrical equipment
  • Equipment and devices
  • Electrical circuits
LT 28 
  • General information
  • Maintenance
  • Power unit
  • Petrol engines 2.0L
  • Petrol engines 2.4L
  • Diesel engines
  • Cooling and heating
  • Fuel and exhaust system
  • Ignition system
  • Transmission
  • Clutch
  • Car gearbox
  • Cardan shaft
  • Rear axle
  • Chassis
  • Brake system
  • Car suspension
  • Steering system
  • Body
  • Body elements
  • Doors, locks and windows
  • Electrical equipment
  • Power devices
  • Equipment and devices
  • Electrical circuits
VWmanual.ru © 2016-2026 | Mobile version | News and articles | Sitemap: EN BG BY UA RS HR RO PL SK HU | Write message | Site search
Passat B2 • Passat B3 • Passat B4 • Passat B5 • Passat B6 • Golf 1, diesel • Golf 1, petrol • Golf 2, petrol • Golf 2 • Golf 3 • Golf 4 • Golf 5 • Polo 3 • Polo 4 • Touareg 1 • Tiguan 1 • Sharan 1 • Transporter T3 • Transporter T4 • LT 28 • LT 2D • Beetle • Caddy 3 •
Our website uses cookies to ensure functionality and convenience.