



The 2.4-liter gasoline engine of car Volkswagen LT 28/35

2.4-liter engine specifications
2.4L engine General information Type 6-cylinder in-line engine with overhead camshaft and water cooling Code DL or HS (low-compression) Cylinder diameter 76.5 mm Piston stroke...
2.4L engine General information Type 6-cylinder in-line engine with overhead camshaft and water cooling Code DL or HS (low-compression) Cylinder diameter 76.5 mm Piston stroke...
General description — models with a 2.4 l engine
1. The 2.4-liter 6-cylinder engine was first installed on the models in question at the beginning of 1983, replacing the 2-liter 4-cylinder engines that are no longer installed on...
1. The 2.4-liter 6-cylinder engine was first installed on the models in question at the beginning of 1983, replacing the 2-liter 4-cylinder engines that are no longer installed on...
Basic operations that can be carried out without removing the engine from the vehicle
10. The following operations can be performed on the engine while it is on the vehicle: Removal and installation the timing belt; Removal and installation the camshaft; Removal...
10. The following operations can be performed on the engine while it is on the vehicle: Removal and installation the timing belt; Removal and installation the camshaft; Removal...

Removal the car engine
11. The engine is removed using the same method as the 2.0L engine (i.e. it is lifted up and pulled out through the left door of the cabin). It should be remembered, however, that...
11. The engine is removed using the same method as the 2.0L engine (i.e. it is lifted up and pulled out through the left door of the cabin). It should be remembered, however, that...
Oil pan — removal and installation (engine still on the vehicle)
LT 28, 31 and 35 (rear axle with wishbones) 70. Drain the oil from the engine. 71. Unscrew the pan mounting bolts. The two bolts at the rear of the oil pan will be easier to...
LT 28, 31 and 35 (rear axle with wishbones) 70. Drain the oil from the engine. 71. Unscrew the pan mounting bolts. The two bolts at the rear of the oil pan will be easier to...

Vibration damper — removal and installation
78. Remove the crankshaft bolt (see photo). Photo 4B.78A. Removing the crankshaft bolt. It is tightened very tightly, so it is necessary to block the flywheel from rotating while...
78. Remove the crankshaft bolt (see photo). Photo 4B.78A. Removing the crankshaft bolt. It is tightened very tightly, so it is necessary to block the flywheel from rotating while...
Timing belt — removal, installation and tensioning
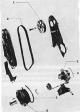
Fig. 13.4. Timing mechanism parts - models produced before 1984: 1 - Camshaft sprocket; 2 - Toothed belt; 3 - Water pump; 4 - O-ring with circular cross-section; 5 - Generator...
Fig. 13.4. Timing mechanism parts - models produced before 1984: 1 - Camshaft sprocket; 2 - Toothed belt; 3 - Water pump; 4 - O-ring with circular cross-section; 5 - Generator...

Camshaft — removal and installation
92. Remove the timing belt as described above. 93. Remove the valve cover. 94. Remove the distributor (see section 7 of this Appendix). 95. Remove the camshaft sprocket mounting...
92. Remove the timing belt as described above. 93. Remove the valve cover. 94. Remove the distributor (see section 7 of this Appendix). 95. Remove the camshaft sprocket mounting...

Cylinder head removal and installation
117. The cylinder head can be removed together with the camshaft, without touching the intake and exhaust manifolds and the carburetor. The latter can be removed after removing...
117. The cylinder head can be removed together with the camshaft, without touching the intake and exhaust manifolds and the carburetor. The latter can be removed after removing...

Cylinder head and valve mechanism — overhaul
143. Remove the cylinder head (see above). 144. Remove the camshaft. 145. Before removing the valve mechanism parts, you should prepare clean boxes in which you can arrange the...
143. Remove the cylinder head (see above). 144. Remove the camshaft. 145. Before removing the valve mechanism parts, you should prepare clean boxes in which you can arrange the...

Valve clearances — checking and adjustment
153. Remove the valve cover. 154. Valve clearances are checked and adjusted on an engine at normal operating temperature. 155. After overhauling the cylinder head, it is necessary...
153. Remove the valve cover. 154. Valve clearances are checked and adjusted on an engine at normal operating temperature. 155. After overhauling the cylinder head, it is necessary...

Oil pan and oil pickup tube — removal and installation
180. The oil pan is basically similar to the one used on a 4-cylinder engine. To remove it, you must first remove the alternator drive belt, timing belt, crankshaft pulley,...
180. The oil pan is basically similar to the one used on a 4-cylinder engine. To remove it, you must first remove the alternator drive belt, timing belt, crankshaft pulley,...

Oil dipstick tube — removal and installation
187. The oil dipstick tube is bolted to the left rear side of the engine. 188. To remove the tube, unscrew the bolt (see photo) at the top of the tube. Photo 4B.188. Upper mount...
187. The oil dipstick tube is bolted to the left rear side of the engine. 188. To remove the tube, unscrew the bolt (see photo) at the top of the tube. Photo 4B.188. Upper mount...

Flywheel — removal and installation
191. To get to the flywheel, you need to remove the clutch. 192. Before removing the flywheel, mark its position relative to the crankshaft so that the flywheel can be...
191. To get to the flywheel, you need to remove the clutch. 192. Before removing the flywheel, mark its position relative to the crankshaft so that the flywheel can be...

Crankshaft seals — replacement
197. Both front and rear crankshaft oil seals can be replaced with the engine in the vehicle. Oil seals must be replaced, regardless of their condition, at every engine overhaul....
197. Both front and rear crankshaft oil seals can be replaced with the engine in the vehicle. Oil seals must be replaced, regardless of their condition, at every engine overhaul....

Crankshaft — removal, inspection and installation
219. Removal, installation and inspection of the crankshaft are discussed in Chapter 1, sections 17 , 19 and 21 . Please note the following additional points. 220. The crankshaft...
219. Removal, installation and inspection of the crankshaft are discussed in Chapter 1, sections 17 , 19 and 21 . Please note the following additional points. 220. The crankshaft...
Low-compression engines (code HS)
238. The 2.4L low-compression engine was first installed in April 1983 on models intended for countries using low-octane fuel. 239. The low-compression engine differs from the...
238. The 2.4L low-compression engine was first installed in April 1983 on models intended for countries using low-octane fuel. 239. The low-compression engine differs from the...
This section is available on russian, bulgarian, belarusian, ukrainian, serbian, croatian, romanian, polish, slovak, hungarian
Similar sections from other manuals for VW cars:
Power unit: Petrol engines Volkswagen Golf 4 (1997-2004)
Electrical equipment: Wiring diagrams (petrol) Volkswagen Polo 3 (1995-2003)
Power unit: Petrol engines Volkswagen Golf 4 (1997-2004)
Electrical equipment: Wiring diagrams (petrol) Volkswagen Polo 3 (1995-2003)
Caddy 3
Beetle
LT 2D
LT 28
- General information
- User manual
- Daily care
- Maintenance
- Petrol engines 1.4 l
- Engine repair
- Cooling and lubrication system
- Power and exhaust system
- Petrol engines 1.6 l
- Engine repair
- Cooling and lubrication system
- Power and exhaust system
- Diesel engines
- Engine repair
- Cooling and lubrication system
- Power and exhaust system
- Transmission
- Mechanical gearbox 0AH
- Mechanical gearbox 0A4
- Drive shafts
- Chassis
- Car suspension
- Steering
- Brake system
- Body and wiring diagrams
- Interior and exterior
- Electrical circuits
- General information
- Maintenance
- Power unit
- Engine repair
- Cooling and lubrication system
- Supply system
- Exhaust system
- Transmission
- Clutch
- Car gearbox
- Chassis
- Front suspension
- Rear suspension
- Steering
- Brake system
- Wheels and tires
- Body
- Exterior
- Electrical equipment
- Equipment and devices
- Power devices
- Electrical circuits
- General information
- User manual
- Maintenance
- Power unit
- Petrol engines 2.3 l
- Diesel engines 2.5 l
- Diesel engines 2.8 l
- Injection system (diesel 2.8 l)
- Transmission
- Clutch
- Manual gearbox
- Differential
- Chassis
- Car suspension
- Steering system
- Brake system
- Body
- Body elements
- Heating system
- Electrical equipment
- Equipment and devices
- Electrical circuits
- General information
- Maintenance
- Power unit
- Petrol engines 2.0L
- Petrol engines 2.4L
- Diesel engines
- Cooling and heating
- Fuel and exhaust system
- Ignition system
- Transmission
- Clutch
- Car gearbox
- Cardan shaft
- Rear axle
- Chassis
- Brake system
- Car suspension
- Steering system
- Body
- Body elements
- Doors, locks and windows
- Electrical equipment
- Power devices
- Equipment and devices
- Electrical circuits