
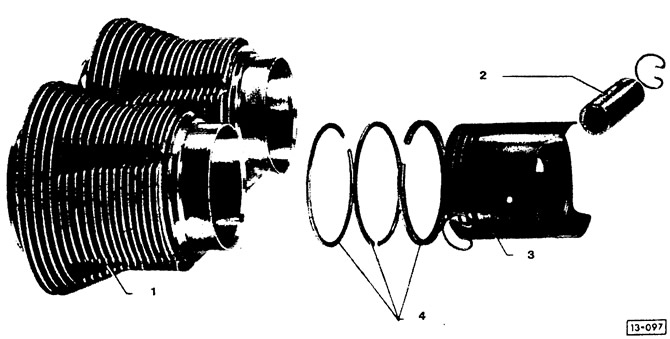
Cylinders, pistons and piston rings: 1 - cylinder (mark before disassembly); 2 - piston pin (during installation, heat the piston to a temperature of approximately 6 (RS); 3 - piston (weight difference of individual pistons: max. 10 g); 4 - piston rings (shift the locks by 120°, the lock of the oil scraper ring must be located on top)
Removing
Remove and disassemble the engine (see sections "Removal and installation of the engine" And "Engine disassembly and assembly").
Remove exhaust system (see section "Exhaust system replacement").
Remove cooling fan (see chapter "Cooling system").
Remove engine cover (see section "Removal and installation of a back protective cover of the engine").
Remove cylinder head (see section "Removal and installation of cylinder heads").
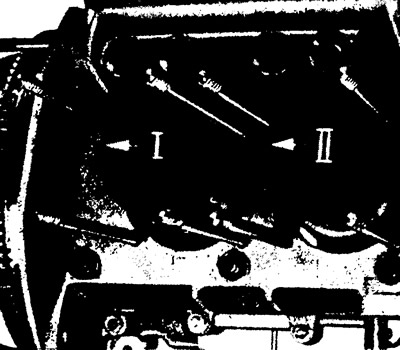
Mark the cylinders on the side and the pistons on the bottom with their serial number and an arrow in the direction of the flywheel so that they can be reinstalled later without mixing them up.
Remove the guide plates under the cylinders and remove the cylinder. Hold the piston when pulling out so that it does not fall down and is not damaged.
Rotate the crankshaft so that the piston to be removed extends as far as possible.
Remove the piston pin circlips using standard circlip pliers.
Press the piston pins by hand through a suitable mandrel. If the piston pin is difficult to withdraw, the piston can be carefully heated with a blowtorch to a temperature of about 60°C.
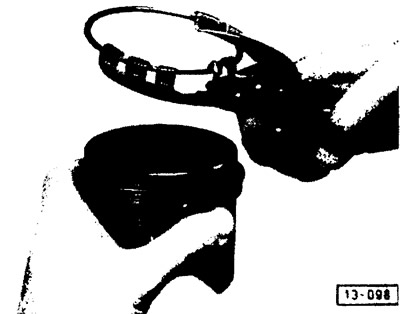
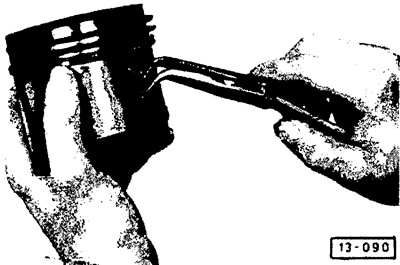
Attention! Piston rings can only be removed with a piston ring pliers.
Installation
When installing new cylinders and pistons, the following requirements must be observed.
There are three pair repair kits available as spare parts "cylinder-piston" (normal size, 1st repair size and 2nd repair size).
Each set "cylinder-piston" a certain diameter is subdivided into two different size classes. These classes are marked with colored dots (blue or pink) on the piston crown and cylinder ribs.
The maximum difference in the masses of the pistons in the new set (for all 4 cylinders) should not exceed 10 g, therefore, for pistons, there are two more mass classes, which are marked with the symbol "-" or "+" on the piston crown and additionally colored dot: brown dot - gray - "+".
Before assembling used pistons, piston rings and cylinders, it is necessary to check the pistons, measure the gap in the piston ring lock, and also check the surface quality of the cylinder mirrors.
Piston rings may only be fitted with piston ring pliers. When installing, the type of rings must be taken into account.
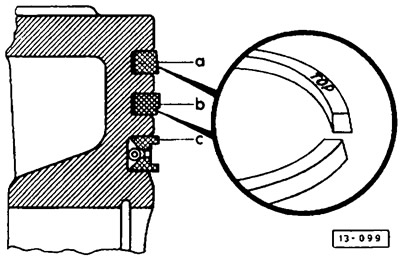
Designation "TOR" towards the bottom of the piston. Piston ring "A" - top compression "b" with a groove - lower compression, "With" - oil scraper.
Assemble the piston. Using pliers, install the retaining rings into the pistons of the 1st and 2nd cylinders from the side facing the flywheel, and into the pistons of the 3rd and 4th cylinders from the back side. This will allow all piston pins to be inserted from the same side.
Put the pistons on the connecting rods (while paying attention to the arrows and the marks made earlier, indicating belonging to the corresponding cylinders) and insert the piston pins up to the circlips. If the fingers cannot be inserted, preheat the pistons to a temperature of approx. 60°C.
Install the second retaining ring with pliers and check that both rings snap into place in their grooves.
Lubricate pistons and piston rings with engine oil.
Turn the three piston rings so that their locks are rotated 120°relative to each other. In this case, the lock of the oil scraper ring must be directed upwards.
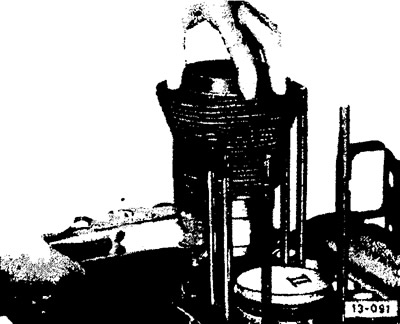
Pull the piston rings together with a clamping band, lubricate the sliding surface of the cylinder with oil and carefully push the cylinder onto the piston.
Check cylinder for wear.
If there are gouges or signs of wear, the cylinder must be replaced. When replacing the cylinder, the piston must also be replaced. New parts must be in the same size class.
The cylinder seat and the cylinder seats in the crankcase and cylinder head must be immaculately clean. Foreign bodies can lead to loss of tightness of the cylinders and damage to them.
Press the cylinder to the crankcase seating surface, then install it by turning it so that the 4 studs on the crankcase do not touch the through holes in the cylinder cooling fins.
Install the guide plate on the bottom side of the cylinder. If necessary, the shield can be bent slightly to ensure it is securely mounted on the studs.
Install the cylinder head.
Install the engine cover.
Install the cooling fan.
Install the exhaust system.
Assemble and install the engine.
Visitor comments