
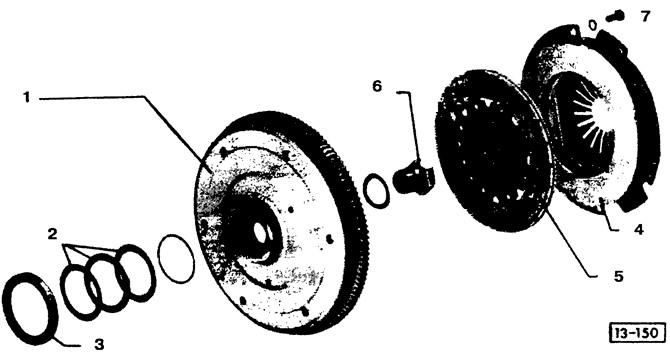
Flywheel: 1 - flywheel; 2 - spacers (the thickness of the washers is determined by checking the axial play); 3 - cuff (removed with a screwdriver); 4 - clutch pressure plate (installation position marked)
Removing
Remove engine (see section "Removal and installation of the engine").
Remove the clutch (see section "Removal, check and installation of coupling").
Mark with paint the mounting position of the flywheel in relation to the crankshaft (see arrow).
Loosen the hollow bolt. At the same time, use a screwdriver to lock the flywheel (need an assistant).
Remove flywheel.
Installation
Before installation, check the integrity of the flywheel ring gear, repair or replace the flywheel if necessary.
Check that the dowel pins and holes for them are not knocked out in the flywheel and in the crankshaft.
Check the needle bearing in the hollow bolt. If the bearing was washed with gasoline, lubricate it and the felt ring with oil. Remove excess grease and oil so that they do not get into the clutch.
Check crankshaft end play, replace old spacer washers if necessary (see below section "Checking and adjusting the axial play of the crankshaft").
Replace (if necessary) mounting bolts, reinstall the flywheel. At the same time, achieve the coincidence of the marks applied during removal.
Fit hollow bolt with lock washer and tighten to 350 Nm (35 kgcm). Check flywheel for runout. The maximum end runout should not exceed 0.3 mm.
Attention! If new parts are installed (crankshaft, flywheel, clutch), care must be taken to ensure that they are set with their indicated unbalances at an angle of approximately 120°to each other. If only two parts are marked, then the marks should be at 180°to each other.
Install clutch.
Install the engine.
Visitor comments