
English Русский
Български
Беларускі
Український
Српски
Hrvatski
Română
Polski
Slovenský
Magyar
  |  Articles  |  Sitemap  |  Contacts  |    |
Car maintenance Ford Car maintenance Hyundai Car maintenance Chevrolet Car maintenance BMW Car maintenance Audi Car maintenance Opel Car maintenance AvtoVAZ
VWmanual.ru


Main   Passat   Golf   Polo   Touareg   Tiguan   Sharan   Transporter   Others  
LT 28 (1975-1991) LT 2D (1996-2003) Beetle (1960-1986) Caddy 3 (2003-2010)

Removal, checking and installation the clutch (VW Beetle)

  • Main
  • Volkswagen
  • Beetle
  • Transmission
  • Clutch
  • Removal, checking and installation the clutch
            0


Contents: Removal ↓ Examination ↓ Installation ↓

Removal


Remove the engine (see section "Removal and installation the engine").

If the old clutch is to be installed again, then before removing the pressure plate, mark it and the flywheel using a scriber or cutter.
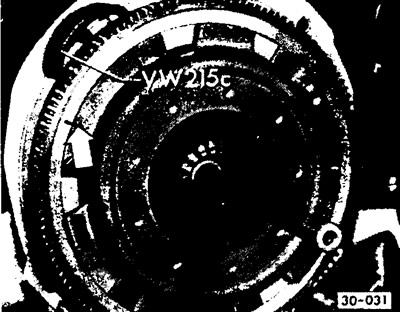
Loosen the hex bolts on the pressure plate alternately in a crisscross pattern by one or two turns…


Loosen the hex bolts on the pressure plate alternately in a crisscross pattern by one or two turns until they are completely loosened.

To prevent the flywheel from turning when loosening the bolts, secure it to the bolt using a wide screwdriver.

Remove the pressure and driven disks.

Blow out the flywheel from the inside or wipe it with a rag soaked in kerosene.

Examination
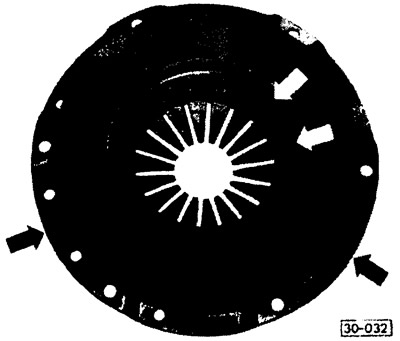


Before installation, check the diaphragm spring fastening between the pressure plate and the cover…


Before installation, check the diaphragm spring fastening between the pressure plate and the cover for cracks, as well as the strength of the riveted connections. Replace damaged clutch.
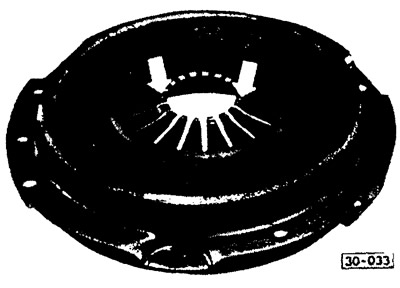


Check the ends of the diaphragm springs. Traces of wear up to 0.3 mm deep are acceptable.

Check the ends of the diaphragm springs. Traces of wear up to 0.3 mm deep are acceptable.

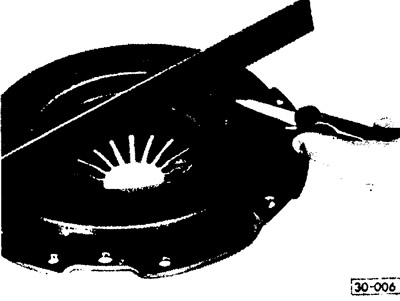
Check the working surface of the pressure plate for cracks, signs of burning and wear. Discs with a…


Check the working surface of the pressure plate for cracks, signs of burning and wear. Discs with a deflection of up to 0.3 mm are suitable for use. The check is carried out using a ruler and a feeler gauge.

The workshop can also check the runout of the driven clutch disc. This check is only necessary if the clutch is to be reinstalled and has not been working properly before. The axial runout of the driven disk should not exceed 0.5 mm.

Check the splines of the gearbox input shaft and apply a layer of M0S2-based paste to them.

Check the clutch release bearing.

Attention! The release bearing is non-serviceable. Under no circumstances should it be washed with gasoline or other solvents.


Wipe the bearing with a clean cloth. Replace the bearing that makes noise during operation.

Apply a thin layer of M0S2 based paste to the bearing guide sleeve.

Lubricate the needle bearing in the flywheel hollow bolt with general purpose grease (amount of lubricant - 0.2 cm³), after cleaning it first.

Wet the felt ring with motor oil and remove any leaked oil.

Installation


Insert the driven and pressure plates of the clutch. To center the driven disk, use either a suitable rod or the input shaft from the old gearbox.
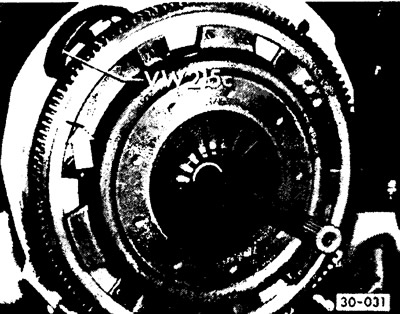
When installing the old clutch, take into account the marks on the pressure plate and flywheel.


When installing the old clutch, take into account the marks on the pressure plate and flywheel.

Tighten the clamp bolts evenly in a crisscross pattern to a torque of 25 Nm (2.5 kgfm). Secure the flywheel with a screwdriver while tightening.

Install the engine.

Adjust the clutch pedal free play.

This article is available at russian, bulgarian, belarusian, ukrainian, serbian, croatian, romanian, polish, slovak, hungarian
The text has been checked: Kolesnikov Artem

Share information:

Previous articles
The principle of operation of the clutch
Description of the clutch design
Next articles
Removal and installation the clutch cable
Checking and adjusting the deflection of the clutch cable guide
Adjusting the clutch pedal free play
Clutch malfunctions and how to fix them


Similar articles from other manuals for VW cars:
Removal and installation / checking of the clutch Passat B3 (1988-1993)
Checking the clutch disc Golf 4 (1997-2004)
Checking the levels of the main working fluids Polo 3 (1995-2003)
Checking the condition of the poly V-belt Touareg 1 (2002-2006)
Checking the operation of the intake manifold flap Tiguan 1 (2007-2015)
Checking the technical condition and checking the clutch Sharan 1 (1995-2000)
Removal, installation and checking the clutch Transporter T4 (1990-2003)
Link to this page in different formats


Visitor comments


No comments yet


How much will 48 + 29 =


Caddy 3 
  • General information
  • User manual
  • Daily care
  • Maintenance
  • Petrol engines 1.4 l
  • Engine repair
  • Cooling and lubrication system
  • Power and exhaust system
  • Petrol engines 1.6 l
  • Engine repair
  • Cooling and lubrication system
  • Power and exhaust system
  • Diesel engines
  • Engine repair
  • Cooling and lubrication system
  • Power and exhaust system
  • Transmission
  • Mechanical gearbox 0AH
  • Mechanical gearbox 0A4
  • Drive shafts
  • Chassis
  • Car suspension
  • Steering
  • Brake system
  • Body and wiring diagrams
  • Interior and exterior
  • Electrical circuits
Beetle 
  • General information
  • Maintenance
  • Power unit
  • Engine repair
  • Cooling and lubrication system
  • Supply system
  • Exhaust system
  • Transmission
  • Clutch
  • Car gearbox
  • Chassis
  • Front suspension
  • Rear suspension
  • Steering
  • Brake system
  • Wheels and tires
  • Body
  • Exterior
  • Electrical equipment
  • Equipment and devices
  • Power devices
  • Electrical circuits
LT 2D 
  • General information
  • User manual
  • Maintenance
  • Power unit
  • Petrol engines 2.3 l
  • Diesel engines 2.5 l
  • Diesel engines 2.8 l
  • Injection system (diesel 2.8 l)
  • Transmission
  • Clutch
  • Manual gearbox
  • Differential
  • Chassis
  • Car suspension
  • Steering system
  • Brake system
  • Body
  • Body elements
  • Heating system
  • Electrical equipment
  • Equipment and devices
  • Electrical circuits
LT 28 
  • General information
  • Maintenance
  • Power unit
  • Petrol engines 2.0L
  • Petrol engines 2.4L
  • Diesel engines
  • Cooling and heating
  • Fuel and exhaust system
  • Ignition system
  • Transmission
  • Clutch
  • Car gearbox
  • Cardan shaft
  • Rear axle
  • Chassis
  • Brake system
  • Car suspension
  • Steering system
  • Body
  • Body elements
  • Doors, locks and windows
  • Electrical equipment
  • Power devices
  • Equipment and devices
  • Electrical circuits
VWmanual.ru © 2016-2026 | Mobile version | News and articles | Sitemap: EN BG BY UA RS HR RO PL SK HU | Write message | Site search
Passat B2 • Passat B3 • Passat B4 • Passat B5 • Passat B6 • Golf 1, diesel • Golf 1, petrol • Golf 2, petrol • Golf 2 • Golf 3 • Golf 4 • Golf 5 • Polo 3 • Polo 4 • Touareg 1 • Tiguan 1 • Sharan 1 • Transporter T3 • Transporter T4 • LT 28 • LT 2D • Beetle • Caddy 3 •
Our website uses cookies to ensure functionality and convenience.