
Wipe the inside of the flywheel with a cloth soaked in gasoline and check the friction surface of the flywheel. If the friction linings of the driven disc are worn down to the rivet heads, then it is quite possible that the rivets have damaged the working surface of the flywheel or clutch pressure plate.
Check the pressure plate and clutch cover for damage, scratches, cracks, colored spots resulting from overheating or deformation. If damage is found, replace both parts as an assembly.
Checking the status of the slave disk
Check the condition of the friction linings. If they are oiled, cracked, uneven wear and one-sided scuffing, as well as when the distance between the rivet head and the working surface of the lining is reduced to 0.3 mm, replace the driven disk with a new one.
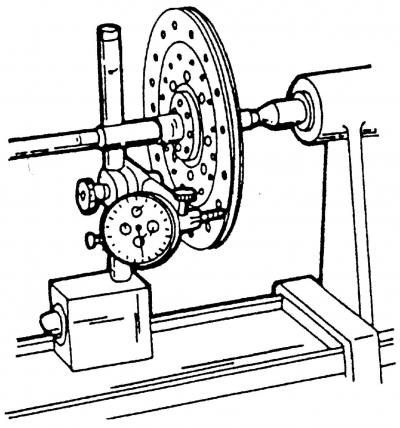
Pic. 227. Checking the beating of the driven disk
Check that the driven disc damper springs are not damaged and their wedge engagement is not too severely broken. To check the runout of the driven disk, place it on a suitable mandrel and clamp it between the holders of the lathe (pic. 227).
Install the measuring device on the holder so that the measuring finger is located against the edge of the driven disk, namely on the outer edge of the disk. Slowly turning the driven disk, follow the readings of the measuring device. If the runout of the working surface of the friction linings is greater than 0.4 mm, then, if desired, you can carefully straighten it with pliers, or replace the driven disk.
Check the degree of wear of the friction linings using a depth gauge.
Check the condition of the splines in the hub of the driven disk and on the input shaft of the gearbox, as well as the clearance in their spline connection. If the gap exceeds 0.4 mm, then the spline connection is considered worn. The reason for this is mostly the driven disk.
Checking the degree of wear of the petals of the diaphragm spring
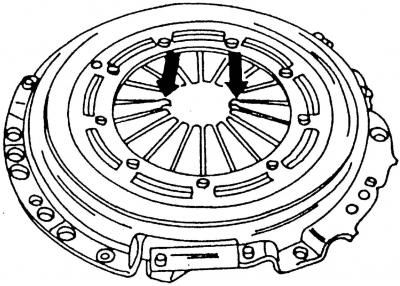
Pic. 228. Checking the wear of the petals of the diaphragm spring. (Checkpoints are indicated by arrows)
If at the ends of the petals (pic. 228) there are deep signs of wear, then replace the casing assembly with the pressure plate. Traces of working out the ends of the petals of the diaphragm spring are allowed to a depth of up to half of its thickness.
Check the position of the diaphragm spring petals. The deviation of the petals from one plane should be no more than 0.5 mm. With a greater deviation from the plane, the petals can be slightly bent with a special tool or a metal strip with a slot.
Checking the deformation of the working surface of the pressure plate
The surface of the pressure plate is to be checked for warpage using a metal ruler (timber) and probe.
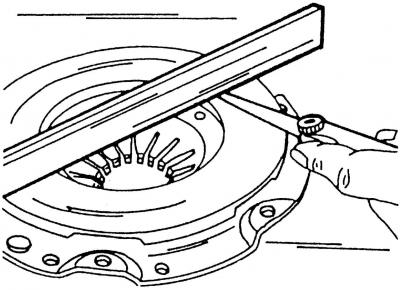
Pic. 229. Checking the deformation of the working surface of the pressure plate
Place a metal ruler on the working surface of the pressure plate (pic. 229) and using a feeler gauge, measure the gap between the plane of the working surface and the ruler.
A pressure plate with an inward deflection of less than 0.3 mm can be used in further operation.
Checking the clutch release bearing
Check the removed release bearing, paying particular attention to smooth rotation, play and signs of wear.
Attention! The removed bearing can only be wiped, but not washed.
The bearing should be checked by hand. It should rotate easily and make no noise. Pay special attention to the bearing, to which there were comments on the noise at the time of disengaging the clutch (pressing the pedal). Increased noise when disengaging the clutch characterizes a malfunction of the release bearing.
Note. It is recommended to replace the release bearing at the same time as the clutch disc.
Visitor comments