English Русский
Български
Беларускі
Український
Српски
Hrvatski
Română
Polski
Slovenský
Magyar
  |  Articles  |  Sitemap  |  Contacts  |    |
Car maintenance Ford Car maintenance Hyundai Car maintenance Chevrolet Car maintenance BMW Car maintenance Audi Car maintenance Opel Car maintenance AvtoVAZ
VWmanual.ru


Main   Passat   Golf   Polo   Touareg   Tiguan   Sharan   Transporter   Others  
Passat B2 (1981-1988) Passat B3 (1988-1993) Passat B4 (1988-1996) Passat B5 (1996-2005) Passat B6 (2005-2010)

Removal and installation / checking of the clutch (VW Passat B3)

  • Main
  • Passat
  • Passat B3
  • Transmission
  • Clutch
  • Removal and installation / checking of the clutch
            0


Contents: Removal ↓ Examination ↓ Installation ↓

Removal


Remove the gearbox, see chapter "Transmission".

Loosen the clutch pressure plate mounting bolts sequentially, depending on the circumstances, by 1 or 1.5 turns until the clamping action of the pressure plate weakens.

Caution: If the bolts are completely loosened at once, the diaphragm spring may be damaged.

Caution: If the bolts are completely loosened at once, the diaphragm spring may be damaged.


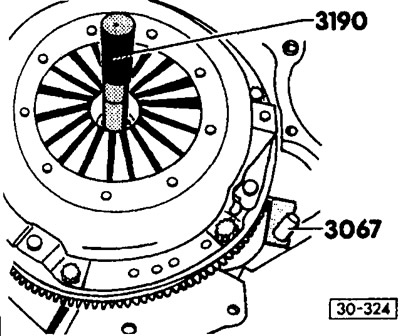
To prevent the flywheel from turning when the bolts are loosened, lock it either with the VW 3067 device or with a screwdriver and pin.

After this, unscrew the bolts completely.

Remove the pressure and driven clutch discs.

Caution: Do not drop the discs when removing them, otherwise after assembly there may be difficulties associated with clutch jerking and disc separation.


Remove the clutch release bearing from the guide sleeve.

Note: Only wipe the bearing, do not rinse it.


Wipe the flywheel with a rag soaked in gasoline.

Examination


Check the clutch pressure plate for unevenness and cracks from burns.

Check the clutch pressure plate for unevenness and cracks from burns.


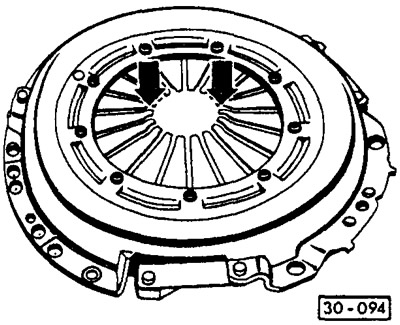
Examine the diaphragm spring for damage (arrows). Traces of running-in at the ends of the diaphragm spring to a depth of up to 0.3 mm are allowed.


Examine the diaphragm spring for damage (arrows). Traces of running-in at the ends of the diaphragm…


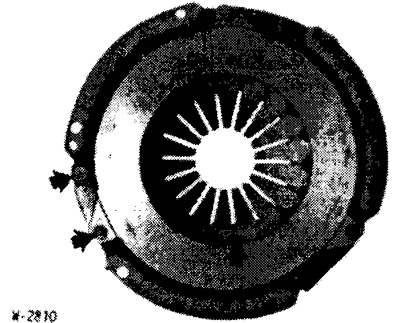
Check the spring connections between the pressure plate and the cover for cracks, the strength of the rivet connections and the reliability of the installation. Replace the coupling with damaged or loose rivets.

Check the spring connections between the pressure plate and the cover for cracks, the strength of…


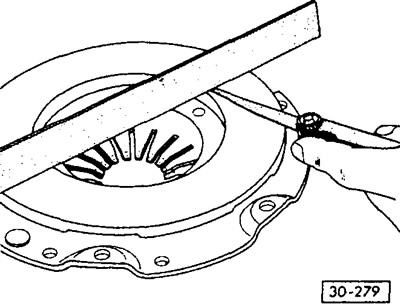
Check the contact surface of the pressure plate for cracks, burns and wear. Pressure plates with inward deflections of up to 0.2 mm can be reinstalled. Check with a metal ruler and feeler gauge.

Check the flywheel for cracks from burns and unevenness.

Replace the driven clutch disc with traces of oil and grease, as well as with mechanical damage.

Check the driven disk for sufficient lining thickness and the absence of cracks.

In the workshop, driven disks can be checked for runout. The maximum permissible lateral runout can be 0.8 mm (2.5 mm when measured by outside diameter).


Note: This check is only necessary if the old driven disc is to be reinstalled and the clutch has previously been disengaged incorrectly. If necessary, the driven disc can be carefully straightened.


Check the clutch release bearing by hand. To do this, lightly squeeze and rotate the bearing. The bearing should rotate easily, otherwise it should be replaced.

When installed, a defective clutch release bearing will draw attention to itself by the noise it produces when the clutch pedal is pressed. In this case, replace the bearing.

Installation


Attention: If new parts are installed, be sure to check the pressure and driven clutch discs against the engine designation and number in the spare parts catalog to exclude the installation of non-standard parts.


Before installing a new pressure plate, remove the anti-corrosion grease only from the working surfaces of the clutch release bearing.

Check the tightness of the centering pins on the flywheel.

Install the clutch slave and pressure plates on the flywheel. Place the pressure plate on the appropriate guide pins. The slave plate must be centered with a suitable pin (for example, HAZET), or using the old gearbox drive shaft.

Clean the splined joint of the driven disk from rust and lubricate with a very thin layer of MoSg antifriction grease. VAG workshops use G 000100 grease. After this, move the driven clutch disk back and forth along the drive shaft of the gearbox until the hub moves easily along the shaft. Be sure to remove excess grease.

When installing the driven disc, make sure that the spring separators are facing the pressure disc.

Screw in the pressure plate mounting bolts and tighten them sequentially in a cross pattern by 1-1.5 turns until the plate is firmly tightened. Tightening torque: 20 Nm. Do not tilt the pressure plate, otherwise the centering holes of the pressure plate and the centering pins of the flywheel will be damaged.

After this, remove the centering pin (old gearbox drive shaft).

Install the gearbox, see chapter "Transmission".

This article is available at russian, bulgarian, belarusian, ukrainian, serbian, croatian, romanian, polish, slovak, hungarian
The text has been checked: Medvedeva Elena

Share information:

Previous articles
Clutch drive
Clutch device
Next articles
Bleeding air from the clutch drive
Replacing the clutch cable
Diagnosing Clutch Faults


Similar articles from other manuals for VW cars:
Checking the clutch disc Golf 4 (1997-2004)
Checking the levels of the main working fluids Polo 3 (1995-2003)
Checking the condition of the poly V-belt Touareg 1 (2002-2006)
Checking the operation of the intake manifold flap Tiguan 1 (2007-2015)
Checking the technical condition and checking the clutch Sharan 1 (1995-2000)
Removal, installation and checking the clutch Transporter T4 (1990-2003)
Checking and adjusting the deflection of the clutch cable guide Beetle (1960-1986)
Link to this page in different formats


Visitor comments


No comments yet


How much will 36 + 32 =


Passat B6 
  • General information
  • User manual
  • Maintenance
  • Petrol engine 1.6L
  • Engine repair
  • Cooling and lubrication system
  • Fuel injection system
  • Petrol engine 2.0L
  • Engine repair
  • Lubrication system
  • Cooling system
  • Fuel and exhaust systems
  • Diesel engine 2.0L
  • Engine repair
  • Cooling and lubrication system
  • Fuel and exhaust systems
  • Transmission
  • Clutch
  • Mechanical gearbox
  • Automatic gearbox
  • Drive shafts
  • Chassis
  • Wheels and tires
  • Car suspension
  • Steering
  • Brake system
  • Body
  • Exterior (external elements)
  • Electrical equipment
  • Power devices
  • Lighting and appliances
  • Electrical circuits
Passat B5 
  • General information
  • User manual
  • Weekly checks
  • Maintenance
  • Power unit
  • Engine repair
  • Cooling system
  • Fuel system (petrol)
  • Fuel system (diesel)
  • Engine management
  • Exhaust system
  • Transmission
  • Clutch
  • Car gearbox
  • Drive shafts
  • Chassis
  • Car suspension
  • Wheels and tires
  • Steering
  • Brake system
  • Body
  • Exterior (external elements)
  • Interior (internal elements)
  • Doors and covers
  • Ventilation and heating
  • Electrical equipment
  • Power devices
  • Lighting and appliances
  • Electrical circuits
Passat B4 
  • General information
  • User manual
  • Maintenance
  • Technical data
  • 8-valve engine
  • Engine repair
  • Cooling and lubrication system
  • Supply system
  • Ignition system
  • Fuel injection «Mono-Jetronic»
  • Control system «Mono-Motronic»
  • Control system «Digifant»
  • Control system «Simos»
  • 16-valve engine
  • Engine repair
  • Cooling and lubrication system
  • Fuel injection «K-Jetronic»
  • Control system «KE-Motronic»
  • Control system «Digifant»
  • Diesel engine
  • Engine repair
  • Cooling and lubrication system
  • Power and control system
  • Turbocharging system
  • Digital control system
  • Transmission
  • Clutch
  • Manual gearbox
  • Hydromechanical gearbox
  • Front wheel drive
  • Chassis
  • Car suspension
  • Steering
  • Brake system
  • Body
  • Body elements
  • Electrical equipment
  • Power devices
  • Lighting and appliances
  • Electrical circuits
Passat B3 
  • General information
  • User manual
  • Driving Tips
  • Maintenance instructions
  • Technical data
  • Power unit
  • Engine repair
  • Ignition system
  • Lubrication system
  • Cooling system
  • Supply system
  • Petrol injection system
  • Diesel engine
  • Exhaust system
  • Transmission
  • Clutch
  • Car gearbox
  • Chassis
  • Suspension
  • Steering
  • Brake system
  • Wheels and tires
  • Body
  • Exterior
  • Interior
  • Heating system
  • Electrical equipment
  • Power devices
  • Lighting system
  • Equipment and devices
  • Wiper system
  • Electrical circuits
Passat B2 
  • General information
  • Introduction to instructions
  • User manual
  • Power unit
  • Engines 4-cylinder FZ
  • Engines 4-cylinder
  • Engines 5-cylinder
  • Transmission
  • Clutch
  • Four-speed gearbox
  • Five-speed gearbox
  • Hydromechanical gearbox
  • Front wheel drive
  • Chassis
  • Front suspension
  • Rear suspension
  • Steering
  • Brake system
  • Body
  • Body elements
  • Electrical equipment
  • Equipment and devices
  • Electrical circuits
VWmanual.ru © 2016-2026 | Mobile version | News and articles | Sitemap: EN BG BY UA RS HR RO PL SK HU | Write message | Site search
Passat B2 • Passat B3 • Passat B4 • Passat B5 • Passat B6 • Golf 1, diesel • Golf 1, petrol • Golf 2, petrol • Golf 2 • Golf 3 • Golf 4 • Golf 5 • Polo 3 • Polo 4 • Touareg 1 • Tiguan 1 • Sharan 1 • Transporter T3 • Transporter T4 • LT 28 • LT 2D • Beetle • Caddy 3 •
Our website uses cookies to ensure functionality and convenience.