English Русский
Български
Беларускі
Український
Српски
Hrvatski
Română
Polski
Slovenský
Magyar
  |  Articles  |  Sitemap  |  Contacts  |    |
Car maintenance Ford Car maintenance Hyundai Car maintenance Chevrolet Car maintenance BMW Car maintenance Audi Car maintenance Opel Car maintenance AvtoVAZ
VWmanual.ru


Main   Passat   Golf   Polo   Touareg   Tiguan   Sharan   Transporter   Others  
Transporter T3 (1979-1992) Transporter T4 (1990-2003)

Removal and installation of cylinders, pistons and piston rings (VW Transporter T3)

  • Main
  • Transporter
  • Transporter T3
  • Petrol engines
  • Engine repair
  • Removal and installation of cylinders, pistons and piston rings
            0


Contents: Removal ↓ Installation ↓

Removal


Removing cylinders and pistons requires a special tool.

Remove the engine.

Remove the exhaust system.

Remove the cylinder head.

Remove the cylinder head.


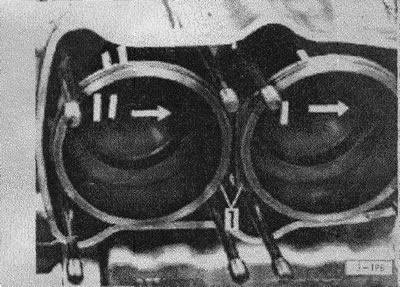
Apply a clear cylinder number and an arrow pointing towards the flywheel on the side of the cylinders and on the piston crowns for subsequent installation in the same position in the same cylinder.
Apply a clear cylinder number and an arrow pointing towards the flywheel on the side of the…


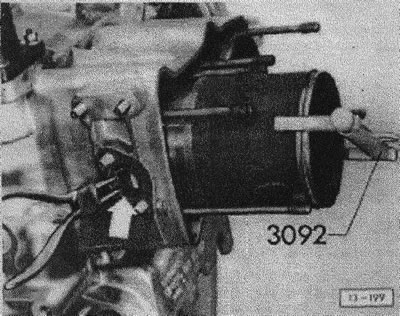
Turn the crankshaft and set the piston to the top dead center position. Pull the cylinder using the VAG 3092 tool until the piston pin hole is free.

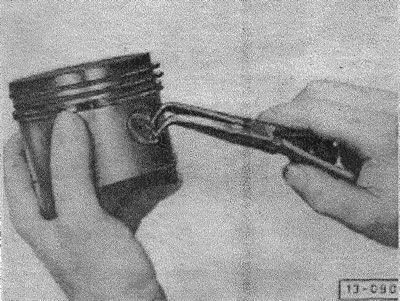
Remove the piston pin retaining ring.

Remove the piston pin retaining ring.


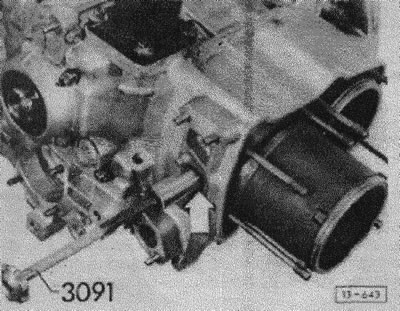
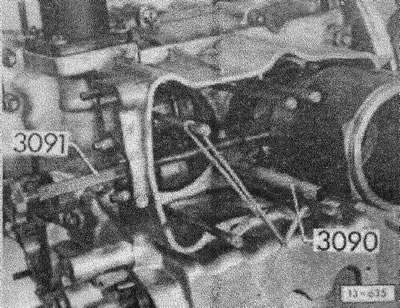
Remove the piston pin using the VAG 3091 tool. Carefully remove the piston and cylinder, push the piston out of the cylinder.


Remove the piston pin using the VAG 3091 tool. Carefully remove the piston and cylinder, push the…


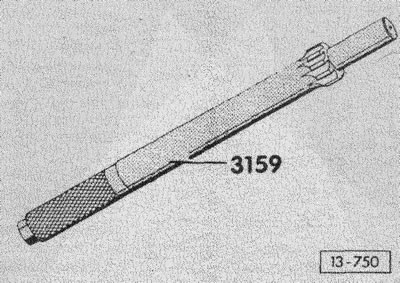
Note: If the piston pin cannot be pulled out using the VAG 3091 tool, then scoring has occurred due to impacts of the piston pin on the retaining ring. In such cases, remove scoring using the VAG 3159 reamer before removing.


Note: If the piston pin cannot be pulled out using the VAG 3091 tool, then scoring has occurred due…


Remove the piston pins using special pliers.

Installation


Before installation, wash all parts in clean gasoline. Remove deposits in the area of the cylinders in the engine crankcase and cylinders in the cylinder head.

Check the cylinders for wear. If scratches or signs of wear are found, replace the cylinder. When replacing cylinders, the pistons must be replaced, as the piston and cylinder in a pair must belong to the same size group.

The seating surfaces in the cylinder, as well as the seating surfaces of the cylinders in the engine crankcase, must be absolutely clean. Foreign particles can cause leaks and cylinder distortion.


When installing new cylinders and pistons, the following instructions must be observed.

In general, there are 2 different size groups of cylinder-piston pairs as spare parts (normal size and plus size). They differ in nominal diameter values.

Each cylinder-piston pair of a certain diameter is in turn subdivided into two different size groups. These groups are distinguished by markings in the form of colored dots applied to the piston bottoms and cylinder cooling fins (blue and pink).

Maximum weight difference in a new set of pistons (for 4 cylinders) should not exceed 10 g.

Therefore, there are pistons of two different groups, which differ in markings on the bottom (minus or plus sign) and additionally with colored dots% brown = (+), gray = (-).

Before installing old pistons, piston rings and cylinders, you need to do the following: check the pistons, measure the clearances by the height of the piston rings, check the cylinder bores.

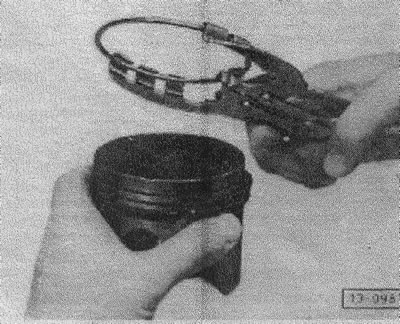
Insert piston rings only with special pliers.

Pay attention to the design of the rings.

It is essential to replace the rubber cylinder sealing rings. Install a thin, green ring on the cylinder head side and a thick, black ring on the engine crankcase side.

It is essential to replace the rubber cylinder sealing rings. Install a thin, green ring on the…


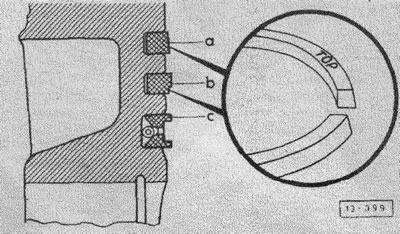
The "Top" marking on the piston rings must face the piston bottom, a - upper piston ring, b - lower piston ring with a step, c - oil scraper ring.

The «Top» marking on the piston rings must face the piston bottom, a - upper piston ring, b - lower…


From the side of the piston facing the flywheel, use special pliers to install the retaining ring.
From the side of the piston facing the flywheel, use special pliers to install the retaining ring.


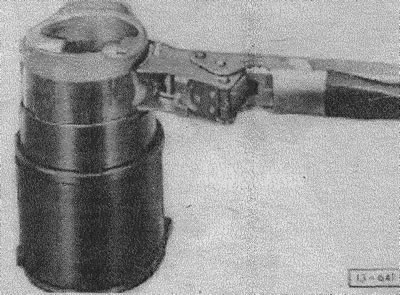
Compress the piston rings with a clamping band. The arrow on the piston should point toward the flywheel, and the joint of the oil scraper ring should be facing upward. In addition, the joints of the piston rings should be offset by 180°.

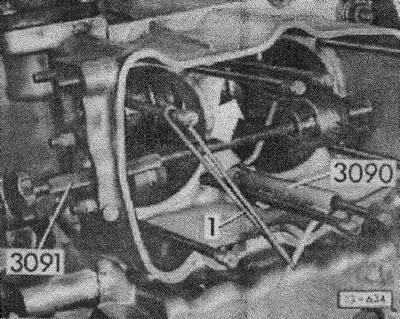
Lightly lubricate the cylinder with engine oil and insert the piston into the cylinder.
Lightly lubricate the cylinder with engine oil and insert the piston into the cylinder.


Place the VAG 3090 connecting rod support on the middle stud, rest it on the connecting rod profile and secure it with rubber band "1" to prevent it from slipping off.

Note: Pay attention to the markings on the connecting rod bearings. R = right side of the engine; L= left side of the engine.


Align the connecting rod so that the piston pin can be inserted into the hole in the housing.

The information is available on the website [vwmanual.ru]

The connecting rod bearing must be facing up "arrow".

The connecting rod bearing must be facing up «arrow».


Install the piston pin using the VAG 3091 tool.

Insert the piston pin retaining ring using special pliers.

Push the cylinder fully into the engine block.

Install the cylinder head.

Install the exhaust system.

Install the engine.

This article is available at russian, bulgarian, belarusian, ukrainian, serbian, croatian, romanian, polish, slovak, hungarian
The text has been checked: Tarasov Ivan

Share information:

Previous articles
Cylinders, pistons and piston rings — design description
Checking the compression in the cylinders
Checking the tightness of valve seats
Valve seat machining
Checking the valve guides
Valve processing
Next articles
Checking the pistons
Checking cylinder bores
Removal and installation the flywheel, replacing the crankshaft seal
Checking and adjusting the axial play of the crankshaft
Disassembly and assembly of the engine crankcase
Removal and installation the camshaft


Similar articles from other manuals for VW cars:
Checking pistons, piston rings and cylinder diameter Passat B6 (2005-2010)
Checking piston rings, ring grooves and connecting rods Golf 2 (1984-1993)
Connecting rod and piston group Polo 3 (1995-2003)
Checking pistons, piston rings and cylinder diameter Touareg 1 (2002-2006)
Removal pistons and connecting rods Sharan 1 (1995-2000)
Checking cylinders, pistons and piston rings Caddy 3 (2003-2010)
Link to this page in different formats


Visitor comments


No comments yet


How much will 20 + 35 =


Transporter T4 
  • General information
  • User manual
  • Maintenance
  • Power unit
  • Engine repair
  • Ignition system
  • Lubrication system
  • Cooling system
  • Fuel system (petrol)
  • Fuel system (diesel)
  • Injection system (petrol)
  • Exhaust system
  • Transmission
  • Clutch
  • Car gearbox
  • Chassis
  • Car suspension
  • Steering
  • Brake system
  • Wheels and tires
  • Body
  • Exterior
  • Interior
  • Doors and windows
  • Heating system
  • Electrical equipment
  • Equipment and devices
  • Lighting and signaling
  • Power devices
  • Electrical circuits
Transporter T3 
  • General information
  • Maintenance
  • Petrol engines
  • Engine repair
  • Lubrication system
  • Cooling system
  • Power and exhaust system
  • Carburetor 34 PICT
  • Carburetors 2E3 and 2E4
  • Fuel injection system
  • Ignition system
  • Diesel engines
  • Engine repair
  • Lubrication system
  • Cooling system
  • Power and exhaust system
  • Transmission
  • Clutch
  • Car gearbox
  • Chassis
  • Front suspension
  • Rear suspension
  • Steering
  • Brake system
  • Body
  • Body and interior elements
  • Doors, locks and windows
  • Electrical equipment
  • Lighting system
  • Equipment and devices
  • Power devices (diesel)
  • Power devices (petrol)
  • Wiring diagrams (diesel)
  • Wiring diagrams (petrol)
VWmanual.ru © 2016-2026 | Mobile version | News and articles | Sitemap: EN BG BY UA RS HR RO PL SK HU | Write message | Site search
Passat B2 • Passat B3 • Passat B4 • Passat B5 • Passat B6 • Golf 1, diesel • Golf 1, petrol • Golf 2, petrol • Golf 2 • Golf 3 • Golf 4 • Golf 5 • Polo 3 • Polo 4 • Touareg 1 • Tiguan 1 • Sharan 1 • Transporter T3 • Transporter T4 • LT 28 • LT 2D • Beetle • Caddy 3 •
Our website uses cookies to ensure functionality and convenience.