



Contents: "Bosch" pump ↓ Pump "Lucas-CAV" in a car with a 1.5…↓ Lucas-CAV pump in a car with a 1.6 l…↓
This work must be done if, for example, the toothed belt has been removed. See the chapter "Engine and its operation". If the car is equipped with a Bosch pump, a special adapter VW-2066 and a small indicator with a measuring range of 0-3.0 mm are required. A new sealing ring for the fuel pump head lock screw is also required.
If the car has an English pump - "Lucas-CAV" and a 1.5 liter engine, then no special tool is needed. For the same pump and a 1.6 liter engine, it is enough to have a VW-3071 adapter and the already mentioned small indicator.
To adjust the pump feed start, you need to be a true professional. The work can be done using only the above-mentioned special tools!
"Bosch" pump
Press the cold start accelerator button.
The piston in cylinder 1 must be at top dead center (see section "Finding Top Dead Center", chapter "Engine and its functioning").
Remove the cover from the timing belt.
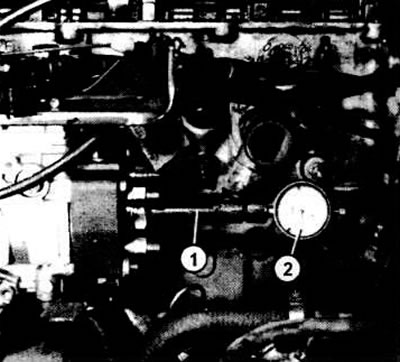
To adjust the start of the Bosch fuel pump, instead of the shut-off screw, a small indicator (2) with a special adapter (1) is screwed into the pump head.
Unscrew the locking screw of the fuel pump head between the injection lines.
Instead of a screw, screw in an adapter, secure the indicator and adjust to 2.5 mm (approximately).
Using a small hammer, lightly tap the pump body to return the centrifugal governor to its normal position.
Slowly turn the crankshaft counterclockwise until the indicator arrow stops (for information on turning the crankshaft, see the section "Engine crankshaft rotation", chapter "Engine and its functioning").
Now set the indicator to "0" with an offset of about 1 mm.
Rotate the crankshaft clockwise until the "OT" mark coincides with the mark on the housing.
Read the indicator: the acceptable value is between 0.83 and 0.97 mm.
If the permissible value is not reached, it must be adjusted. To do this, unscrew both upper bolts in the bracket and the fastening bolt on the guide side of the pump, near the stop.
The original can be seen on the portal www.VWmanual.ru
Unscrew the third pump mounting bolt through one of the holes in the toothed belt pulley.
By rotating the pump around its own axis, it is now possible to adjust the pump's start of delivery.
When adjusting, it is advisable to aim as accurately as possible for a stroke value of 0.90 mm (tolerance ±0.02 mm). Re-secure the pump with a torque of 25 Nm.
Remove the indicator and adapter. Tighten the locking screw, laying a new sealing ring. The tightening torque is 15 Nm. If there are leaks, tighten additionally with a torque of 25 Nm.
Pump "Lucas-CAV" in a car with a 1.5 liter engine
Remove the cover from the fuel pump inspection hole.
The arrow should align with the drilled mark on the high pressure fuel pump rotor.
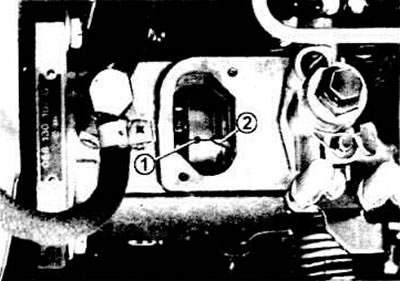
Adjustment of the English fuel pump "Lucas-CAV", 1.5 l engine: the mark (1) should be near the arrow (2).
In case this is not the case:
- unscrew the fastening bolts at the pump flange and the stop;
- turn the fuel pump accordingly and tighten the bolts again securely.
Turn the crankshaft two revolutions in the direction of engine rotation. Reinstall the piston in cylinder 1 at the top dead center "OT".
Check the adjusted pump feed start and make adjustments if necessary.
Place the cover on the inspection hole.
Lucas-CAV pump in a car with a 1.6 l engine
Check: Pull the cold start button out completely.
Set the piston of cylinder 1 to top dead center ("TDC").
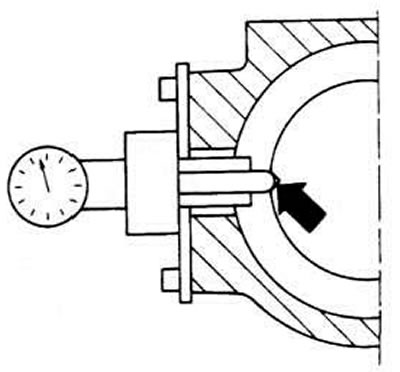
Adjustment of the English pump "Lucas-CAV", 1.6 l engine: the indicator probe should fall into the recess when the engine piston is at the top dead center
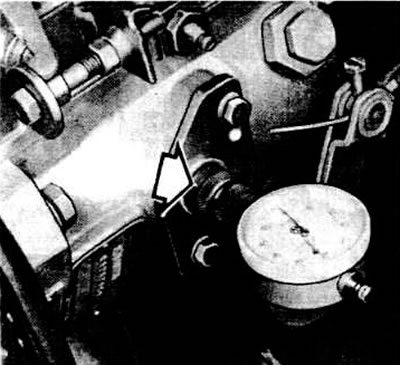
Injection system "Lucas-CAV", 1.6 l engine: the indicator together with the adapter (arrow) is installed on the pump
Screw the adapter pin into the small indicator and then unscrew it approximately 1/2 turn.
A slight back-off of the pin by 1/2 turn is necessary to prevent the indicator from jamming when the tolerance is exceeded in an unfavorable manner.
Screw the adapter together with the indicator in place of the locking screw with a displacement of about 2 mm.
Slowly turn the crankshaft 2-3 cm counterclockwise (against the direction of engine rotation).
Rotate the crankshaft slowly in the direction of engine rotation (clockwise), until the arrow on the indicator shows the minimum value (corresponds to the lowest point of the notch on the mounting washer).
Check the position of the "OT" mark. A tolerance of ±2 mm is permitted.
Adjustment: set the piston in cylinder 1 to the "OT" position.
Remove both upper bracket mounting bolts and the rear stop bolt.
Scroll the fuel pump and find the lowest point on the indicator; securely fix the fuel pump in this position.
Check the adjustment again.
Visitor comments