



Contents: Processing of the cylinder head…↓ Checking the axial displacement of…↓ Valve sizes ↓ Valve seat machining ↓ Intake valve seat machining ↓ Exhaust valve seat machining ↓
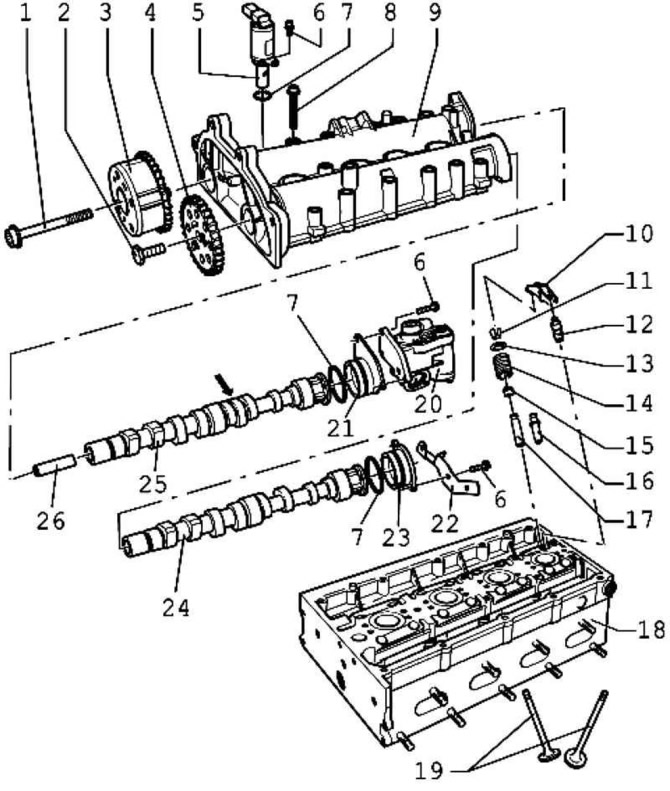
Fig. 2.45. Valve mechanism: 1 – bolt 40 Nm + tighten by 1/4 turn (90°); 2 – bolt 50 Nm + tighten by 1/4 turn (90°); 3 – phase shifter; 4 – camshaft drive sprocket; 5 – valve 1 of the variable valve timing system; 6 – bolt 10 Nm; 7 – O-ring round section; 8 – bolt 10 Nm + tighten by 1/4 turn (90°); 9 – camshaft housing; 10 – roller lever; 11 – conical cracker; 12 – support element; 13 – valve spring plate; 14 – valve spring; 15 – oil seal; 16 – valve guide repair sleeve; 17 – valve guide bushing; 18 – Cylinder head; 19 – valves; 20 – EGR valve with EGR potentiometer; 21 – lid; 22 – holder; 23 – cover; 24 – exhaust camshaft; 25 – intake camshaft; 26 – guide bushing
The valve mechanism details are shown in Fig. 2.45.
Processing of the cylinder head seating surface
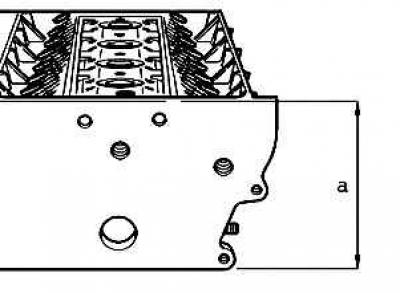
Fig. 2.46. The value of the machining allowance
Allowance for machining the cylinder head a = not less than 108.25 mm (Fig. 2.46).
Note: After finishing the seating surface, the valves must be lowered accordingly (treat the valve seat ring), otherwise the valves will collide with the piston. In doing so, observe the minimum permissible size.
Checking the axial displacement of the camshaft
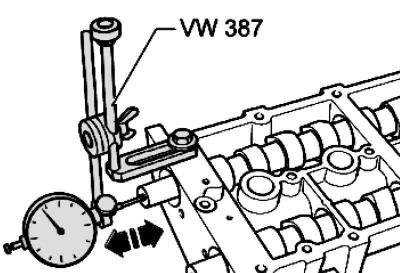
Fig. 2.47. Checking the axial displacement of the camshaft
Take measurements with the camshaft housing removed and the cover installed.
Tolerance limit max. 0.40 mm
Valve sizes
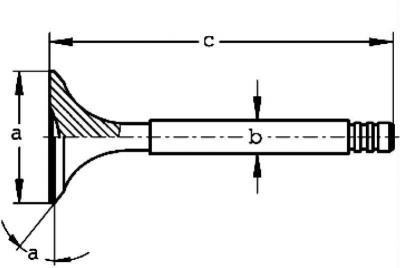
Fig. 2.48. Valve dimensions
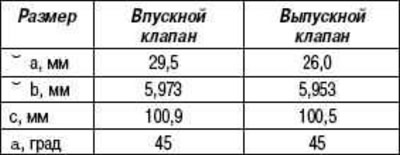
See Fig. 2.48.
The information is posted on this website (VWManual.ru)
Note: Valves must not be machined. Only lapping is permitted.
Valve seat machining
Note: When repairing engines with leaky valves, it is not enough to treat or replace the valve seats and valves. Especially in engines with a long service life, it is necessary to check the valve guides for wear.
Note: Valve seats should only be reworked to the extent that a flawless working surface is achieved. Before machining, calculate the maximum allowable machining allowance. If the machining allowance is exceeded, the hydraulic clearance adjustment function in the valve drive may be impaired (hydraulic compensators), which will entail replacing the cylinder head.
Note: If the valve is replaced during repair, use a new valve for measurements.
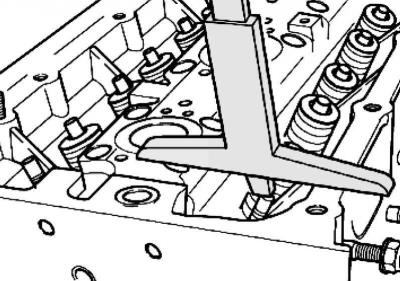
Fig. 2.49. Measuring the distance between the end of the valve stem and the top edge of the cylinder head
Measure the distance between the end of the valve stem and the top edge of the cylinder head (Fig. 2.49).
Calculate the maximum allowable machining allowance based on the measured distance and the minimum allowable dimension.
Minimum dimensions
- Inlet valve - 7.6 mm,
- Exhaust valve - 7.6 mm
Measured distance minus minimum dimension = maximum allowance for machining.
Example
- Measured distance - 8.0 mm
- Minimum size - 7.6 mm
- Max. allowance for processing - 0.4 mm (8.0 mm - 7.6 mm).
Note: The maximum allowable machining allowance is shown in the valve seat machining drawings as dimension "b".
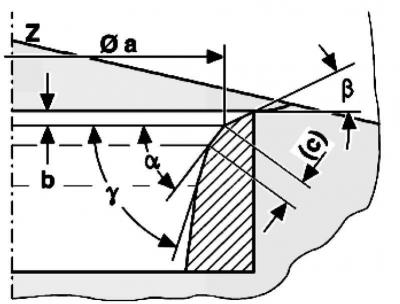
Fig. 2.50. Inlet valve machining diagram
Intake valve seat machining
- a = ∅ 28.7 mm;
- b = max. allowance for machining;
- c = 1.5–1.8 mm;
- Z = lower edge of cylinder head;
- a = 45° valve seat angle;
- b = 30° upper correction chamfer;
- g = 60° lower correction chamfer.
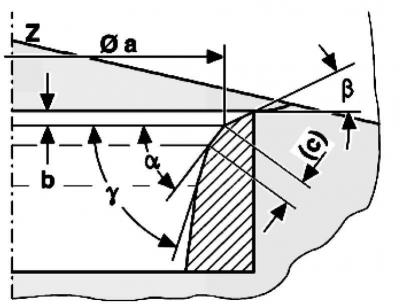
Fig. 2.51. Diagram of the exhaust valve processing
Exhaust valve seat machining
- a = ∅ 25.0 mm;
- b = max. allowance for machining;
- c = approx. 1.8 mm;
- Z = lower edge of cylinder head;
- a = 45° valve seat angle;
- b = 30° upper correction chamfer;
- g = 60° lower correction chamfer.
Visitor comments