



Cylinder head assembly for 2.3-I-VR5 engine
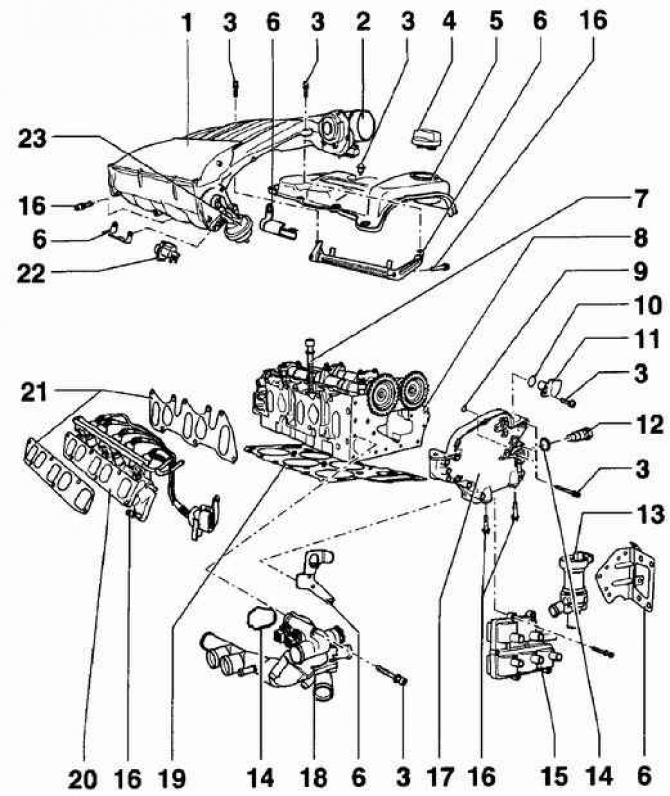
- 1 - Upper intake manifold. The upper intake manifold is first attached to the lower intake manifold, and then the manifold assembly is attached to the cylinder head;
- 2 - throttle body;
- 3 - bolt, 10 Nm;
- 4 - lid;
- 5 - cylinder head cover;
- 6 - bracket;
- 7 - cylinder head mounting bolt. New bolts must be used during installation;
- 8 - cylinder head. If the flatness is more than 0.1 mm, it is necessary to regrind the cylinder head. The minimum permissible height of the cylinder head is 139.5 mm;
- 9 - O-ring. When installing, it is necessary to use a new O-ring lubricated with clean engine oil;
- 10 - sealing ring;
- 11 - Hall sensor;
- 12 - chain tensioner, 40 Nm. The engine can only be turned with the chain tensioner installed;
- 13 - water pump;
- 14 - sealing ring. If the seal is damaged, a new sealing ring must be used;
- 15 - ignition system unit;
- 16 - bolt, 25 Nm;
- 17 - timing chain cover. Removal and installation of the timing chain cover can only be performed on the installed cylinder head. When installing the timing chain cover, it is necessary to fill the holes in the end of the cover with liquid sealant VW-AMV18800102;
- 18 - thermostat housing;
- 19 - Cylinder head gasket. A new cylinder head gasket must be used during installation;
- 20 - lower part of the intake manifold;
- 21 - lower intake manifold gaskets;
- 22 - valve for switching the intake manifold channels;
- 23 - vacuum actuator
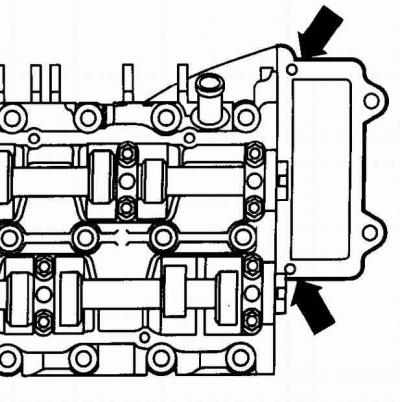
Location of sealant holes in the drive chain cover
The original information is posted on the resource VWManual.ru
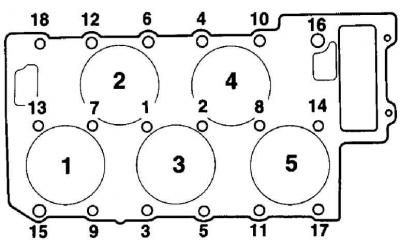
Cylinder Head Bolt Tightening Sequence for VR5 Engine
The operations for removing and installing the cylinder head of the VR5 engine are similar to the operations for removing and installing the cylinder head on a four-cylinder gasoline engine. This subsection only describes the differences for removing and installing the cylinder head on VR5 engines.
Execution order
1. Remove the cylinder head mountings and the cylinder head cover.
2. Unscrew the cylinder head mounting bolts in the reverse order of tightening them, see Fig. Sequence of tightening the cylinder head mounting bolts on the VR5 engine.
3. Clean the 3 mm diameter holes from the sealant in the end of the drive chain cover, see Fig. Location of the sealant holes in the drive chain cover.
4. Fill the holes in the end of the timing chain cover with liquid sealant VW-AMV18800102.
Warning: After installing the cylinder head, the sealant holes in the end of the timing chain cover are half-closed.
5. Before installing the cylinder head gasket, check that the guide bushings are installed in holes 15 and 16 of the cylinder block, see Fig. Tightening sequence of the cylinder head mounting bolts on the VR5 engine.
6. Carefully install the head onto the cylinder block. Insert and hand tighten the cylinder head bolts and washers.
7. In a certain sequence (see fig. Cylinder head bolt tightening sequence on VR5 engine) tighten all bolts to a torque of 30 Nm, then tighten all bolts to a torque of 50 Nm and finally tighten all bolts in two stages, each time by 90°.
Visitor comments