
English Русский
Български
Беларускі
Український
Српски
Hrvatski
Română
Polski
Slovenský
Magyar
  |  Articles  |  Sitemap  |  Contacts  |    |
Car maintenance Ford Car maintenance Hyundai Car maintenance Chevrolet Car maintenance BMW Car maintenance Audi Car maintenance Opel Car maintenance AvtoVAZ
VWmanual.ru


Main   Passat   Golf   Polo   Touareg   Tiguan   Sharan   Transporter   Others  
Passat B2 (1981-1988) Passat B3 (1988-1993) Passat B4 (1988-1996) Passat B5 (1996-2005) Passat B6 (2005-2010)

Gas distribution mechanism drive (VW Passat B5)

  • Main
  • Passat
  • Passat B5
  • Power unit
  • Engine repair
  • Gas distribution mechanism drive
            0


Timing drive mechanism
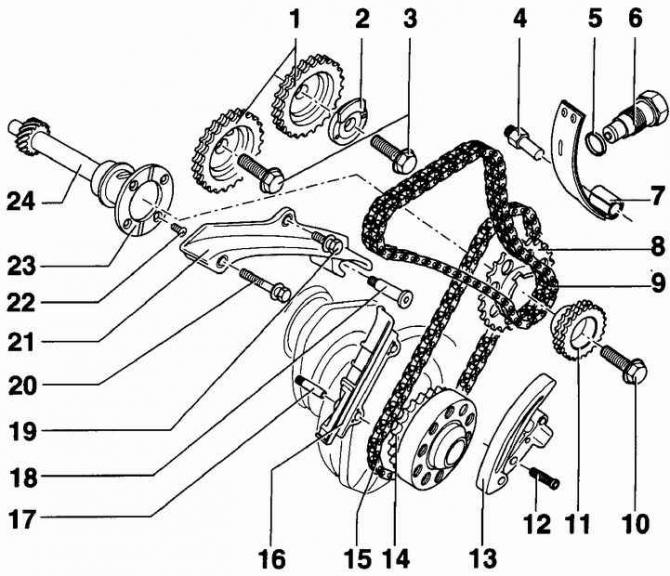


Timing drive mechanism

  • 1 - camshaft sprocket;
  • 2 - pulse rotor for Hall sensor;
  • 3 - camshaft sprocket mounting bolt, 10 Nm. Before screwing in the bolt, lubricate the lower surface of the bolt head with a thin layer of engine oil. When tightening the bolt, hold the camshaft from turning with a 24 mm wrench;
  • 4 - pivot pin, 18 Nm;
  • 5 - O-ring. If damaged, use a new O-ring;
  • 6 - chain tensioner, 40 Nm;
  • 7 - shoe;
  • 8 - asterisk;
  • 9 - Double-row roller chain. Before removing the chain, mark the direction of rotation of the chain;
  • 10 - bolt, 100 Nm;
  • 11 - asterisk;
  • 12 - bolt, 10 Nm;
  • 13 - Chain tensioner. Before removing the chain tensioner, use a screwdriver to release the locking gear and separate the chain guide from the tensioner. The engine can only be turned with the chain tensioner installed;
  • 14 - leading chain sprocket,
  • 15 - single chain;
  • 16 - chain guide;
  • 17 - special pin for chain guide, 10 Nm;
  • 18 - guide pin with flange, 10 Nm;
  • 19 - bolt, which is installed using a special tool VW-D6, 20 Nm,
  • 20 - bolt, 20 Nm;
  • 21 - chain guide;
  • 22 - bolt installed using a special tool VW6, 20 Nm;
  • 23 - guide ring;
  • 24 - intermediate shaft

Places to apply marks before removing the timing chains
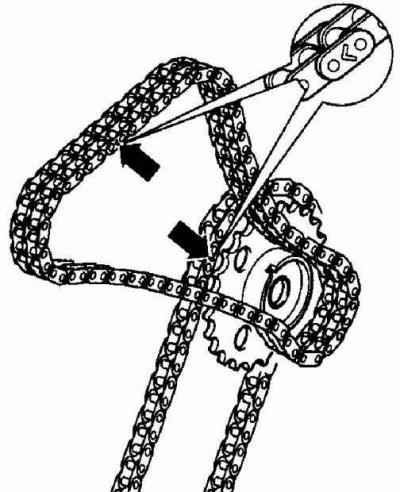


Places to apply marks before removing the timing chains


The location of the groove on the intermediate shaft sprocket when the piston of the first cylinder is set to TDC in the compression stroke
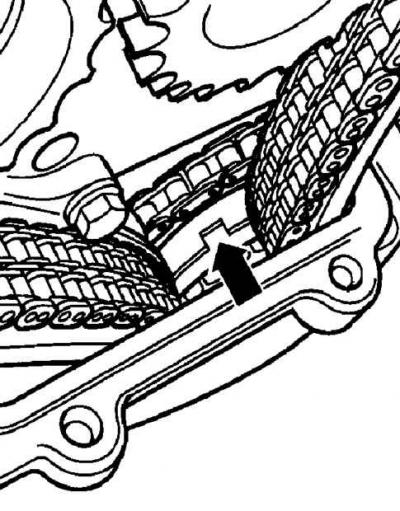


The location of the groove on the intermediate shaft sprocket when the piston of the first cylinder…


The arrangement of the elements of the gas distribution mechanism when the piston of the first cylinder is installed at the top dead center in the compression stroke
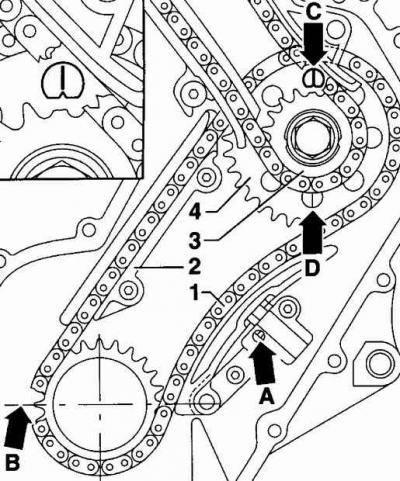


The arrangement of the elements of the gas distribution mechanism when the piston of the first…

  • 1 - chain:
  • 2 - chain guide;
  • 3 - front sprocket of the intermediate shaft;
  • 4 - rear sprocket of the intermediate shaft;
  • A - chain tensioner mechanism lock;
  • B - the installation tooth on the crankshaft sprocket must be in line with the connector of the main bearing cap No.1;
  • C - timing mark on the intermediate shaft sprocket;
  • D - timing mark on the intermediate shaft sprocket

The camshafts are driven from the crankshaft, not directly, but through an intermediate sprocket. A smaller diameter sprocket is fixed on the same shaft as the intermediate sprocket, through which the second chain is driven by the valve timing mechanism. The upper chain of the camshaft drive is tensioned by a plate tensioner, which is held in the required position by an externally located adjusting bolt. The lower chain of the valve timing mechanism drive has a hydraulic tensioner, which does not require adjustment.


Execution order


1. Before removing the timing chains, use paint to mark the chains in the locations shown in Fig. Locations for marking before removing the timing chains.
1. Before removing the timing chains, use paint to mark the chains in the locations shown in Fig.…


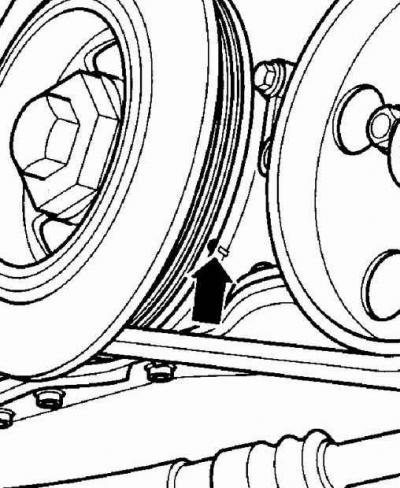
2. Rotate the engine crankshaft to a position where the piston of the first cylinder is at top dead center. In this case, the timing mark on the crankshaft pulley/vibration damper should be aligned with the pointer on the chain cover.

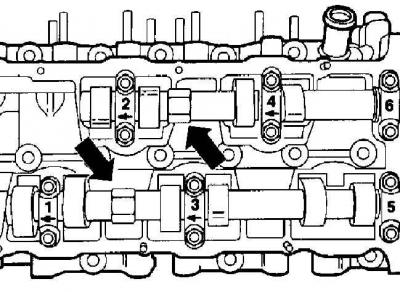
3. When the piston of the first cylinder is set to TDC, a groove should be visible on the sprockets of the intermediate shaft (see fig. Location of the groove on the intermediate shaft sprocket when the piston of the first cylinder is set to TDC in the compression stroke).

If the groove on the intermediate shaft sprocket is not visible, rotate the engine crankshaft one full revolution and re-align the timing marks with the pointers.
If the groove on the intermediate shaft sprocket is not visible, rotate the engine crankshaft one…


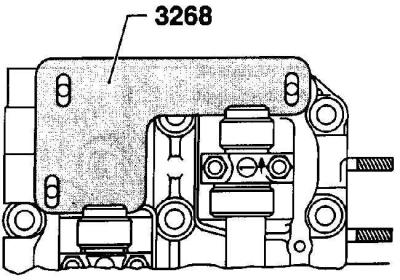
4. Secure the camshafts by inserting the special tool VW-3268 into the camshaft grooves.

4. Secure the camshafts by inserting the special tool VW-3268 into the camshaft grooves.


5. When unscrewing the camshaft sprocket mounting bolt, use a wrench to hold the camshaft by the flats to prevent it from turning.

This article is available at russian, bulgarian, belarusian, ukrainian, serbian, croatian, romanian, polish, slovak, hungarian
The text has been checked: Tarasov Ivan

Share information:

Previous articles
Cylinder head repair
Checking hydraulic valve lifters
Removal and installation of cylinder head of 1.6-I and 1.8-I engines
Removal and installation a timing belt for petrol engines
Lower engine compartment splash guard
Engine design
Next articles
Removal and installation the cylinder head of the 2.3-I-VR5 engine
Removal and installation a toothed belt of a diesel engine
Removal and installation the cylinder head of a diesel engine
Removal and installation the timing belt of the 2.8-I-V6 engine
Removal and installation the cylinder head of the 2.8-I-V6 engine
Checking the compression in the engine cylinders


Similar articles from other manuals for VW cars:
Drive mechanism Golf 3 (1991-1997)
Gas distribution mechanism Polo 3 (1995-2003)
Checking the belt drive pulleys for misalignment (4.2L petrol… Touareg 1 (2002-2006)
Removal and installation the lifting mechanism and drive cable… Tiguan 1 (2007-2015)
Timing drive mechanism — design description Sharan 1 (1995-2000)
Windscreen wiper drive device Transporter T4 (1990-2003)
Hydraulic drive and clutch release mechanism LT 2D (1996-2003)
Link to this page in different formats


Visitor comments


No comments yet


How much will 21 + 28 =


Passat B6 
  • General information
  • User manual
  • Maintenance
  • Petrol engine 1.6L
  • Engine repair
  • Cooling and lubrication system
  • Fuel injection system
  • Petrol engine 2.0L
  • Engine repair
  • Lubrication system
  • Cooling system
  • Fuel and exhaust systems
  • Diesel engine 2.0L
  • Engine repair
  • Cooling and lubrication system
  • Fuel and exhaust systems
  • Transmission
  • Clutch
  • Mechanical gearbox
  • Automatic gearbox
  • Drive shafts
  • Chassis
  • Wheels and tires
  • Car suspension
  • Steering
  • Brake system
  • Body
  • Exterior (external elements)
  • Electrical equipment
  • Power devices
  • Lighting and appliances
  • Electrical circuits
Passat B5 
  • General information
  • User manual
  • Weekly checks
  • Maintenance
  • Power unit
  • Engine repair
  • Cooling system
  • Fuel system (petrol)
  • Fuel system (diesel)
  • Engine management
  • Exhaust system
  • Transmission
  • Clutch
  • Car gearbox
  • Drive shafts
  • Chassis
  • Car suspension
  • Wheels and tires
  • Steering
  • Brake system
  • Body
  • Exterior (external elements)
  • Interior (internal elements)
  • Doors and covers
  • Ventilation and heating
  • Electrical equipment
  • Power devices
  • Lighting and appliances
  • Electrical circuits
Passat B4 
  • General information
  • User manual
  • Maintenance
  • Technical data
  • 8-valve engine
  • Engine repair
  • Cooling and lubrication system
  • Supply system
  • Ignition system
  • Fuel injection «Mono-Jetronic»
  • Control system «Mono-Motronic»
  • Control system «Digifant»
  • Control system «Simos»
  • 16-valve engine
  • Engine repair
  • Cooling and lubrication system
  • Fuel injection «K-Jetronic»
  • Control system «KE-Motronic»
  • Control system «Digifant»
  • Diesel engine
  • Engine repair
  • Cooling and lubrication system
  • Power and control system
  • Turbocharging system
  • Digital control system
  • Transmission
  • Clutch
  • Manual gearbox
  • Hydromechanical gearbox
  • Front wheel drive
  • Chassis
  • Car suspension
  • Steering
  • Brake system
  • Body
  • Body elements
  • Electrical equipment
  • Power devices
  • Lighting and appliances
  • Electrical circuits
Passat B3 
  • General information
  • User manual
  • Driving Tips
  • Maintenance instructions
  • Technical data
  • Power unit
  • Engine repair
  • Ignition system
  • Lubrication system
  • Cooling system
  • Supply system
  • Petrol injection system
  • Diesel engine
  • Exhaust system
  • Transmission
  • Clutch
  • Car gearbox
  • Chassis
  • Suspension
  • Steering
  • Brake system
  • Wheels and tires
  • Body
  • Exterior
  • Interior
  • Heating system
  • Electrical equipment
  • Power devices
  • Lighting system
  • Equipment and devices
  • Wiper system
  • Electrical circuits
Passat B2 
  • General information
  • Introduction to instructions
  • User manual
  • Power unit
  • Engines 4-cylinder FZ
  • Engines 4-cylinder
  • Engines 5-cylinder
  • Transmission
  • Clutch
  • Four-speed gearbox
  • Five-speed gearbox
  • Hydromechanical gearbox
  • Front wheel drive
  • Chassis
  • Front suspension
  • Rear suspension
  • Steering
  • Brake system
  • Body
  • Body elements
  • Electrical equipment
  • Equipment and devices
  • Electrical circuits
VWmanual.ru © 2016-2026 | Mobile version | News and articles | Sitemap: EN BG BY UA RS HR RO PL SK HU | Write message | Site search
Passat B2 • Passat B3 • Passat B4 • Passat B5 • Passat B6 • Golf 1, diesel • Golf 1, petrol • Golf 2, petrol • Golf 2 • Golf 3 • Golf 4 • Golf 5 • Polo 3 • Polo 4 • Touareg 1 • Tiguan 1 • Sharan 1 • Transporter T3 • Transporter T4 • LT 28 • LT 2D • Beetle • Caddy 3 •
Our website uses cookies to ensure functionality and convenience.