
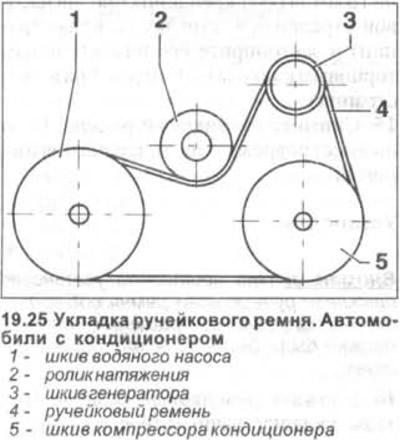
Depending on the configuration and type of engine, such units are:
- generator;
- water pump:
- air conditioning compressor (see illustration 19.0).
Brook tension (polyclinic) belt is carried out by a tension roller. It is not necessary to check the tension of the ribbed belt as part of maintenance.
Attention! If, after removing the ribbed belt, it is planned to reinstall it, then before removing it, the direction of its rotation should be marked with a marker or chalk. The rotation of the engine, when viewed from the side of the ribbed belt, occurs to the right, i.e. clockwise. If the belt is installed against the previous direction of rotation, this increases its wear and can also lead to a break.
Vehicles with diesel engine, 16 liter BGU/BSE/BSF gasoline engine, gasoline engine (T) FSI 2.0 liter AXW/BLR/BLX/BLY/AXX
Attention! Location of ribbed belt drive parts for vehicles with a 1.6 liter BGU / BSE / BSF gasoline engine and with a gasoline engine (T) The 2.0 liter FSI is virtually identical.
Removing
1. Remove the mudguard (protection) engine, see relevant chapter.
2. Vehicles with a diesel engine. Remove the fuel filter from the mounting bracket and set it aside from the work site without disconnecting the fuel hoses from the filter.
3. Mark the direction of rotation of the ribbed belt by drawing an arrow on it with chalk or felt-tip pen.
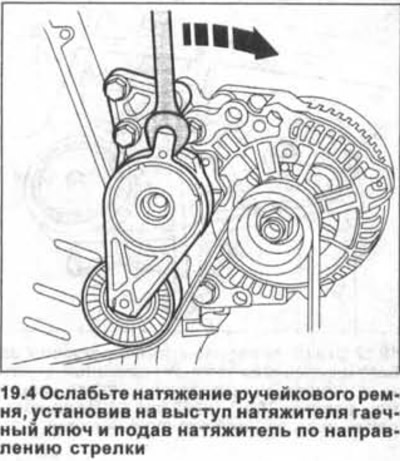
4. Loosen the tension of the ribbed belt by placing a wrench on the tensioner lug and pushing the tensioner in the direction of the arrow as shown in the illustration.
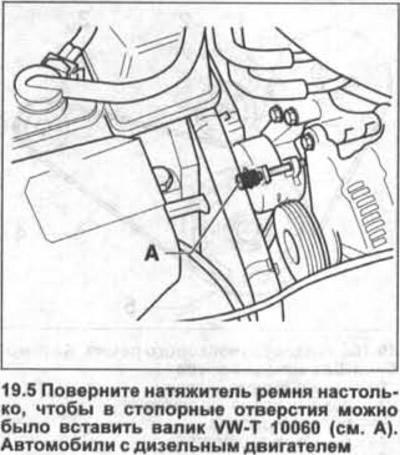
5. Vehicles with a diesel engine. Turn the belt tensioner so that the VW-T10060 roller can be inserted into the locking holes (see A in illustration), a 5 mm drill or a 4 mm hexagon socket wrench and lock the tensioner.
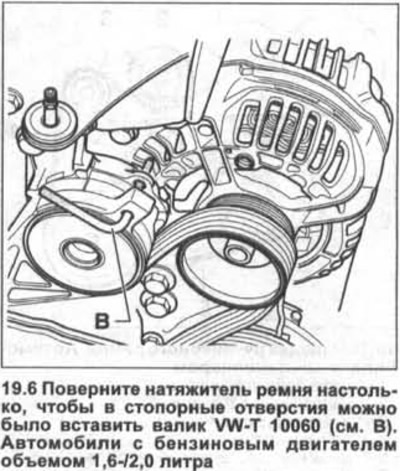
6. Vehicles with a 1.6-/2.0-liter petrol engine. Turn the belt tensioner so that the VW-T 10060 roller can be inserted into the locking holes (see B in the illustration) or a suitable drill.
7. Remove the ribbed belt.
Installation
Attention! If, after removing the ribbed belt, the auxiliary units driven by it were dismantled, then check the fastening of the units before laying the belt.
Attention! When reinstalling the old ribbed belt, observe its direction of rotation, which should have been marked before removal.
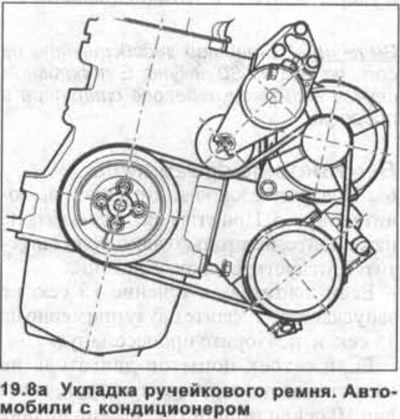
8. Lay the ribbed belt. In this case, start laying with a belt pulley on the crankshaft.
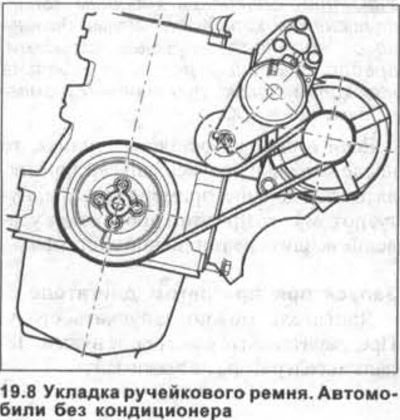
Lastly, the belt is placed on the alternator pulley (see illustrations 19.8 and 19.8a).
9. Turn the tensioner slightly clockwise to loosen the stopper roller seat, remove the roller and release the tensioner.
10. Make sure the ribbed belt fits snugly around all accessory pulleys.
11. Cars with a diesel engine. Install the fuel filter.
12. Replace the engine mudguard, see relevant chapter.
Vehicles with 1.4-/1.6-litre FSI petrol engine BKG/BLN/BAG/BLF/BLP
Removing
13. Remove the protective cover of the ribbed belt.
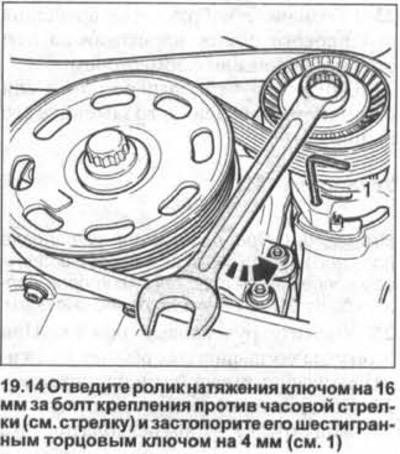
14. Take the tension roller with a 16 mm key for the fastening bolt counterclockwise (see arrow in illustration) and lock it with a 4mm hex socket wrench (see 1 in the illustration).
15. Remove the ribbed belt. If it is damaged, then replace it with a new one.
Installation
Attention! When reinstalling the old ribbed belt, observe its direction of rotation, which should have been marked before removal.
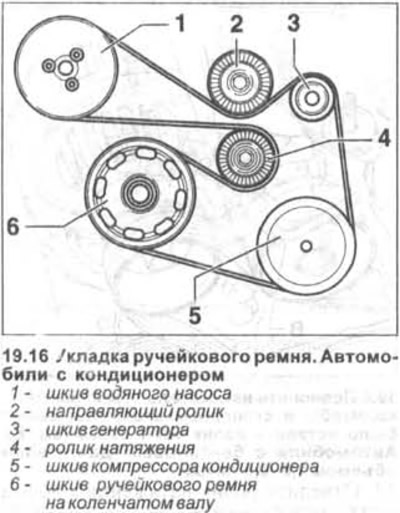
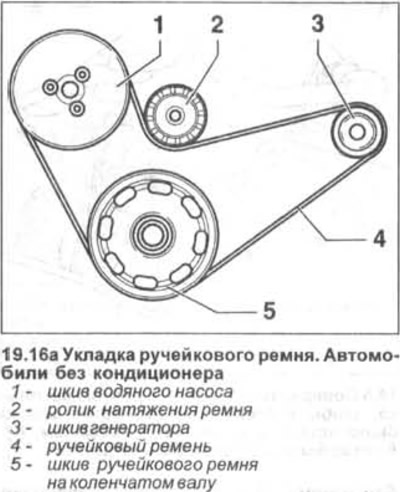
16. Lay the ribbed belt. In this case, start laying with a belt pulley on the crankshaft (see illustrations 19.16 and 19.16a).
17. Turn the tensioner slightly counterclockwise to loosen the stopper roller seat, remove the roller and slowly release the tensioner.
18. Make sure the ribbed belt fits snugly against all accessory pulleys.
19. Install the ribbed belt guard.
Vehicles with a 1.4 liter BCA petrol engine
Removing
20. Remove the protective cover of the ribbed belt.
21. Remove the right fender liner, see the relevant chapter.
22. Take the tension roller with a key for the fastening bolt clockwise (see arrow in illustration) and lock it, for example, with a roller VW-T 10060 (see A in illustration).
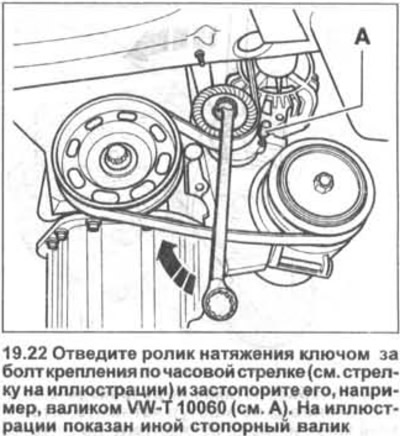
23. Indicate the direction of rotation of the ribbed belt by drawing an arrow on it with chalk or a felt-tip pen.
24. Remove the ribbed belt. If it is damaged, then replace it with a new one.
Installation
Attention! When reinstalling the old ribbed belt, observe its direction of rotation, which should have been marked before removal.
25. Lay the ribbed belt. In this case, start laying with a belt pulley on the crankshaft (see illustration).
26. Turn the tensioner slightly clockwise to loosen the stopper roller seat, remove the roller and slowly release the tensioner.
27. Make sure the ribbed belt fits snugly against all accessory pulleys.
28. Install the ribbed belt guard.
29. Reinstall the right fender liner, see the relevant chapter.
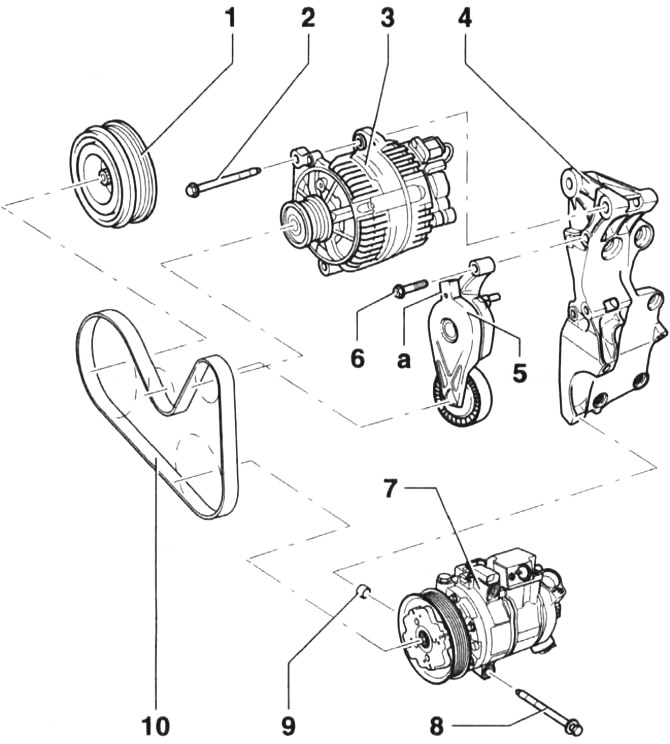
Ribbed belt. Diesel vehicles
1 - belt pulley on the crankshaft. The belt pulley can only be installed in one position
2 - bolt. Tightening torque 25 Nm
3 - generator
4 - bracket for mounting the generator and air conditioning compressor
5 - ribbed belt tensioner. In order to loosen the tension of the ribbed belt, it is necessary to take the tensioner by the protrusion -a- with a wrench
6 - bolt Tightening torque 25 Nm
7 - air conditioning compressor
8 - bolt. Tightening torque 25 Nm
9 - mounting sleeves
10 - brook (polyclinic) belt. Before removing the belt, mark the direction of rotation with chalk or a felt-tip pen. Check the condition of the belt. The bending of the belt is not allowed.
Visitor comments