



Contents: Removal ↓ Installation ↓
Removal
1. Place the machine on supports.
2. Remove the lower engine compartment cover.
3. Fold the radiator and lock support forward.
4. Remove the alternator and power steering pump V-belts (see subsection 2.12.1 and subsection 2.12.2).
5. Tilt the generator up as far as it will go and tighten the bolts securely.
6. Unscrew the cylinder head cover, remove the sealing and disc washers.
7. Unscrew the rear guard of the fuel injection pump drive from the cylinder head.
8. Loosen the clamps and remove the air hose between the air filter and the intake manifold.
9. Open the locks and remove the front camshaft drive guard.
10. Using a felt-tip pen or grease pencil, draw an arrow on the toothed belt indicating the direction of its movement. The direction of rotation of the engine, when viewed from the toothed belt side, is right-hand, clockwise.
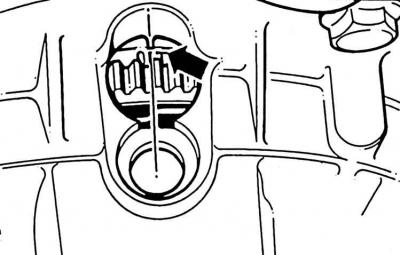
11. Set the crankshaft to TDC for cylinder 1.
12. The crankshaft is in the TDC position for cylinder 1 if the flywheel-clutch housing marks match.
 |
 |
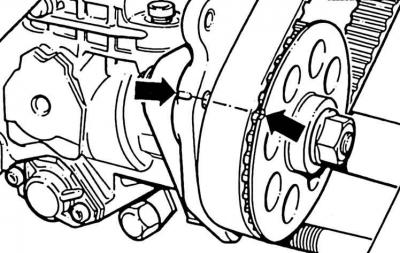
13. At the same time, the marks on the fuel injection pump gear and the console must match (indicated by arrows). If the marks do not match, turn the crankshaft one revolution in the direction of its rotation.
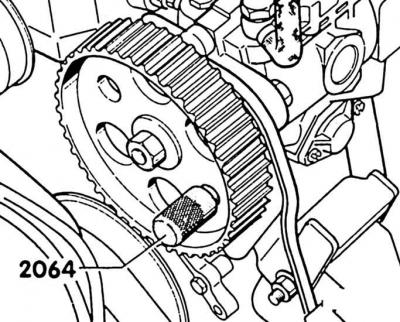
14. Wedge the injection pump gear with a suitable pin, VW-2064 or a pin as shown in the figure.
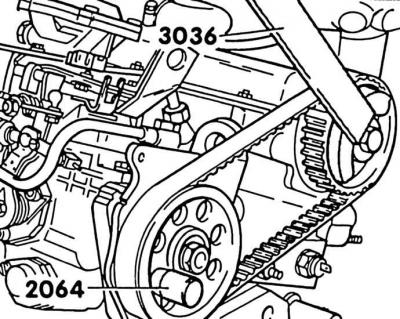
15. Hold the fuel injection pump drive gear with the VW-3036 counterstop. Unscrew the mounting bolt, remove the drive gear and the fuel injection pump toothed belt.
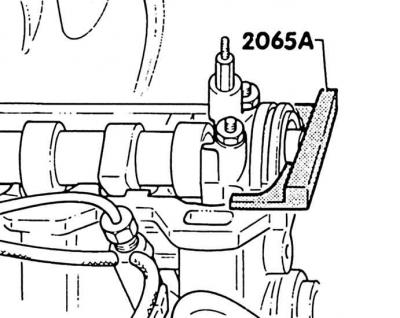
16. Wedge the camshaft with the VW-2065-A installation ruler. If you don't have a special tool at hand, make a ruler as shown in the picture Adjusting ruler and mandrel for checking the camshaft. The installation ruler has a recess that prevents possible rotation of the camshaft.
17. Remove the car from the support.
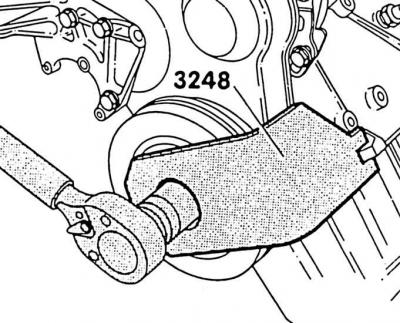
18. Unscrew the central bolt of the crankshaft vibration damper. To do this, you need the VW-3248 counterstop. Due to the high torque when unscrewing the bolt, the car must stand on its wheels.
19. Place the machine on supports.
20. Unscrew the M8 bolt from the vibration damper.
21. Remove the vibration damper.
22. Loosen the water pump bolts and loosen the timing belt.
23. Unscrew the lower timing belt cover.
24. Remove the toothed belt from the crankshaft gear.
Attention! The toothed belt must not have any cuts. A belt with cuts must be replaced, as it may break during operation, which will lead to serious engine damage.
Attention! If the camshaft is turned with the timing belt removed, then none of the pistons should be at TDC. Otherwise, severe damage to the pistons or valves cannot be avoided.
Attention! If it is necessary to turn the shaft, then first set all pistons at the same height. To do this, apply a chalk mark on top of the crankshaft belt pulley (prerequisite: the crankshaft is in the TDC position for cylinder 1), then turn the crankshaft pulley 1/4 turn left or right. The chalk mark should now point left or right.
Installation
1. Using the inspection window in the gearbox, check that the TDC mark on the flywheel matches the corresponding mark.
2. Wedge the camshaft with a setting ruler.
3. Balance the installation ruler: to do this, turn the jammed camshaft so that one end of the installation ruler rests on the cylinder head. Measure the resulting gap with a petal feeler gauge under the other end of the ruler. Insert a feeler gauge equal to half the measured size again between the end of the ruler and the cylinder head. Turn the camshaft so that the end of the ruler falls on the feeler gauge. Insert a second petal feeler gauge of the same size under the other end of the ruler – between the ruler and the cylinder head.
4. Loosen the camshaft drive gear mounting bolt by 1/2 turn.
5. Knock the camshaft drive gear off the camshaft cone by hitting a pin inserted into a 6 mm hole in the timing belt housing with a hammer.
6. Install the camshaft timing belt.
Attention! If you are going to use the old belt, be sure to pay attention to the direction of its rotation. Installing the belt in the opposite direction can lead to its breakage and engine failure. Therefore, always install the belt so that the arrow indicates the direction of engine rotation (if you look from the toothed belt side, then clockwise).
7. Install the lower timing belt cover.
8. Tighten the timing belt.
9. Tighten the lower timing belt cover.
10. Check if the crankshaft is in the TDC position for cylinder 1, adjust if necessary.
11. Tighten the camshaft drive gear mounting bolt to 85 Nm.
12. Remove the installation ruler.
13. Install the vibration damper and tighten the 4 M8 bolts to 20 Nm.
14. Remove the car from the support.
15. Install the vibration damper center bolt. Pre-apply the sealant AMV18800102 to the thread and the surface of the head attachment.
16. Tighten the central bolt to 460 Nm.
Caution! Due to the high tightening torque, the machine must stand on its wheels.
17. Remove counter stop VW-3248.
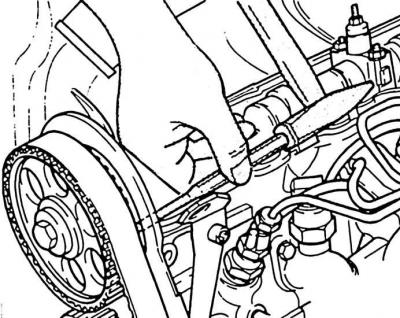
18. Install the drive gear and the fuel injection pump toothed belt.
19. Tighten the drive pinion bolt to approximately 50 Nm, then loosen by 1/2 turn. The drive pinion should rotate by hand.
20. Check the tension of the rear toothed belt using the VW-210 control device. Required value: 12...13 on the device scale.
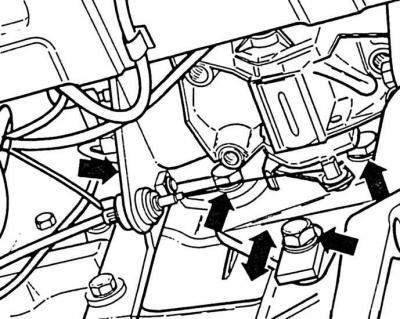
21. If necessary, adjust the tension of the rear toothed belt. To do this, loosen the mounting bolts (arrows) and move the console with the fuel injection pump down or up.
22. Tighten the bolts on the console to 50 Nm.
23. Remove the pin from the fuel injection pump gear.
24. Check and adjust the fuel injection pump start (see subsection 2.17.7.6).
25. Screw on the fuel injection pump drive casing.
26. Check the cylinder head cover gasket, replace if necessary. Check for the presence of a sealing cone on the stud, install if necessary. Install the gasket, install the cylinder head cover, put the upper sealing washer and the disc washer on the stud. Tighten the two nuts to 10 N·m, put on the sealing caps.
27. Install the upper timing belt cover at the front.
28. Fit and tighten the V-belt (see subsection 2.12.1).
29. Install the air hose between the air filter and the intake pipe and secure with two clamps.
30. Install the radiator with the lock support.
31. Place the machine on supports.
32. Install the lower engine compartment cover.
33. Remove the car from the supports.
Visitor comments