
English Русский
Български
Беларускі
Український
Српски
Hrvatski
Română
Polski
Slovenský
Magyar
  |  Articles  |  Sitemap  |  Contacts  |    |
Car maintenance Ford Car maintenance Hyundai Car maintenance Chevrolet Car maintenance BMW Car maintenance Audi Car maintenance Opel Car maintenance AvtoVAZ
VWmanual.ru


Main   Passat   Golf   Polo   Touareg   Tiguan   Sharan   Transporter   Others  
Transporter T3 (1979-1992) Transporter T4 (1990-2003)

Removal and installation the camshaft (VW Transporter T4)

  • Main
  • Transporter
  • Transporter T4
  • Power unit
  • Engine repair
  • Removal and installation the camshaft
            0


Camshaft and valve train of a 4-cylinder petrol engine
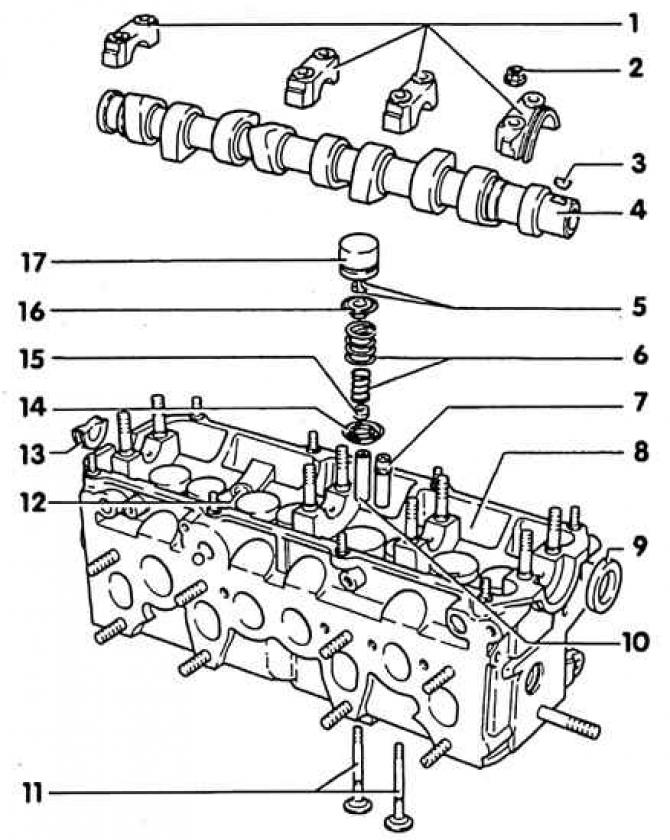


1. Main bearing caps; 2. Nut, 20 Nm; 3. Key (working without tightening); 4. Camshaft; 5. Cone…

1. Main bearing caps; 2. Nut, 20 Nm; 3. Key (working without tightening); 4. Camshaft; 5. Cone valve crackers; 6. Outer and inner valve springs; 7. Valve guide. Repair version with flange; 8. Cylinder head; 9. Sealing ring; 10. Valve guides; 11. Valves; 12. Plug; 13. Plug; 14. Lower valve spring plate; 15. Oil seal; 16. Upper valve spring plate. Designation: wide chamfer outside, chamfer inside; 17. Hydraulic disc pusher


4-cylinder petrol engine


Removal


1. Remove the upper timing belt cover.

2. Remove the cylinder head cover.

3. Set the crankshaft to TDC for cylinder 1 (see subsection 2.5.2).

Attention! Do not change the position of the engine crankshaft any further.


4. Loosen the timing belt and remove it from the camshaft gear from above (see subsection 2.5.1.1).

5. Wedge the camshaft from the front with a tenon. To do this, insert a suitable tenon or a strong screwdriver into the hole in the camshaft gear and rest it against the upper edge of the cylinder head. To avoid damaging the sealing surface of the cylinder head, place a wooden lining underneath. Holding the screwdriver firmly, loosen the camshaft mounting bolt. Unscrew and remove the camshaft gear; if necessary, tap it in with light blows of a rubber hammer. Remove the key from the camshaft.


6. Mark all main bearing caps. Mark four caps, from right to left, looking in the direction of travel, with numbers from 1 to 4.

7. Remove covers 1 and 3. Then unscrew covers 2 and 4 alternately in a crosswise manner.

8. Remove the camshaft.

Caution! If the plate tappets are removed, they must be marked so that they can be reinstalled in their original positions. Place the plate tappets with the sliding surface facing (shifting towards the camshaft) down.


Installation


Installation


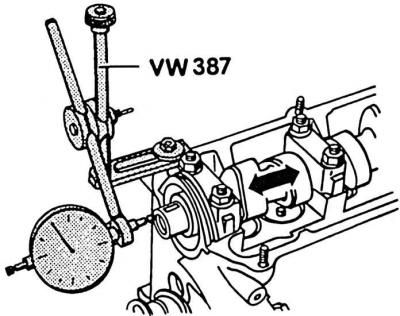
1. If necessary, the camshaft runout can be checked at the factory before installation. Wear limit: 0.01 mm.

2. If the same camshaft is to be installed again on an engine with high mileage or noise in the valve drive, it is recommended to check the axial clearance. Wear limit: 0.15 mm. The measurement is carried out with the plate tappets removed and the first and last main bearing caps installed.

3. Install a new camshaft sealing ring. Pre-lubricate the lips and outer edge of the sealing ring with oil.
3. Install a new camshaft sealing ring. Pre-lubricate the lips and outer edge of the sealing ring…


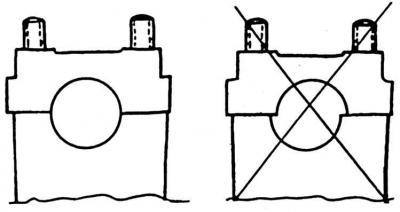
4. Perform a test installation of the bearing caps, paying attention to the position of the centers. The caps must be installed so that the holes in the caps and the cylinder head match. Pay attention to the marks.


(The article is published on this resource www.VWMANUAL.ru)

5. If the plate tappets were removed, install them in their original places. Lubricate the plate tappets with a thin layer of oil and do not tilt them when installing.

Attention! The plate tappets cannot be interchanged!


6. Lubricate and install the camshaft.

Attention! The cams of cylinder 1 must be directed upwards. Install the bearing caps according to the marks. Pay attention to the position of the centers.


7. Tighten covers 2 and 4 crosswise to 20 Nm.

8. Install covers 1 and 3 and tighten to 20 Nm.

9. Install the camshaft key. Install the drive gear and tighten to 80 Nm, holding the gear with a tenon.

10. Place the timing belt on the camshaft timing gear, paying attention to the correct position of the intermediate shaft and vibration damper (see subsection 2.5.2).

11. Tighten the timing belt (see subsection 2.5.1.1).

12. Install a new cylinder head cover gasket, carefully tightening the cover bolts to 10 Nm.

13. Install the timing belt guard.

Attention! If new plate tappets are installed, the engine must not be started for approximately 30 minutes, otherwise the valves will rest against the pistons!

This article is available at russian, bulgarian, belarusian, ukrainian, serbian, croatian, romanian, polish, slovak, hungarian
The text has been checked: Orlov Dmitry

Share information:

Previous articles
Removal and installation the cylinder head (diesel 5-cylinder)
Removal and installation the cylinder head (petrol 5-cylinder)
Removal and installation the cylinder head (diesel 4-cylinder)
Removal and installation the cylinder head (petrol 4-cylinder)
Cylinder head — design description
Removal and installation the timing belt (5-cylinder diesel)
Next articles
Hydraulic disc tappets
Replacing the valve stem seals
Removal and installation valves
Checking the valve guides
Finishing the valve seat in the cylinder head
Lapping of valve seats


Similar articles from other manuals for VW cars:
Camshaft / valve drive 4-cylinder Passat B3 (1988-1993)
Timing Belt (Camshaft Drive Belt) Golf 1 (1974-1984, petrol)
Cylinder block, camshaft and flywheel Polo 3 (1995-2003)
Replacing camshaft seals Touareg 1 (2002-2006)
Camshaft drive chain Tiguan 1 (2007-2015)
Replacing the camshaft seal Sharan 1 (1995-2000)
Checking the camshaft timing belt (SDI and TDI diesel engines) Caddy 3 (2003-2010)
Link to this page in different formats


Visitor comments


No comments yet


How much will 22 + 49 =


Transporter T4 
  • General information
  • User manual
  • Maintenance
  • Power unit
  • Engine repair
  • Ignition system
  • Lubrication system
  • Cooling system
  • Fuel system (petrol)
  • Fuel system (diesel)
  • Injection system (petrol)
  • Exhaust system
  • Transmission
  • Clutch
  • Car gearbox
  • Chassis
  • Car suspension
  • Steering
  • Brake system
  • Wheels and tires
  • Body
  • Exterior
  • Interior
  • Doors and windows
  • Heating system
  • Electrical equipment
  • Equipment and devices
  • Lighting and signaling
  • Power devices
  • Electrical circuits
Transporter T3 
  • General information
  • Maintenance
  • Petrol engines
  • Engine repair
  • Lubrication system
  • Cooling system
  • Power and exhaust system
  • Carburetor 34 PICT
  • Carburetors 2E3 and 2E4
  • Fuel injection system
  • Ignition system
  • Diesel engines
  • Engine repair
  • Lubrication system
  • Cooling system
  • Power and exhaust system
  • Transmission
  • Clutch
  • Car gearbox
  • Chassis
  • Front suspension
  • Rear suspension
  • Steering
  • Brake system
  • Body
  • Body and interior elements
  • Doors, locks and windows
  • Electrical equipment
  • Lighting system
  • Equipment and devices
  • Power devices (diesel)
  • Power devices (petrol)
  • Wiring diagrams (diesel)
  • Wiring diagrams (petrol)
VWmanual.ru © 2016-2026 | Mobile version | News and articles | Sitemap: EN BG BY UA RS HR RO PL SK HU | Write message | Site search
Passat B2 • Passat B3 • Passat B4 • Passat B5 • Passat B6 • Golf 1, diesel • Golf 1, petrol • Golf 2, petrol • Golf 2 • Golf 3 • Golf 4 • Golf 5 • Polo 3 • Polo 4 • Touareg 1 • Tiguan 1 • Sharan 1 • Transporter T3 • Transporter T4 • LT 28 • LT 2D • Beetle • Caddy 3 •
Our website uses cookies to ensure functionality and convenience.