
Cylinder Head Bolt Tightening Order

Remove the cylinder head only when the engine is cold (room temperature). Exhaust and intake manifolds are not removed.
The cylinder head can be removed without removing the engine.
Features of removing and installing the cylinder head of a diesel engine are described in subsection 2.6.1.4. A cylinder head gasket defect can be recognized by one or more of the following:
- power loss;
- coolant leak (white puffs of exhaust gases when the engine is warm);
- oil leakage;
- coolant in engine oil (the oil level does not decrease, but increases, the gray color of the engine oil, foam bubbles on the oil level indicator, the oil is liquid);
- engine oil in the coolant;
- strong seething of the coolant;
- lack of compression between two adjacent cylinders.
Removing
1. Disconnect wire "masses" (-) from the battery.
Attention! At the same time, the code of the anti-theft device and the tuned radio stations are erased from the radio receiver's memory. The battery must only be disconnected when the ignition is switched off, otherwise the fuel injection system control unit will fail.
2. Remove upper intake manifold.
3. Remove all vacuum hoses. To facilitate assembly, pre-mark them with adhesive tape.
4. Disconnect the throttle control cable from the throttle connector and stop.
5. Disconnect and disconnect all wires.
6. To facilitate assembly, mark the wires with adhesive tape.
Attention! Open the cable clamps and cut if necessary. Do not remove the cable clamps so that the new clamps can be installed in the old places during assembly.
7. Remove spark plug wires.
8. Remove distributor cap. To do this, open the two plate clamps with a screwdriver.
9. Remove the distributor slider.
10. Mark all fuel lines with adhesive tape and remove them.
11. Drain the coolant completely.
12. Loosen the clamps and remove all coolant hoses from the cylinder head.
13. Place the machine on stands.
14. Remove the lower engine compartment cover.
15. Unscrew exhaust pipe from exhaust manifold and transmission bracket. Lower the exhaust system slightly down and hang it on a wire.
16. Remove upper toothed belt cover.
17. Loosen toothed belt and remove from top of camshaft.
18. Unscrew the cylinder head cover.
19. Remove the cylinder head gasket.
20. Loosen 1/2 turn and then unscrew the cylinder head bolts in reverse order of their numbering from 12 to 1 (see fig. Cylinder Head Bolt Tightening Order).
21. Check the disconnection of all wires and hoses going to the cylinder head.
22. Remove the cylinder head by first unscrewing the screws of the rear toothed belt cover and bending it to the side.
23. Install the cylinder head on two wooden blocks.
24. Remove the cylinder head gasket.
Installation
1. Before installing, clean the mating surfaces of the cylinder head and cylinder block from gasket residues with a suitable scraper. Make sure that dirt does not get into the bores of the cylinder block. Close the holes with rags.
2. Check the absence of oil in the holes for the cylinder head screws, if necessary, remove the oil. To do this, insert a clean rag into the hole and collect the oil.
Attention! Remaining oil in the holes when tightening the bolts can cause damage to the cylinder block.
3. Check the cylinder head for flatness with a steel ruler and a spade feeler at various points. The flatness must not exceed 0.1 mm.
Attention! If the sealing surfaces of the cylinder head are to be brought down, the minimum permitted head height must not be lowered (see subsection 2.10.3).
4. The cylinder head with broken valve seats or valve seat rings, as well as the beginning of the threaded entries of spark plugs, can be further operated without reducing their service life and bulkheads if the gap width does not exceed a = max 0.5 mm.
5. Always replace the cylinder head gasket. Inscription "oben" should point to the cylinder head. Install the gasket without sealant so that it does not cover any openings.
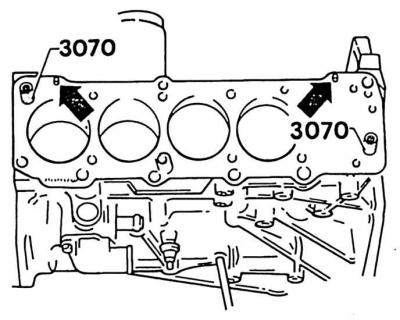
6. To center the cylinder head, screw into holes 9 and 10 of the cylinder head bolts (see fig. Cylinder head bolt tightening order) guide pins VAG-3070 (the arrows indicate the places of installation of the fingers). If there are no fingers at hand, then make the guide pins yourself. To do this, cut off the heads of the old cylinder head bolts and cut a slot for a screwdriver on their end.
7. Turn the crankshaft at the belt pulley so that all pistons are approximately at the same height.
8. Install the cylinder head, while paying attention to the guide pins.
9. Install the remaining 10 bolts with washers and tighten by hand. Always replace cylinder head bolts.
10. Unscrew the guide pins with a screwdriver and screw in the remaining two bolts with washers. Tighten by hand.
Attention! Tighten the cylinder head bolts with great care. Before tightening it is necessary to check the accuracy of the torque wrench. The cylinder head bolts are tightened with a cold engine.
11. The cylinder head bolts are tightened with a torque wrench in sequence from 1 to 12 in two stages: first with a force of 40 Nm, and then with 60 Nm. After that, an additional tightening with a hard wrench is performed: 1/2 turn (180°). Additional tightening 90°х2 is allowed (for 2 times at 90°each). When tightening the cylinder head bolts, estimate the angle of rotation by the location of the key handle relative to the engine: 1/4 turn (90°) corresponds to the position of the handle across the engine.
Attention! For petrol engines, the cylinder head bolts must not be re-tightened when the engine is warm as part of maintenance or repairs.
12. Install toothed belt.
Attention! When replacing a cylinder head with a camshaft installed, after installing the head, lubricate the contact surfaces between the bucket tappets and the working surface of the cams with oil.
13. Install cylinder head cover with gasket and tighten to 10 Nm. Replace damaged gasket.
14. Install the exhaust pipe to the exhaust manifold.
15. Install the engine mudguard.
16. Take the car off the stands.
17. Fit coolant hoses and secure with clamps.
18. Connect all electrical wires according to the labels with adhesive tape.
19. Install the distributor slider. Move back and forth to check the security of fastening.
20. Install the distributor cap and secure with two plate clamps.
21. Fit spark plug wires in cylinder order 1-2-4-5-3. The first cylinder is located at the toothed belt.
22. Connect all fuel lines and secure with clamps.
23. Connect all vacuum hoses according to the marks with adhesive tape.
24. Connect the throttle control cable to the throttle and stop.
25. Slide the heating hose onto the front exhaust pipe cover and secure with a clamp.
26. Install intake manifold.
27. Connect wire "masses " (-) to the battery. Enter the anti-theft code, program the radio stations and set the exact time on the clock.
Attention! Connect the battery only with the ignition off, otherwise the fuel injection system control unit will fail.
28. Fill with coolant. Always replace the coolant.
29. Check engine oil level. If the cylinder head gasket was defective, change the oil and filter.
30. Warm up the engine to operating temperature, check the coolant level and the tightness of the hose connections.
31. Check ignition timing (see subsection 2.14.6).
32. Check idle speed and CO content (see subsection 2.18.1).
33. Check compression (see subsection 2.11).
Visitor comments