
English Русский
Български
Беларускі
Український
Српски
Hrvatski
Română
Polski
Slovenský
Magyar
  |  Articles  |  Sitemap  |  Contacts  |    |
Car maintenance Ford Car maintenance Hyundai Car maintenance Chevrolet Car maintenance BMW Car maintenance Audi Car maintenance Opel Car maintenance AvtoVAZ
VWmanual.ru


Main   Passat   Golf   Polo   Touareg   Tiguan   Sharan   Transporter   Others  
Transporter T3 (1979-1992) Transporter T4 (1990-2003)

Removal and installation the timing belt (petrol 5-cylinder) (VW Transporter T4)

  • Main
  • Transporter
  • Transporter T4
  • Power unit
  • Engine repair
  • Removal and installation the timing belt (petrol 5-cylinder)
            0


Contents: Removal ↓ Installation ↓

Removal


1. Place the machine on supports.

2. Remove the lower engine compartment cover.

3. Remove the car from the supports.

4. Remove the V-belt.

5. Set the crankshaft to the TDC position for the first cylinder. Rotate the crankshaft clockwise.
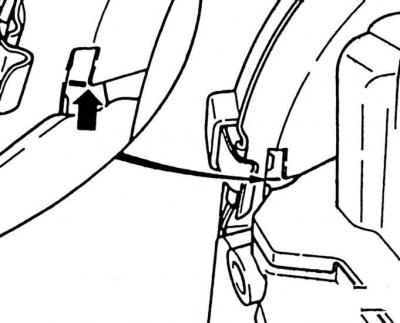
5. Set the crankshaft to the TDC position for the first cylinder. Rotate the crankshaft clockwise.


6. The crankshaft is at TDC if the mark on the camshaft gear coincides with the mark on the rear timing belt cover.
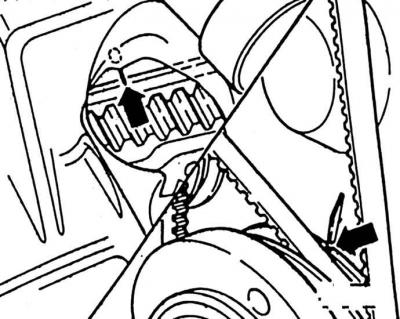
6. The crankshaft is at TDC if the mark on the camshaft gear coincides with the mark on the rear…


7. At the same time, the mark on the flywheel or clutch driven disk must match the TDC mark. The figure shows both corresponding marks on the vibration damper and on the toothed belt cover. These marks are used to adjust the TDC on a removed engine.

8. Remove the upper timing belt cover. Using a felt-tip pen or grease pencil, mark an arrow on the belt in the direction of its rotation. The engine rotates, when viewed from the front, clockwise to the right.


9. Loosen the timing belt (see subsection 2.5.1.3).

10. Unscrew the vibration damper from the crankshaft timing belt gear by unscrewing 4 M8 bolts.

11. Remove the timing belt.

Attention! The toothed belt must not have any cuts. A toothed belt with cuts must be replaced, as it may break during operation, which will lead to serious damage to the engine.


12. If possible, do not change the position of the timing belt gears.

Installation


Attention! If you are installing an old toothed belt, be sure to pay attention to the direction of movement. Installing the toothed belt in the opposite direction can lead to its breakage and engine failure!


1. Place the timing belt on the crankshaft gear, idler pulley and water pump.

2. Screw the vibration damper with 4 bolts to a torque of 20 Nm.

3. Screw on the lower timing belt cover. Otherwise, rotate the camshaft so that the mark on the camshaft drive gear aligns with the top edge of the cylinder head cover gasket.

Caution! If the camshaft is rotated with the timing belt removed, no piston should be at TDC. Otherwise, severe damage to the pistons or valves may occur.


Attention! If it is necessary to turn the camshaft, first set all pistons to the same height. To do this, apply a chalk mark on top of the crankshaft belt pulley (prerequisite: the crankshaft is in the TDC position for cylinder 1), then turn the crankshaft belt pulley 1/4 turn (90°) to the left or right, using the chalk mark as a guide.


4. Check the crankshaft position at TDC for cylinder 1. The TDC mark (0) on the flywheel should be visible in the inspection hole of the clutch housing, located exactly next to the installation edge.


5. If the timing belt is to be installed on a removed engine, the notch on the belt pulley must match the installation mark on the cylinder head cover. In this case, the crankshaft is in the TDC position for cylinder 1.

6. Put on the timing belt.

Attention! When installing the timing belt, do not change the position of the camshaft and crankshaft. Otherwise, the engine may be seriously damaged or will not develop full power. After tensioning the timing belt, check the position of the camshaft and crankshaft again. This means: if the mark on the camshaft gear coincides with the upper edge of the cylinder head cover gasket, then at the same time the TDC marking on the flywheel must coincide with the corresponding mark. Otherwise, repeat the adjustment of the camshaft drive gear and crankshaft gear.


7. Tighten the timing belt.

8. Turn the crankshaft 2 revolutions in the direction of its rotation and check the adjustment and tension again.

9. Install the upper timing belt cover.

10. Screw on the V-belt tensioner.

(The original can be found at: «VWManual.ru»)

11. Install and tension the V-belt.

12. Install the engine splash guard.

13. For repairs that require removing the timing belt only from the camshaft gear, adjust the timing belt as follows:
  • set the crankshaft to TDC for cylinder 1;
  • loosen and remove the timing belt from the camshaft gear;
  • put on and tighten the timing belt;
  • the position of the camshaft and crankshaft should not be changed during repairs.

This article is available at russian, bulgarian, belarusian, ukrainian, serbian, croatian, romanian, polish, slovak, hungarian
The text has been checked: Orlov Dmitry

Share information:

Previous articles
Removal and installation the timing belt (diesel 4-cylinder)
Removal and installation the timing belt (petrol 4-cylinder)
Timing Belt Adjustment (Diesel 5-Cylinder)
Timing Belt Adjustment (5-Cylinder Petrol)
Timing Belt Adjustment (4-Cylinder Diesel)
Timing Belt Adjustment (4-Cylinder Petrol)
Next articles
Removal and installation the timing belt (5-cylinder diesel)
Cylinder head — design description
Removal and installation the cylinder head (petrol 4-cylinder)
Removal and installation the cylinder head (diesel 4-cylinder)
Removal and installation the cylinder head (petrol 5-cylinder)
Removal and installation the cylinder head (diesel 5-cylinder)


Similar articles from other manuals for VW cars:
Removal and installation a timing belt for petrol engines Passat B5 (1996-2005)
Timing Belt (Camshaft Drive Belt) Golf 1 (1974-1984, petrol)
Installation instructions for the timing belt of the… Polo 4 (2001-2009)
Removal and installation a poly V-belt (4.2L petrol engine) Touareg 1 (2002-2006)
Removal, installation and tensioning the timing belt Tiguan 1 (2007-2015)
Removal the timing belt Sharan 1 (1995-2000)
Checking the timing belt (4-cylinder petrol engines) Caddy 3 (2003-2010)
Link to this page in different formats


Visitor comments


No comments yet


How much will 39 + 19 =


Transporter T4 
  • General information
  • User manual
  • Maintenance
  • Power unit
  • Engine repair
  • Ignition system
  • Lubrication system
  • Cooling system
  • Fuel system (petrol)
  • Fuel system (diesel)
  • Injection system (petrol)
  • Exhaust system
  • Transmission
  • Clutch
  • Car gearbox
  • Chassis
  • Car suspension
  • Steering
  • Brake system
  • Wheels and tires
  • Body
  • Exterior
  • Interior
  • Doors and windows
  • Heating system
  • Electrical equipment
  • Equipment and devices
  • Lighting and signaling
  • Power devices
  • Electrical circuits
Transporter T3 
  • General information
  • Maintenance
  • Petrol engines
  • Engine repair
  • Lubrication system
  • Cooling system
  • Power and exhaust system
  • Carburetor 34 PICT
  • Carburetors 2E3 and 2E4
  • Fuel injection system
  • Ignition system
  • Diesel engines
  • Engine repair
  • Lubrication system
  • Cooling system
  • Power and exhaust system
  • Transmission
  • Clutch
  • Car gearbox
  • Chassis
  • Front suspension
  • Rear suspension
  • Steering
  • Brake system
  • Body
  • Body and interior elements
  • Doors, locks and windows
  • Electrical equipment
  • Lighting system
  • Equipment and devices
  • Power devices (diesel)
  • Power devices (petrol)
  • Wiring diagrams (diesel)
  • Wiring diagrams (petrol)
VWmanual.ru © 2016-2026 | Mobile version | News and articles | Sitemap: EN BG BY UA RS HR RO PL SK HU | Write message | Site search
Passat B2 • Passat B3 • Passat B4 • Passat B5 • Passat B6 • Golf 1, diesel • Golf 1, petrol • Golf 2, petrol • Golf 2 • Golf 3 • Golf 4 • Golf 5 • Polo 3 • Polo 4 • Touareg 1 • Tiguan 1 • Sharan 1 • Transporter T3 • Transporter T4 • LT 28 • LT 2D • Beetle • Caddy 3 •
Our website uses cookies to ensure functionality and convenience.